Word Clock Does The Job With Laser-Etched Acrylic

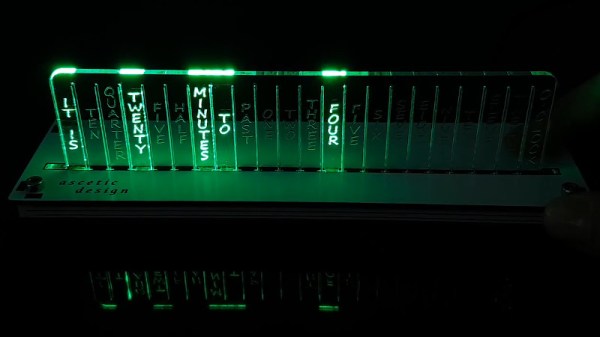
As far as telling the time, word clocks go out of their way to spell it out for you. As long as you know the language, they’re a stylish and effective way to get the message across. [Simon] built an elegant, stripped-back word clock of his own, with a laser cutter helping to get the job done.

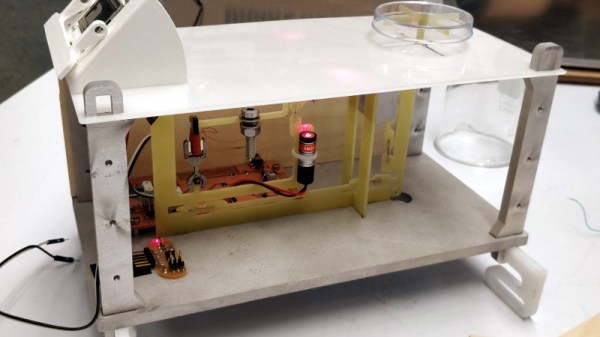
The core of the build is an Arduino Nano, hooked up to a string of 22 WS2812B LEDs, driven via the FastLED library. An NXP PCF8563T serves as the real-time clock, to ensure stable and accurate timekeeping. The electronics are all housed inside an enclosure that appears to be constructed from PCBs, with instructions on operating the clock printed on the base.

The actual display is via laser-cut and laser-etched acrylic. The display piece slides into the top of the clock, with the LEDs edge lighting various segments to display the relevant words that make up the current time. The clock is designed in such a way that these display slides can be easily switched out to change the look of the clock, with different fonts and designs.

It’s a quick and clean take on the popular word clock design, and one any makerspace could whip up in a weekend. As far as word clocks go, however, the sky really is the limit when it comes to complexity. Video after the break.

Continue reading “Word Clock Does The Job With Laser-Etched Acrylic”

3D Printing Paper — Sort Of

There are only a few truly ancient engineered materials, and among the oldest is paper. Traditionally, paper is flat and can be bent into shapes. However, paper can be molded into for example packing material or egg cartons. [XYZAidan]  has a process that can recycle paper into 3D cardboard-like objects. You need a 3D printer, but it doesn’t actually print the paper. Instead, you use the printer to create a mold that can form paper pulp you make out of recycled paper and a blender.

[Aidan] provides seven different molds ranging from a desk tray and a dish to simple cubes and coasters. The molds are made in three parts to assist in removing the finished product.

Continue reading “3D Printing Paper — Sort Of”

Folding An Off-The-Shelf 3D Printer

Most 3D printers don’t take up a lot of space, but they can be pretty bulky and awkward to travel with. [Jón Schone] needed a compact folding 3D printer for a secret project on his YouTube channel ProperPrinting, so he decided to modify a Creality Ender 3 Pro to achieve this.

Starting with a brand new Ender 3 Pro, and his first steps were to move the display and power supply unit into the bottom frame to make space for the folding top frame. For the folding mechanism, he settled on a four bar linkage that allows the vertical frame to translate to the front of the printer as it folds down, which lets it become a really compact package with minimal wasted space. The joints consist of fitting 3D printed in carbon fibre reinforced nylon, with bolts for shafts. The entire mechanism is made adjustable for fine-tuning by using threaded rod and sliding mounting points on the extruded frame. Small brackets on each side of the frame allows the printer to snap securely into both its upright and folded positions.

All in all we think this is well-designed and beautifully executed hack, enough to make us really want to build one for ourselves. It will remain to be seen if any slop develops with repeated folding and use, especially at the snap-in end stops, but that should still be an easy fix if it happens.

We’ve previously featured [Jón]’s custom 3D printed D-sub connectors, also for his Ender 3. Also check out another folding printer, the X-printer.

Continue reading “Folding An Off-The-Shelf 3D Printer”

Compact 3D Printed Hovercraft Is Loungeroom Floor Fun

Hovercraft come in all shapes and sizes. and while they’ve largely disappeared as a major commercial transit option, they remain popular in the hearts and minds of makers everywhere. [RCLifeOn’s] latest project concerns a compact, indoor-sized hovercraft piloted via FPV, and it looks to be brilliant fun.

The build consists of a 3D printed chassis, with a skirt cut out of a garbage bag and held on with press-fit clamps. Twin ducted fans are employed, one for propulsion, the other for levitation. A 5GHz FPV camera is nestled on top of the rear fan housing to provide a video feed for the pilot.

The craft was somewhat uncontrollable in initial testing. Tweaks to the weight distribution and the addition of a bigger rudder helped tame the rig. [RCLifeOn] also demonstrates a unique way of balancing damaged fan assemblies in the field; it’s a technique we’ll keep in the back of our mind for future use.

The trick to a good hovercraft build is light weight, big control surfaces, and a good skirt. You can even go off-book and use the Coanda effect, if you’re so inclined. Video after the break.

Continue reading “Compact 3D Printed Hovercraft Is Loungeroom Floor Fun”

Handheld MQTT Remote For Home Automation

If you’re working on a home automation project, you’re probably knee-deep into MQTT by now. If not, you should be. The lightweight messaging protocol is an ideal choice for getting your “Things” on the Internet, and controlling them all can be done easily through a simple web interface or an application on your mobile device. Or if you’re [serverframework], you make yourself a handsome little all-in-one MQTT remote.

The hardware here is pretty simple; inside there’s just a NodeMCU ESP8266 development board, some buttons, an RGB LED to give feedback, and a 3.7v 1200mAh LiPo battery with associated charging module. Everything is held inside a nice little wooden box that looks like it would fit right in with the living room decor. We’d like to see some kind of a cover over the exposed perfboard the circuit is assembled on, but that’s arguably a personal preference kind of thing.

Most of the magic in this project is actually happening on the software side. Not only does the provided source code handle all the MQTT communications with Home Assistant, but it provides a clever user interface that allows [serverframework] to perform 25 functions with just five buttons. No, you aren’t seeing things. There are actually six buttons on the device, but one of them is a dedicated “power” button that wakes the remote out of deep sleep.

If you’d like to learn more about getting this protocol working for you, our resident MQTT guru [Elliot Williams] has plenty of thoughts on the subject. From his talk at the 2017 Hackaday Supercon to his home automation tutorial series, there’s plenty of information to get you started.

Continue reading “Handheld MQTT Remote For Home Automation”

Ask Hackaday: Drone Swarms Replace Fireworks; Where Are The Hackers?

Your mom always warned you that those fireworks could put an eye out. However, the hottest new thing in fireworks displays is not pyrotechnic at all. Instead, a swarm of coordinated drones take to the sky with different lighting effects. This makes some pretty amazing shows possible, granting full control of direction, color, and luminosity of each light source in a mid-air display. It also has the side benefit of being safer — could this be the beginning of the end for fireworks accident videos blazing their way across social media platforms?

For an idea of what’s possible with drone swarm displays, check out the amazing pictures found on this site (machine translation) that show off the 3D effects quite well. Note that although it appears the camera is moving during many of these, the swam itself could be rotated relative to a stationary viewer for a similar effect.

What I couldn’t find was much going on here in the hobby space. Granted, in the United States, restrictive drone laws might hamper your ability to do things like this. But it seems that in a purely technical terms this wouldn’t be super hard to do — at least for simple designs. Besides, there must be some way to do this in US airspace since drone performances have been at the Super Bowl, Los Angeles, New York, Miami, and Folsom, CA.

So if the regulations were sorted, what would it take to build a swarm of your own performing drones?

Continue reading “Ask Hackaday: Drone Swarms Replace Fireworks; Where Are The Hackers?”

Open-Source Analytical Balance Pits Gravity Against Electromagnetism

As the open-source movement has brought its influence to more and more fields, we’ve seen an astonishing variety of things once only available at significant expense become accessible to anyone with access to the tools required to create them. One such arena is that of scientific instrumentation, and though we have seen many interesting developments there has been one which has so far evaded us. An analytical balance, a very specialised weighing machine designed to measure the tiniest of masses, remains available only as a new unit costing a fortune, or as a second-hand one with uncertain history and possible contamination. Fortunately, friend of Hackaday [Zach Fredin] is on the case, and as part of one of his MIT courses he chose to create an open-source analytical balance.

The write-up is interspersed with his course notes as he learns a series of fabrication techniques, but in addition to the milled Delrin finished model he treats us to his prototype and gives us an explanation of how these instruments work. It’s a technique that’s rather different to a traditional weighing machine: instead of measuring deformation of a spring in some way it produces a force from an electromagnet to oppose that exerted by gravity on the mass to be measured, and quantifies how much electrical energy is required to do that. The mechanism incorporates feedback through a vane and an optical sensor, which he admits he’s not yet had time to set up properly.

It’s an interesting project not least because it exposes some of the inner workings of an analytical balance, and we look forward to his completing it. If this whet your appetite for the topic it’s worth also looking at [Ben Krasnow’s] video of a balance made using a moving coil meter for an explanation of the technique.