
So, you’ve decided you want to get into cars. After much research and deliberation, you’ve bought yourself a sweet project car, and can’t wait to get down to work. First things first – it’s time to learn about basic maintenance!
Get It Right For A Good Time
Doing necessary maintenance on time is key to enjoying your project car. Too many gearheads know the pain of a neglected beast that spends more time up on jackstands than out on the road. Buying the right car, and keeping a close eye on what needs to be done, will go a long way to improving your experience and relationship with your ride.
If you’ve just bought a car, no matter how good things look, it’s a good idea to go through things with a fine-tooth comb to make sure everything’s up to scratch. This can avoid expensive damage down the line, and is a great way to get your feet wet if you’re new to working on cars. Here’s a bunch of easy jobs you can tackle as a novice that will keep your ride in tip-top condition.
Fluids
Your car relies on a variety of highly-engineered fluids in order to run smoothly and reliably. Using the right fluids and changing them at regular intervals is important to ensure your car performs well. While the seller may have assured you that everything’s been changed on schedule, the first thing you should be doing when you get your project home is to change the fluids.
Engine oil is perhaps the most important. Over time, contaminants build up in the oil and it begins to lose its effectiveness as a lubricant. Left too long, and your oil pump can clog and you’ll lose oil pressure, destroying your engine in mere seconds. Alternatively, metallic particles can build up as the engine wears, and your oil filter can only do so much. You want to keep your oil fresh and of the appropriate grade, with most manufacturers recommending a set time period or mileage amount to change the oil. This is an easy job on the vast majority of cars, though you might find some difficulty in reaching your oil filter (looking at you, Miata). It’s a great way to get comfortable working on your car – just make sure you put the new oil in before you start the engine, else you’ve almost certainly ruined your ride. You can even send samples of your oil away for analysis that can help diagnose long-term issues. Oh, and be sure to us a new filter every time – and keep an eye out for leaks!
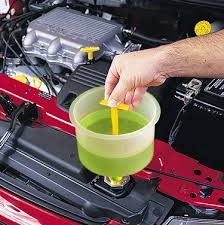
Coolant is also an important fluid to check and change regularly. If it looks rusty and brown, your engine components are corroding and that’s no good for the long time health of your ride. Thankfully, it’s easy to change: most cars having a tap to help dump the coolant before you top it up. If things are particularly dirty, you might want to run a coolant flush solution through the system before you replace the fluid. Just make sure you burp the air out of the system properly before heading out back on the road, lest you overheat your engine.
Other fluids in your car are generally have quite long intervals before service is required. Automatic transmissions often recommend oil changes quite rarely; more than 100,000 km is common. Similar intervals are typical for manual transmissions and differential oil. If you’ve just got the car and it’s shifting and driving well, you’re likely safe to leave these alone. They’re a little more difficult to tackle, usually, so consider approaching these once you’ve gotten a little more comfortable with the wrenches.
Filters
Filters play an important role, ensuring your car doesn’t clog its fuel injectors every time you fill up at a dodgy gas station, or making sure sand doesn’t wreck the cylinder bores. However, they get clogged over time, leading to reduced performance and other niggling issues. Thankfully, they’re often cheap and easy to change, and are easily handled by the shadetree mechanic.
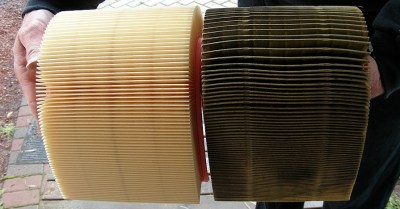
Air filters are the engine’s main protection from dust and particulates. Often made out of paper or foam, they’re usually located in an accessible spot next to or on top of the engine, and a simple visual inspection is usually enough to tell if they need replacement. If they’re dirty or falling apart, swap it out. If it’s covered in oil, you’ll also want a new one, though that ‘s indicative you have other problems. Generally, a high quality OEM filter is the best replacement. There’s little to be gained by swapping to a pod-filter or a cheap eBay intake, unless you really know what you’re doing and are sourcing high quality parts.
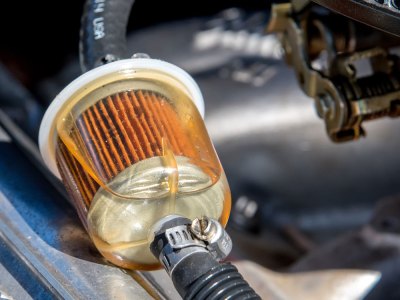
Fuel filters are responsible for making sure the tiny passages of your carburetor or injectors don’t get blocked with detritus in fuel. If you’re having strange issues with stumbling or a lack of acceleration, you might find your fuel filter is nearing the end of its life. When they get clogged, fuel pressure drops and this can lead to performance issues. Carbureted cars often have one or more inline filters that can be swapped out with little more than a screwdriver. Fuel injected cars can be a little more complex and often have multiple filters, but they’re still fairly straightforward to change if you know where to look. Their in-tank pumps also have a special filter sock on them, but these usually last as long as the pump and you needn’t worry about them too much.
Wheels and Tires
Ask around the racetrack about how to start making your car faster, and the first thing you’ll get told is “tires, tires, tires”. Your tires are the interface between your car and the road, and no matter what you do to the rest of the car, if you’ve got bad tires, it’ll all be for naught. It’s not just about speed on the track, though – whether you’re driving on the street or off-road, a good set of tires is important to keep your car pointed the right way, and avoid ending upside down in a ditch.

Oftentimes, project cars can come with a mismatched set of wheels and tires, or completely bald rubber. Worst case, you’ve dragged something out of a barn or a field, and it’s sitting on rubber well over 10 years old. Just because they have tread and hold air, doesn’t mean they’re safe to drive on. Rubber doesn’t age well, and unless your new ride has a set of fresh meats with plenty of tread and a current date code, you’ll want to get them replaced.
It’s also important to pay attention to wheel and tire size. Putting huge rims on your car can look cool to some, but it’s often a great way to spoil your handling. There’s no need to stick rigidly to the manufacturer’s standard wheels, of course – these can be ugly and boring, after all. The best way to get the right wheels and tires is to talk to other enthusiasts that have builds similar to what you’re going for. They’ll be able to tell you what works for your car, with your suspension setup, and your intended goals.
For example, the original NA Miata came with 14″ x 5″ wheels. These are fine for getting about town, but for track use, they’re too skinny to generate much grip. It’s also difficult to find good rubber to suit 14″ wheels these days; there are options available, but they’re expensive and obscure. By asking around forums, and chatting to the old hands at the track, I was able to learn that a set of 15″ wheels between 7″-8″ wide would be a good bet, ideally with an offset between +20 and +35 to make sure they nicely filled the guards. Armed with this knowledge, I was able to purchase a set of wheels that looked great and fit properly without needing any wheel spacers or other ugly hacks. Wrapped in some sticky semi-slicks, my lap times dropped by 4 seconds overnight! By doing my research, I got a great result without wasting any time or money.
Fixing Faults
It’s likely that, as you’ve bought a project, your car has a few issues. Maybe it’s got a noisy exhaust, or it’s using more fuel than it should. While these may not get in the way of your car getting from A to B, they can dull your enjoyment significantly, and add to the financial burden of having a project car. However, fixing these issues is a great way to start learning about how your car works!
Diagnosis can be tough for the beginner, particularly when faced with a tricky problem, minimal tools, and limited experience. Many will guess at the cause of the problem, and begin replacing parts only to find the issue reoccurring time and again. Ideally, finding the root cause of an issue is more productive. This is achieved by logically looking at the symptoms, and testing parts and subsystems to see that they are indeed properly operational. This involves learning how to use a multimeter, pressure gauges, and all manner of other equipment. This can be expensive, but can pay off down the road. Oftentimes, it’s important to weigh up buying more tools versus simply taking the car to a shop that already has the gear.
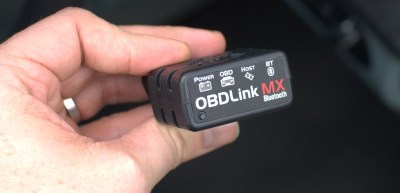
The one tool that any wrencher should have for working on OBD-II equipped cars is the scantool. This plugs into the diagnostic port in post-1996 vehicles, and allows the ECU to communicate fault codes to the driver. This is helpful in a wide variety of situations. For example, if your fuel economy is poor, and your scantool reports a bad oxygen sensor signal, it’s simple to replace the part and get things up and running again. Other problems, like misfires, can be more difficult to diagnose, but a scantool still helps point you in the right direction.
Thankfully, many parts of the car community are eager to share their knowledge and passion with those eager to learn. Facebook groups, forums, and similar gatherings are great places to look for help. Often, your problem will have been faced by many before, and simply putting the symptoms into Google will net the answers you need. Else, reach out, and start a conversation with those that may be able to help. Finding a good local mechanic can also be helpful. While many shops simply exist to get cars in and out the door, others often specialize in certain makes and models and are willing to work with enthusiasts who need a little help on their journey toward working on their car. I’ve been lucky myself to know several great mechanics, who were able to step in and solve a couple of sticky issues that were just outside of my own abilities to solve. After picking up the car, I’ve learned a lot from a quick chat about what they had to do to fix the problem!
It’s a Marathon, Not A Sprint
For the newly initiated into the automotive hobby, it can sometimes feel like too much. If you’ve just started poking around under the hood of your new ride and found a mess of wires, bodged hoses and a forest of zipties, you might be a little overwhelmed. However, through regular maintenance, consultation with those in the know and a little perseverance, you can learn a lot and build yourself a sweet ride along the way. Happy hacking!


“Oh, and be sure to us a new filter every time – and keep an eye out for leaks!”
And, oh, fill the new filter with oil first, before mounting it.
Otherwise you’ll have a big air bubble in your oil system which will propagate all the way to your cam shafts and make them run dry for a few seconds anyway. Causing damage, of course.
Especially with overhead cam shafts that are designed to run on a thin film of pressurised oil.
:)
And even more critically, check you’ve put the sump plug back in before filling with oil. Also a good idea to check you’ve put the oil cap back on too…
It’s embarrassing when you realise that’s what the “thunk” noise was on the underside of the car when you’re heading down the autobahn later that day. So I’m told. Thank goodness for engines with high volume low-pressure oil systems!
“And even more critically, check you’ve put the sump plug back in before filling with oil”
Been there, done that, unfortunately. With my motorbike. Quite embarrassing when you’re crouched down next to your bike, filling up the oil, and then suddenly feel your feet slip from under you, making you sit on your ass in a puddle of oil…! :(
I’ve had that happen leaving the dealership of a certain German car company after taking my dad’s 4×4 in for a service – didn’t exactly inspire confidence in that particular garage and the mechanics there. Driving out the lot and noticed a snaking line following the car’s path.
On the plus side, the manager of the dealership was so worried something else might have been missed they loaned me a SL-something sort of thing with a 5L v8 overnight to let them make sure, which I made the most of given it was June! (plus the garage was near my office so hardly out my way).
If it’s an oil filter.
Make sure the gasket on the old oil filter didn’t stick to the block. 2 oil filter gaskets are not better than 1
“And, oh, fill the new filter with oil first, before mounting it.” That’s totally dependent on the car and the filter. In fact I’ve never seen a filter on any engine (metal cased ones or sponge/paper based) that require anything more than a little oil on the gasket. I’ve read about older filters that required priming by submerging in oil (and draining prior to installation). The majority of those that I’ve changed (in about 5 or 6 cars, a few mowers and ride-ons) are positioned horizontally to the engine and if they contained oil would spill most of it in any attempt to mount it.
The only time an oil filter is to be filled first, by most all manufacturer’s specs, is the huge diesel engine filters, and the ones attached to an engine with a turbo charger. The thin film is not under pressure on the cams. Just open up a valve cover and look. Even then, the turbo charger will also have a thin film left from the previous oil in the system and is not under the higher pressures of the boost. I’ve had turbo chargers and super chargers. They don’t wear that fast from a start up and idle to distribute oil, plus, unless you run the engine with the drain plug open and the reservoir empty, you’re still going to have oil in the lines. Most car filters are extremely small compared to the older cars and with the use of synthetics and blends, that oil adheres better now than with the old conventional oils.
I would also like to add one more invaluable advice: buy a torque wrench and a manual which lists the torque of every screw and bolt of the engine. This will save you lots of frustration over broken bolts, stripped threads, cracked aluminium, leaking gaskets.
And while I’m at it: even more invaluable advice:
When you removed bolts and put them back, put a little bit of grease (preferably lithium grease or ceramic grease) on the bolt first. And then screw the bolt back on with, let’s say, one nM less torque. This will do two things: you will never bolt a bolt on too tight anymore, and when you unbolt the bolt later again, it will not have been corroded stuck and will unscrew really easily without damage (because there’s no chance of air or water getting in anymore).
Don’t be afraid that the grease will make your bolt come loose due to vibration easier. It won’t, if you tightened it to the right torque.
1 nM is 0.74 ft lb.
What fraction of an ugga dugga is that ?
1 nM is 0.74 lb-ft. I’m not from the US, not used to Anglo-Saxon units. :)
Torque is in Nm
NM is nautical mile
not sure what nM should be…
nano-miles
It’s nanoMolar, a measure of concentration. mM, milliMolar, is extremely common in biochemistry and chemistry.
Ah. It’s probably one ugga dugga less than your common sense tells you to apply. But… It depends on the amount of beers you had. Three beers is best, no more, no less. With three beers, it’s one ugga dugga less than your common sense tells you. With more beers, there is less common sense, and you should use fewer ugga duggas.
If you come to find that after a few beers, you should apply 0 ugga duggas, then it’s the perfect time to just go lie in the sun somewhere, drink a few more beers, and try again the next morning. :)
😂😂😂😂
Threadlock actually seems to work well for keeping your bolts from rusting in also. Anti-seize on the other hand seems to do the opposite, they should trade names.
Yes. I was going to mention threadlock. But… They will also make it harder to unbolt later. In general, with threadlock, you need to apply heat to soften the threadlock when you want to unbolt a bolt (especially with the thinner type of bolts). I think that’s just too much trouble.
I do use threadlock on parts that don’t have to be unbolted very often. Like the cylinder head bolts, etc.
I’m not sure what you mean with anti-seize, but is that the grease with copper inside? *Never* use that on steel bolts that go into aluminium. Steel->copper->aluminium causes a small electric potential that will seize the bolt tight over time due to galvanic corrosion.
That’s why I mentioned ceramic grease. Instead of copper, it has small ceramic particles in it, and actually prevents galvanic corrosion, while keeping the bolt tight but still easy to unbolt.
There’s an aluminum safe one, and it’s still useless, dries out, seems like you put something between thick tar and concrete in there and is high torque all the way out. (I’ve actually had stuff snap after getting it a couple of turns, not snagging on the backside either.)
I don’t really notice a higher breakout torque with threadlock than with a bolt that’s been in “dry” but started to rust in after say 3-6 months. After that in this climate, the threadlock one stays the same, but the “dry” one takes anything then from copious amounts of penetrant to drilling out because it snapped. Impact wrenches make a huge difference though.
Snapping after a few turns could also be caused by head bolts sticking out on the other side in open air, and having grown a healthy coat of rust. Happened on the first engine of my citroen bx. :(
check to make sure your bolts don’t enter the water jacket. those bolts will need non hardening sealer like permatex #1
There are threadlock compounds of different strengths available that will all avoid a nut or bolt coming off by vibration but differ in the force required to unscrew them.
See the corresponding Loctite page for reference: https://www.henkel-adhesives.com/it/en/insights/all-insights/blog/difference-between-threadlockers.html
Good to mention, I always think of blue as the original and thus most generic/regular form unless I say “high strength threadlocker” so guess I should have said blue, now more types are more commonly encountered.
Purple threadlock for small fasteners and anything you’ll be removing quite often and don’t want coming loose. Doesn’t need heat and is rated for hardware smaller than 6mm. About the only place to get it is Amazon though!
In a pinch a little bit of nail polish will work…
I’ll add.. Buy a GOOD Torque wrench. Find a used Snap-on or Mac wrench and get it calibrated. The cheap ass wrenches you find at the discount tool places are more often than not woefully inaccurate. Good enough for lug nuts but not so much for head bolts and other critical fasteners. You definitely want a click-type 3/8 and 1/2″ drive wrench, the beam style are harder to read but an inch-pound beam style wrench is handy for setting things like bearing preloads.
My $40 special torque wrench would click at precisely the same time as my Warren & Brown when I linked them together.
Was consistent right up to the top 1/4 of its range where it was just slightly under the W&B.
My conclusion is even a cheap torque wrench is better than no torque wrench. :)
I agree. And they’re actually quite simpel to calibrate as well., although it’s a bit lengthy process.
This is a nice explanation: https://www.wikihow.com/Calibrate-a-Torque-Wrench
How inaccurate are we talking about? Are we talking ~20% off, were you could start worrying about over-torque?
The situation to worry about with inaccuracy is with the bottom end of the range of the click breakaway torque wrenches. Now a high end model might be a 50-150ftlb and be reasonable accurate near the 50, but a cheaper one might promise you 20-150, and you will probably be snapping bolts at 20. In general it’s better to get more than one with overlapping ranges. Also if you pay out the ass for something that promises a high accuracy 10-250 in one tool, you’re still gonna be snapping bolts at the low end, because the scale error and chance of slight movement of the adjustment when you’re using it may make a lot of difference at the low end where a single footpound is 10% over, not half a percent.
Personally, I only trust my 30-200 from 70-200 and have a 15-150 I use for 30-150, and under 30 use a 0-50 deflecting beam, and also have an inch pound deflecting beam.
Front wheel drive driveshaft nuts are usually the tightest torque on the car, so if you look the spec up for those, you’ll know if you only need a 150ftlb or whether you ought to buy a 200. RWD I don’t know if you need above 150, until you get into heavy trucks.
Actually in literally every side by side review of torque wrenches I have seen on You Tube, the least expensive Pittsburgh one from HF has been on par with the mondo expensive one from Snap On as far as accuracy goes. The Snap on has a much nicer fit and finish, but it is a torque wrench, not a rectal thermometer. I can live with a few rough edges on a torque wrench.
Oil filter hack: Look for an application with a bigger filter and same thread/fitting as yours. Obviously if you can barely get your hand over the end of the filter now, this will not work, but a lot have many inches of space. One example is using a ford mustang V8 filter on smaller dodge engines. Firstly, it’s gonna be able to trap more before it’s full, but also, filters have a bypass valve in. This opens when the filter cannot flow enough for the oil demand and thus there is a pressure differential. To avoid oil starving your motor it has a bypass valve in. Now, for your stock filter, this is designed to happen somewhere around 3000 RPM or so… yup, all the time you’re over 3000 RPM your oil is going unfiltered. Using a bigger filter might push this to 4000 RPM or so, so you might want to consider this essential for engine life if you live somewhere really hilly, or tow much.
Electrical hack: Every time you touch a connector, clean it and put it back together with dielectric grease. Keeps the wet and salt out and gives you very much fewer electrical headaches.
Coolant hack: neverevereverevereverever put tap water in your cooling system. The people that tell you it’s okay make money off you replacing radiators and heater cores every 3 -5 years. Use premix or distilled/deionized water to mix, rainwater inland if you have a clean collection system.
Maintenance fluids hack: Read the MSDS, gas line antifreeze, gas drier, lock de-icer, octane booster, contact cleaner, can all be replaced by just buying a cheap bottle of 99% isopropyl alcohol. Varsol/mineral spirits replaces throttle body cleaner, carb cleaner, and injector cleaner.
About the coolant hack. I would advice against water completely. The oil pump needs a bit of lubrication too, and water does not have that. Also, distilled water is not going to help because it’s still ionized and will cause corrosion inside your system (which likely contains a mix of different metals). Deionized water should be ok, but you still should add a lubricant.
Basically: just always go for premix, it’s the easiest thing to do. And make sure it’s suited for your system (aluminium-only systems or mixed aluminium/copper systems).
Ooops, I mean of course to mix with concentrated coolant. Which has a small amount of de-ionisers and such in it, but there are very few areas with soft enough tap water that it has the capacity to entirely treat the 50% added water volume.
Gas line antifreeze and similar products are not needed in areas, like the USA, where the gas is 10% ethanol.
Yeah. With 10% ethanol in your gas, it’s probably more effective to replace your steel gas tank with a plastic one, than to add gas line antifreeze. :) Ice will simply unfreeze when it get’s warmer, rust takes a little more effort to get out of the system. ;)
As the temperature drops ethanols ability to keep water dissolved drops also, so yes you do.
I like the oil filter hack. Never thought much about it, but it’s entirely true. If you’re going to take your car (or motorbike) to the track, it’s definitely something to think about, because you’ll be running your engine in the high-rev area all the time.
I’d think that you should always use a same-diameter filter, but take the longest possible version of it.
Right, jegs.com very helpfully has sizes and fittings listed for the fram filters (I know, eww fram, so shop the equivalents.)
electrical hack n2 – apply same thinking with the oil filter to the battery. The battery tray is almost always common for all engines of the car model, so unless you have the biggest engine available for that model, you can get a bigger battery. A beefier battery takes less of a beating when cranking, lasts a LOT longer.
Don’t go too tall though, you don’t need it shorting on the hood.
DAMHIKT!
(Don’t Ask Me How I Know That!)
Re: Oil filter hack…
If you have a Briggs and Stratton engine that needs its filter replaced,
instead of paying $17 for theirs, see if Walmart has a $3 one for a Yugo.
Oof, I have more. Apart from the tire rubber, it is most important to check another type of rubber: rubber brake line hoses (if the car has any). Not many people know that these are only valid for 5 years, and should be replaced after that.
For normal road use, it’s not much of an issue if they weren’t replaced even once during the lifetime of the car (although, consider what could happen when you need to do an emergency brake, and the hose bursts…). But for track use, renew all rubber brake hoses before going on the track. And replace them with steel-lined brake hoses, which will make your braking much tighter.
One of my hobbies is racing on tracks on a motorbike. I ride a 1996 Honda CBR 900 RR, and all my advice goes doubly for motorbikes. They only have 2 wheels, and any failure is likely to be more catastrophic than with 4 wheels. ;)
Miata oil filters are easy… at least for the NA and NB models. Jack the front up and remove the passenger front wheel. Reach in through the wheel well and the fiter is right in front of you. Easy peasy!
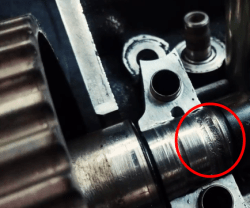
“A lack of oil pressure caused the cam to seize in the head in my 1992 Daihatsu Feroza. This totalled the car, and I miss it dearly!”
metal spraying
It’s a HaD article in itself.
Fixed more than one head that way. Underside the cam and oversize the cam journal, or junk the cam if not custom/expensive and get another one then bore the head back to stock.
If it’s a common engine, just get a whole replacement head from the wrecker, throw a seal kit in its general direction, threaten it with a wire brush to remove any carbon and wave a feeler gauge at it and adjust clearances then slap it on.
Obviously. The biggest issue being the first word you posted.
First steps:
– Inspect the car properly before buying it, a tiny unseen thing can lead to an incredible amount of time or money trying to fix it
– Get proper documentation, either from the parts store or from the manufacturer, ideally both
– Get a minimum amount of tools: a small toolbox to leave always in the car, and all the proper stuff to leave at home (1/4″, 3/8″, 1/2″ sockets, torque wrench, jack stands, hydraulic jack, power/air tools if you’re rich enough).
– Don’t trust anyone, not even yourself, double-check everything when you work on something. A paint marker can help to keep track of each bolt you torqued.
Never forget to keep track of the timing belt in case of an interference engine (usually rated for 5-10 years or 60-200’000km). It can also be a PITA to change on some cars (barely enough space of a hand, not keys on the camshafts/crankshaft, dodgy tools to lock the shafts in place).
Don’t forget to clean the car, especially underneath and in the wheel arches in the winter. Rust is something terrific… Having a clean engine bay also helps a lot to find the problems when they happen (fluid leaks), and will help you to pass the inspections.
to the salt problem – leave the car in the cold…rusting is a chemical process, slows down with the temperature. Bringing a car that’s covered with snow and brine into a warm garage is the worst thing you can do to it.
When cleaning, be careful about closed-cycle pressure car-washes, makes a nice brine bath in the winter. Last but not least – keep the drip tray under the hood free of leaves and other junk, otherwise it holds water which then aids corrosion.
I once replaced my timing belt with a cheap one I bought on eBay.
13,000 miles later it burst.
Gates belts for me, from now on.
no doubt this article will encourage many people to change their own fluids and dump the old stuff down the drain, why is there no mention of how to dispose of toxic auto waste? It’s not just fluids, dead engine mounts are saturated with motor oil.
Ok… But you just mentioned it… So, add to the article and tell us what to do with the fluids and other contaminated stuff?
In The Netherlands, I just bring it all to the ‘milieustraat’ (municipal waste facility). They know what to do with it (recycle or destroy in the most environmentally friendly way possible). I put it in containers (bottles), and put labels on them with a description of the content, so that they will have an easy task sorting/recycling it.
In most parts of the USA, auto parts stores will take engine oil, transmission fluid, brake fluid, etc. for recycling.
Antifreeze is often accepted at county or city run household hazardous waste sites.
Another thing to consider about older cars is reading through the manual for periodic maintenance items and doing them all when you get the car under the theory the previous owner didn’t. Replace all the filters.
On pre-1980’s cars, repacking wheel bearings isn’t that difficult and sure beats replacing them. My project car has a hollow steering trunnion that’s supposed to be filled with oil, to gradually lubricate the front wheel bearings; a previous owner filled one with grease instead. That was sure a pain to fix. But stuff like replacing water pump belts, maybe the timing belt, are almost always worth doing.
Get under the car and look at the brake lines, if they’re visible. Go find yourself a dirt road and hit the brakes really hard and then look at the skid marks: did all four wheels lock up? I know someone who got a car with one brake line smashed flat so he only had three functional brakes. When I got my car the rear brakes weren’t functioning because they hadn’t been correctly adjusted. (Front disc rear drum, and drums often need physical adjustment and maintenance.) It’s also worth testing out the emergency brake and seeing if it actually works. Mine didn’t at all and it took quite a bit of adjustment to get it working. This goes triple for quite old cars that had mechanical rather than hydraulic brakes.
Disconnect the battery and put an ammeter between the battery and positive cable: see how much current it’s drawing when the car’s off, and make sure it’s a reasonable number, like uA to tens of mA. If it’s hundreds of mA go looking for what’s sucking up the power. There are lots of things that can fail and leave you with a car that constantly has a dead battery.
A lot of newer cars you’ll have to pull the ABS fuse to test the brakes as described.
Also cars have not had an ’emergency’ brake for many years, they are careful to call it a parking brake so as not to have any liability.
Be sure to clean flush brake fluid every few years as it absorbes water and then rusts the lines from the inside. One of those ‘one man bleeder’ kits is handy.
Heh, those jar and line jobbies I like to call “one and a half man bleeder kits” … never seems you make very fast progress with them on your own. Modern cars you can bleed for hours and not seem to get anywhere. Hence at the minimum I’d recommend one of the cheap hand vacuum pump kits. Or it may not even yield to that and you’ll need to grab a spare reservoir cap, stick a schraeder valve in it and do pressure bleeding with a tire pump or small compressor.
Even my Mrs can understand the simple up down up down on the brake or clutch pedal.
If you still live in your basement, ask your mom to help.
I swap out a bit of brake fluid every other oil change. Get a Mity Vac can pull fluid out of anything with it and refresh the fluid. I pull 4 oz of brake fluid out and it keeps fresh fluid in tje system. Not to mention the vac gauge can also help diagnose problems with the motor. Hook it up to the manifold at a vacuum port, search Google for vacuum gauge readings and it’ll show you what the needle should be doing for certain problems.
They paved my favorite dirt road 2 years back :-( haven’t found another one yet that isn’t miles away.
It really depends on the car. If you get a car you pay real $$ for and want to keep a long time, some of the above is sage advice. Some of it is also really bad advice if you screw something up. I have had totally non mechanical friends come to me with issues after they did self service. The funniest one told me his oil pan was leaking or had a hole in it. I did not realize just how non mechanical this guy was. I got under it and sure enough there was oil dripping from the pan, but I could also see a stream of it coming from above the pan. I got on top and followed it back to the dip stick. I pulled the dip stick out and oil literally came gushing out of it. It turns out someone told him his car needed oil so he found the fill hole with the picture of the oil can on it and proceeded to fill it to the top, put the cap on and call it good. That one was an easy fix. The sadder one was the empowered female who would not let the garage make a couple bucks chancing her oil so she DIY, only she did not properly tighten the drain plug. The check oil light came on and she drove it to my place. The amazing thing was the engine did not self destruct. But after a new plug, fresh oil and a trip around the block, after it sat a while you could see a line of silvery sludge on the tip of the dip stick. She had that car for a while after that but it never ran the same.
I tend to buy junkers. I love it when scrap prices are low and I can pick up a car on CL for $300 or so. I do as little as I humanly can to keep them moving under their own power and often manage to get at least a few years out of them. I should mention that I am retired and do not depends on them for my daily commute, though I do put a good number of miles on them. When one starts giving me too much grief I loot it for anything good and get my few hundred back in scrap. The SO is on her 5th year on $500 car I picked up, and I think rust is going to kill it before a lack of maintenance. It had started leaking antifreeze around the head gasket so I poured a bottle of head gasket goo in the coolant tank, something I would not do with a nice car, and no more leak, and no more funny business with the car running a tad hot idling in traffic.
My advice to you if you want to get started in cars is to get a project car that will NOT be your daily driver. That way you can enjoy a nice afternoon under a shade tree wrenching on it. It can almost be relaxing. When it pisses you off, you can just put it down for a while. If you work on your daily driver, than you have a lot of stress as you *have* to get it running again, in one session, unless you like to bike or walk. And don’t bother trying to polish a turd. If you buy a turd that runs, do as little as possible to keep it running. It won’t go forever, but if can get 3 years out of a $300 car, that is a pretty good exchange.
totally second the advice that having a project car as your daily driver is an absolutely terrible idea. However, the plus side of this is that when your DD has something bad happen (recall, gets hit) it’s really nice to have the project car running and available for the repair time.
To each their own. Some guys will always be a hobby mechanic at most. Some guys will drive a 50 year old car as a daily driver. There are only about 6 reasons a chevy inline 6 engine won’t start.
and 4 of those reasons involve the monojet in my decade of of daily driving an i6 chevy
Who else wants a giant jolly wrencher on their hood??
Sadly I no longer have the firebird for it but still!
My neighbor had a kinda terrible but amazing-looking old little british sportscar in his driveway for a couple of years and I kept trying to talk my wife into getting it when he finally sold it. We took it for a test drive and she said “this is a terrible idea.” (Well, she said something much more graphic than that.) I dropped the subject for two days, and then said “you know, if we got that car you could spray paint a jolly roger across the whole side and hood, and not reduce its value at all” and her eyes got as big as saucers and we bought it the next day. Nine years later we still haven’t painted a jolly roger on it, but, maybe a jolly wrencher is a possibility.
If you do anything with antifreeze, be sure to clean up thoroughly afterwords. Don’t leave pools of antifreeze or open containers of it exposed. It is very toxic to animals and they are attracted to the taste of it!
Also with all fluids, make sure the fluid you are using is compatible with the fluid that exists.
BRAKE FLUID – conspicuously absent from the article…
https://www.yourmechanic.com/article/what-are-the-types-of-brake-fluid
Anti-freeze – green or orange?
https://www.popularmechanics.com/cars/how-to/a91/1272436/
Motor Oil
https://auto.howstuffworks.com/how-to-choose-the-right-oil-for-your-car-or-truck2.htm
“Also with all fluids, make sure the fluid you are using is compatible with the fluid that exists.”
Moreso with Automatic Transmission Fluid (ATF)!
If you are into hacking cars then check out Beth’s videos, https://www.youtube.com/channel/UCzj5Cmki0vmTLioqfr9tQ4Q
Some years ago I was driving my WWII Ford GPW army jeep on a club trip, on a windy road out in the back country hills north west of Sydney. I was tail-end Charlie with one jeep in front of me, the others had taken off out of sight to get to a country pub that was along the route.
Then the jeep in front suddenly slowed and pulled over, so I pulled up behind. Turned out he’d blown the head gasket. So, not a major problem. I happened to be carrying a spare, so we waited a bit for it to cool then got to work ripping the old flathead off with screwdrivers and paint scraper blade, and proceeded to scrape the top of the block and the head.
We had the motor in pieces when a fellow on a lonely cross-country pushbike trip idly cycled by and asked what the problem was, “oh just changing a blown head gasket, shouldn’t take long”. He shook his head and rode on.
Meanwhile we got the new gasket on, torqued the head down, and on our way again.
Total time from start to finish was three-quarters of an hour.
Okay, Aussie, what’s a pushbike?
-A Yank
B^)
Should be a list of common sound to watch for. ie EEEEEEEE sound while turning wheel at low speed could indicate low power steering fluid. Thum-thum-thum might be a flat tire. Clunking sound when going over bumpy road could be problem with shock or strut or your exhaust pipe is hanging a little low due to broken hook.
For those who don’t want to deal with car repair and self maintenance, turn the radio off and if you hear anything different than usual, let someone know. Don’t wait until you see bluish smoke or even fire to get something done, it’ll be too late.
Indeed, the bit about the fire. I carry a fire extinguisher and first aid kit in all my vehicles. I started doing this after a club member friend was driving along in his jeep once, in the city, and saw a car on fire on the other side of the road. Luckily he had a fire extinguisher so he jumped out and put it out.
Buy yourself an Electric car, the only stuff on this list that will apply is the tire, suspension, and coolant checks. All the filters, etc, aren’t an issue. (Except for the cabin air filter)
One tip for buyers of new combustion engined machines. These days plugs are rated for 100,000 km, to 100,000 miles. Heads are aluminum, so when you get the thing home, spend some time removing each plug, giving it a dab of anti-seize, and put it back. On those with an inline 4, this will be a 20 minute job, tops. Those with a transverse V6, in something like a minivan, better be ready with a lot of extensions, universal joints, and a vocabulary that could teach a drill instructor a few new words.
When it’s finally time to change things, whomever has the job will thank you. If you didn’t do this, pickup the heli-coil kit when you buy the plugs, I guarantee at least one will come out with some of the head stuck in the threads.
If you sprung for the nickel based (ultra temp) version of the anti-seize, do the oxygen sensors while you are at it. Be sure to keep it well away from the business end. Note, nickel anti-seize is glitter for mechanics. It’s sparkly, and if you aren’t careful, it will spread to cover everything.
While you are greasing and inspecting things, if your car has single piston calipers, there will be pins to allow them to slide side to side, and keep pad wear even. They would appreciate a dab of grease on a regular basis, otherwise they will stick, and accelerated wear will happen.
Ok the wheel is off and you checked the brakes, give the CV boots a look while it’s out of the way. a $10 replacement boot beats a $200 half shaft.
“These days plugs are rated for 100,000 km, to 100,000 miles”
Yes that’s true. And oil and coolant is often similar stupidly long service intervals too.
But there are assumptions for the above and you have to ask why are we cared about a set of plugs lasting 100,000 miles when a pack of 4 NGK’s cost me $8 ?
Could it be that such grossly high numbers are for marketing reasons?
Could it be that it’s under “test conditions” ?
The same conditions that give you BS mileage figures ?
I’ve seen too many manufacturer claims lke sealed for life, or oil spec for transmission which are just plain wrong.
All manufacturers do accelerated life span testing. It’s an approximation of real world. Some things just do not translate in reality.
Have you tried changing plugs in a lot of modern cars? There are perhaps a few that are easy, there are a few that are challenging, and there are a few that are downright difficult. FWIW, I don’t think the plug technology has gotten 10X better but I think with better ECU’s and more sensors the conditions the plugs operate under have vastly improved, leading to the plugs lasting longer. Ditto for oil lasting longer, I think synthetics have come a long way, but also engines now are much tighter than they were 30 years ago, and that combined with better engine management leads to longer oil life. It still gets a lot of shear but it also gets a lot less crap in it.
On my old Suzuki Sidekick I kept 2 spark plug sockets handy. There was a slight difference between them. The plugs were deep inside the valve covers. One socket made it easier to remove the plugs and the other made it easier to install them. It’s been a few years, and I don’t remember quite well, but I think one had a slightly tighter grip on the plug, so as not to drop it when taking it out…
Funny you mention Suzuki, I had a Suzuki bike and a dumb assed friend left it out in the rain and the choke lever literally fused into the cable. I wound up unhooking the cable and it was not hard once you got the hang of it to reach on top of the engine and find the lever the cable pulled on and push it by hand. It looked odd, but it actually had an added benefit. You would naturally let go of the lever when the head got hot, and that was about the time to let out the choke anyway. More times that I care to admit I would go blasting off with the intent to turn the choke off at the end of the block, and forget. With that engine by the time it started running rough from running with the choke on, the plugs were fouled enough that if you stopped the bike you were in for a hard if not impossible time re-starting it. I always had an extra set of plugs with me. In fact that bike got to to buy a controversial device, I got a plug sandbalser that I still use to this day. Mostly on mowers now. People joke about plugs just being a few bucks but they add up, and the PITA factor of having to run into town to get them. I love my little plug sandblaster.
What did you to to that Trans-Am?? Sacrilege! Blaspheme!
What’s next? How to get on a bike?
When I owned a 1994 Suzuki Sidekick, I got to know it quite well over the 18 years.
Once though, I reached between the top of the Front Differential and the Oil Sump, (a tight fit) and I pulled out a threaded metal plug that was sitting up there. I have no idea where it should have been, but it had been there for years.
B^)
I feel your pain regarding the seized cam :( My pride and joy is down because a pin on one of my roller lifters slowly worked its way loose, shaving just enough block material out of the lifter bore onto the #6 connecting rod journal, which led to a spun bearing.
On a side note, I’m relatively new around here and pleasantly surprised to see so many hackers enjoy turning wrenches on cars too! Birds of a feather….