I’ve always thought that there are three things you can do with metal: cut it, bend it, and join it. Sure, I knew you could melt it, but that was always something that happened in big foundries- you design something and ship it off to be cast in some large angular building churning out smoke. After all, melting most metals is hard. Silver melts at 1,763 °F. Copper at 1,983 °F. Not only do you need to create an environment that can hit those temperatures, but you need to build it from materials that can withstand them.
Turns out, melting metal is not so bad. Surprisingly, I’ve found that the hardest part of the process for an engineer like myself at least, is creating the pattern to be replicated in metal. That part is pure art, but thankfully I learned that we can use technology to cheat a bit.
When I decided to take up casting earlier this year, I knew pretty much nothing about it. Before we dive into the details here, let’s go through a quick rundown to save you the first day I spent researching the process. At it’s core, here are the steps involved in lost wax, or investment, casting:
- Make a pattern: a wax or plastic replica of the part you’d like to create in metal
- Make a mold: pour plaster around the pattern, then burn out the wax to leave a hollow cavity
- Pour the metal: melt some metal and pour it into the cavity
I had been kicking around the idea of trying this since last fall, but didn’t really know where to begin. There seemed to be a lot of equipment involved, and I’m no sculptor, so I knew that making patterns would be a challenge. I had heard that you could 3D-print wax patterns instead of carving them by hand, but the best machine for the job is an SLA printer which is prohibitively expensive, or so I thought.
A Pattern of Creativity
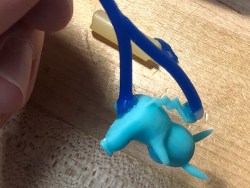
That perception changed when my brother Sam picked up an Elegoo Mars 3D printer. I was surprised that you could get a sub-$300 SLA machine, and absolutely floored by the quality of prints it produced. I was able to pick up some printer resin designed for investment casting, and printed my first pattern- two tiny Pikachus and a rook.
I use PowerResins WAX for my printing resin. It’s pricey but prints really well and burns out cleanly. It does have issues adhering to the build platform, but you can get around that by priming the plate. Some people recommend painting on a few payers of resin and curing them with UV light before printing. I follow a tip I found in this YouTube video and just include a few primer layers in my print. This may seem a bit wasteful, but if it keeps one print from coming off the plate, it’s worth it.
Of course, we can go the classic route here and make our patterns by hand instead. I’ve taken a swing at this and had success making simple things like a ring which I carved from wax, but I would be lost on more intricate designs. Like I said, I’m no sculptor, but it’s fun to carve a pattern manually. Wax is available in many forms — sheets, blocks, ring blanks, and others. There are some real nice carving tools out there which I own now, but my first ring was formed with a pocket knife, a file, and a disc sander. It’s not all about removing material either- since wax is easy to melt, it’s common to fuse parts together to create a finished piece.
Some like to either take their wax model, or something else entirely and make a silicone mold of it before starting the process. That lets them inject hot wax (a process called injection molding) into the silicone to create the pattern, allowing them to save the original. I’ve never tried the process, but its a great way to make multiple copies of a piece.
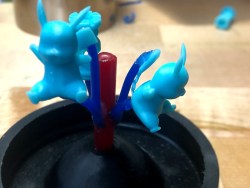
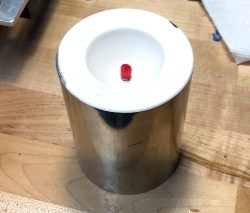
Once we have something to replicate in metal, it’s time to make a tree. The tree is a wax structure that holds all of the wax bits we’ve just made, and once wax is burned out of the mold, acts a guide for the molten metal as its poured. The branches of the tree are often referred to as sprues, and the process as spruing. To form the tree, we start with a central wax rod and attach smaller wax wires to it using sticky wax and a wax pen, which heats up wax to melt it. (Man, that’s a lot of wax.) We can then attach the parts we made to those wires. The tree sits in a rubber sprue base, which will form a bowl in the top of the mold called the button. Now that we have a complete pattern, it’s time to make a mold.
Set in Stone… Well, Plaster
We have a positive of our final part, but now we need to make a negative. We’ll take a steel cylinder called a flask and slip it onto the sprue base. We’ll need some investment plaster here too — standard plaster of Paris won’t cut it, as it won’t stand up to the heat. Thankfully, it’s not hard to get your hands on a bag of the the right material. Less thankfully, it’s nasty stuff. I always wear glasses, gloves, and a respirator with I work with it, and work outside for good measure. I even brush my clothes off before going indoors. It turns out that the ingredient that binds the investment, free silica, can cause cancer when inhaled. I’ve found that if something can withstand high temperatures and gives off powder, you probably shouldn’t breathe it. Anyway, we can mix some of that with water and pour it into the flask. I use a handheld electric mixer, which will never see a kitchen again, to mix my investment.
If we just pour it right in, the final piece won’t come out very nice. The mixing process introduces tons of bubbles into the slurry, and thanks to its high viscosity those bubbles aren’t gonna pop themselves. I like to use a vacuum chamber to debubble my investment before pouring it into the flask- don’t let that scare you though.
My “vacuum chamber” is an old mechanical pump plumbed to a Maxwell House coffee can. While the pump is running and the cup of investment is in the coffee can, I violently tap the chamber for a few minutes to help the bubbles make their way to the surface. Another trick I’ve picked up to get rid of bubbles is to wipe isopropyl alcohol onto the pattern and shake off the excess right before pouring the investment. Some like to paint a think layer of investment on and let it harden before mixing up more to pour into the flask. After pouring, I like to put the whole flask into the vacuum chamber to pull out any remaining bubbles, while tapping the chamber a bit more gently. Once we have a flask full of hardened plaster, we should let it to cure fully: at least an hour or two, but I like to wait overnight.
Getting Burned Out
So we’ve made a replica of our final piece, then entombed it in metal and plaster. Now it’s time to destroy all our hard work by throwing it in a furnace. Well, placing it in a kiln. Very carefully. While wearing gloves and safety glasses.
This part of the process, called burnout, is where we remove the wax/ plastic pattern from the mold. This leaves behind a cavity that, if we’ve done everything correctly so far, is free of ash and ready to accept some molten metal. It’s a bit nerve-wracking, especially if we’ve spent hours carving a wax model.
I like to start the flask out hole-down so that the wax can drip out into a tray as it melts, and then flip the flask hole-up to allow gasses to escape once the melting is complete. Some say to keep it hole-up the entire time. Investment manufacturers have recommended schedules (times and temperatures) to follow, but I like one suggested by Practical Casting by Tim McCreight. I listed the schedule I use in the original blog post I linked at the start of this article. We also have some leeway in our choice of kiln here; for my first few tries, I used a lab furnace I stole off of my brother’s nanofab bench, returning to it every 15 minutes or so to adjust temperatures to follow the scheduled ramps. Now I use a purpose-built programmable kiln.
The last step in any burnout schedule is to hold the flask at a temperature suitable for casting, generally a few hundred degrees below the pouring temperature of the metal. I usually keep it at 1250 °F until I’m ready to pour.
Melting Some Metal
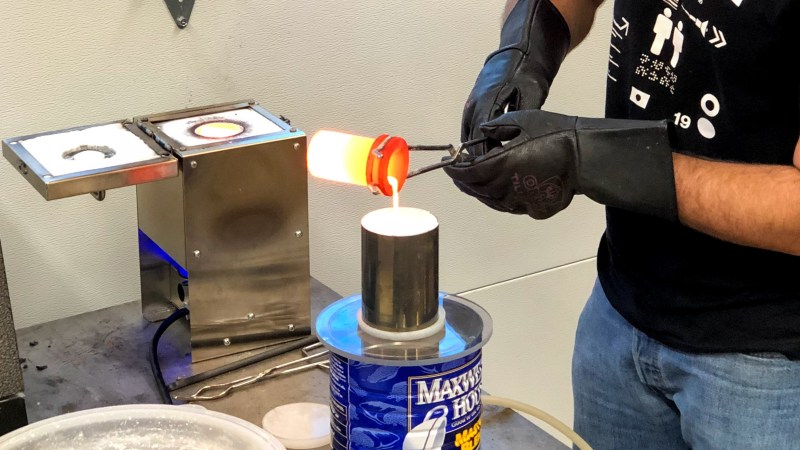
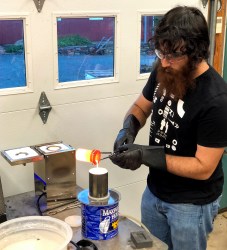
After all that work we finally have a mold, and now it’s time to fill it. Basically, we’ll melt some metal the pour it into the cavity. We’ll need another furnace for this part- while our kiln is keeping the flask hot, we add metal to a crucible, place it in the furnace, and melt it down. Knowing the pouring temperature of the metal is important here- for example, silver melts at 1,763 °F but pours around 1850 °F. I learned that the hard way when silver which appeared molten in my crucible turned solid in the air between the crucible and the flask while I was trying to pour it. We also need to be careful not to boil the metal, which is actually something that can happen.
Similarly to the previous step, I started out with a furnace stolen from Sam before getting one meant for the task. Both my furnace and kiln are small electric ovens made by TableTop furnaces (in America!). I have links to them in the full equipment list in the blog post I linked to.
There are a few ways we can approach the pour. We can take the flask out of the kiln and simply, well, pour the metal. This is known as gravity casting, because we rely on gravity to pull the molten metal down into the mold. It works, but we might see some loss of detail and unfilled crevices where the metal was not able to flow.
Another method is called sling casting, where we put the flask in a holder with a rope tied to it and use our arms to swing the flask in a circle next to us. The centrifugal force helps push metal down into those hard-to-reach spots. I haven’t tried this method, as it terrifies me for obvious reasons.
A slightly more tame version of sling casting is centrifugal casting, where the flask is placed horizontally in a centrifuge, which uses similar action to pull metal into the mold.
My preferred method is vacuum casting. I have a hole in the top of my coffee can vacuum chamber, on which I place a silicone mat (also with a hole through it). The investment plaster is porous, so when I pull a vacuum through the flask, the molten metal is pulled down into the mold.
During the pour, it often doesn’t look like the mold took any metal at all. Instead, it looks like the metal just pooled up in the button rather than flowing through the cavity. This fools me every time, and the pour almost always turns out fine.
Regardless of the method we chose, now we wait a few minutes for the button to cool to a dull red color. At this point, we can quench the flask in a bucket of water. Using tongs, by the way. We’ve been using tongs this whole time. As the water around the flask boils, the investment dissolves and we’ll hear a thud as the metal tree falls to the bottom of the bucket. Wait a minute or so for everything to cool, assuming there’s enough water in the bucket: I use 5 gallons. (Less water = more cooling time.) Finally,we can retrieve the tree and hopefully marvel at how well the process went.
Post Processing
We’re done! Well, almost. We have a metal tree, but what we want is metal parts. Unless the parts we cast are tiny trees, in which case I suppose we have a tree of trees. Now we need to do a few post-processing steps to clean up the parts.
First up is removing them from the tree. We’ll try to cut the part off of the sprue as close to the part as possible. I use a jeweler’s saw and a small hacksaw for this, but a rotary tool or larger saw should work fine too. Once the parts are separated, we can clean them up. I often grind the remnants of the sprue off with a grinding wheel, and touch up the area with a file. Any bubbles or other defects can be similarly dressed up, then it’s off to a tumbler.
I like to tumble with Dawn dish soap and water in stainless steel shot for several hours to polish up the part. This won’t soften the raw cast texture, so if we want to smooth out any surfaces we’ll need to do that with files and sandpaper ahead of time. The post-processing is an art in itself, so we can expect to spend quite a bit of time in this area, depending on the final look we want to achieve. If the as-cast finish is acceptable then the process goes much quicker.
Well, now we’re actually done. All that’s left is to admire the cool thing we just cast, and make our friends jealous with our newfound hobby.
Waxing Philosophical
I’ve been making things with my hands as long as I can remember, but this process feels different from all the others. There’s something existential about spending hours crafting (or even printing) a wax pattern, only to consume it in the process of forming something new. Most steps of this process are a “point of no return” so everything we do must be deliberate, creating as well as destroying. Any mistakes in the wax pattern are carried through to the final metal piece. There are countless ways for it to go wrong, but it’s the most gratifying process I’ve ever worked with.
Maybe I’m reading too far into the whole thing though. All I can say for sure is that I made some cool stuff, and had a ton of fun along the way.


Hmm. It begs the question, wax filament. Better yet, liquid filament, with coloured dye injection during extrusion. 3D printed RYB full colour candles? Mixed media prints with “Dissolvable” [ low temperature meltable ] support materials. Perhaps even parts that can take advantage of waxes high thermal expansion.
Wax filament exists. I’ve printed some and still have most of a spool left over, because PLA prints so much better, is more dimensionally stable (wax distorted/pulled in a lot during printing, separated from the bed, straight walls curved) and PLA burns out beautifully. If you make your mold like a sandcast mold, with a pouring basin/riser and separate vents, you can blow into the riser and blow any remaining ashes out the vents. But I’m getting casts where the z layers are clearly visible with no sign of debris on the faces of the castings without blowing the mold out, so it looks to me like PLA burnout is fine.
yes it works fine. just very little black ashes in the mold. nothing to worry about.
you get great detail.
the wax filament seems to be a waste of money.
Nice going Adam!
PP
Thank you!
go watch vegoilguy on youtube IMHO for tutorials on this. This write up is ok but he really gets into it and does a great job explaining everything especially stuff like burn out cycles and such. great resource
VOG is the man! I actually linked to one of his videos in the article (and talked about him in the blog post on my personal site too). I picked up a lot of useful bits from his videos.
Ransom&Randolph makes casting investment called Plasticast specifically for 3d print material. The shipping’s expensive so if you can, find somewhere semi local for purchase. (LIke Rio Grande if you’re within driving distance of Albuquerque.)
I’ve had really good luck with painting a thin layer of investment onto the model, then coating heavily afterwards, as it doesn’t need vacuum debubbling in that case. (Not applicable for jewelry scale castings, but works well for castings the size of engine parts where a 1mm bubble won’t be a big issue.)
You can mix and match wax and PLA. I usually do all my sprues and forms in PLA and adhere them together with a combination of wax (to smooth joints) and using a soldering iron and some PLA filament just like a TIG welder.
I put my burnout molds on risers so there’s airflow under them, with the sprue vent pointing down, and leave them like that for the whole burnout. It’s done really well for me. I have a small hole in the bottom of the burnout oven with a steel tube through it so the melted out wax or PLA can exit through that rather than needing to be entirely vaporized. It reduces the noxiousness quite a bit.
Since your using wax in the 3D printing process can you join multiple printed pieces, bigger than the printer can print individually, to make a bigger wax cast? You know, like printing a wax model for a big ass sword?
I don’t see why not, though thankfully the printer isn’t the size bottleneck in my setup.
That said, a sword is probably best made via smithing- and that’s a whole other topic!
In bronze we trust….
You can print multi-section molds that dovetail together, or stick them together with double-stick tape, but running a cool soldering iron along the joint works really well.
This is generally how jewelers assemble multi-part casting trees, although they use something more specialized than a soldering iron. A wood burning tool also works fine. (So does a 2 watt laser diode.)
Sometimes you WANT a multi part mold. Engine head casting, for instance, has a bottom part, then you place in a core for the water cooling jacket, then you put the top part in, and pour in the investment around it. Though with that cool new Creality belt platform printer, you can print stuff that’s arbitrarily long in one dimension, and swords are one of the main things people are making.
you might look to the Jewelry Industry for tools for wax carving. in particular, try here…. https://contenti.com/jewelry-casting-supplies/wax-working-tools/electric-wax-worker
Absolutely. Common practice in the casting industry. After all, that’s how all the fill pipes and vents are added.
> I’ve found that the hardest part of the process for an engineer like myself at least, is creating the pattern to be replicated in metal
Later:
>Basically, we’ll melt some metal the pour it into the cavity. We’ll need another furnace for this part- while our kiln is keeping the flask hot…
…yeah, I’m gonna say that’s the most prohibitive part. lol
Yeah, kinda. But look in the picture of Adam pouring — that small metal box off to the left is the furnace in question. A kiln will/should be a bit bigger, but it’s still something you could easily pull off space-wise in a garage or (vented) workshop.
It’s just going to depend on the metal, ZAMAK (pot metal) melts around 800*F and Aluminum is 1200*F, both are doable in the home garage fairly cheaply.
Man this sounds like so much work! It doesn’t sound like a very fun project either. Great job on following through and reporting back all your hard work to us. Do you think using a cnc machine to make a mold then advanving to doing the pour might cut much of the trial, error and messy middle work out of the process?
I’ve been watching casting videos the last few months or more. Looks like a cool hobby to get into. Lost wax/PLA looks to be interesting too. I’ve thought of doing bronze boat parts rather than just ingots or generic coins. Nice write up
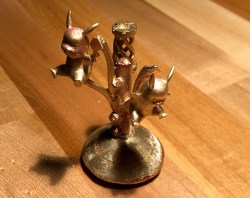
I feel sorry for that poor Pikachu on the right.
Nintendo IP? Enjoy your DMCA takedown request.
(good job tho)
Just a minor comment-silica is not a binder. And every bag of mason’s sand that is sold (in my neck of the woods, at least) has the warnings about silica dust inhalation. Because sand is silica. Sorry to be pedantic….
Mineral dust in general is bad news for your lungs because of the size.
Really informative, thanks dude!!
How hard is it to hit the dimensions you want, considering thermal expansion and contraction. If you have to get that right do you have to make you PLA object a little bigger or smaller than the dimensions you need for the final object? If so, do you have to do a lot of calculation on thermal expansion of different materials in order to get it right?
Thanks.