Metal Plating Plastic Or Metal Parts

Like most of us, [Clem] wants to 3D print in metal. Metal 3D printers do exist, but they are generally way out of reach for most of us garage hackers. As an alternative, [Clem] uses a homebrew electroplating system to get prints with a metallic coating.

The setup is quite simple. Small glass jars to act as the plating tanks and the machine uses an Arduino controller along with a PCB to hold things like a relay to control the 24V used for electroplating. To keep everything tidy, [Clem] designed a 3D printed box that stores all the cables and chemicals when you aren’t using them. Since the parts might get hot, the plastic is PETG.

The trick is that parts need to be conductive in order to use electroplating — typically plastic isn’t conductive. [Clem] paints the plastic parts to grant them conductivity. Graphite paint didn’t give great results. However, an iron-based paint worked better but obscures detail on the print. In addition to galvanization (plating with zinc or steel) you can see copper plating of a nail at around the 12 minute mark, with a plastic plating demo a minute later. The machine can even plate gold using an expensive gold-bearing electrolyte. In the video comments, someone also mentioned that it would be interesting to try plating conductive filament without using the paint. [Clem] tried to remove rust from a big part, but the power supply wasn’t up to the task.

Copper plating is often used as a step to make a part conductive so you can then plate with another metal. In addition to copper sulfate, you can use copper acetate. Sometimes, getting metal into fine details can be tough and it is easier to use a pen to plate those areas directly.

Continue reading “Metal Plating Plastic Or Metal Parts”

Simple Christmas Tree Christmas Tree Ornament

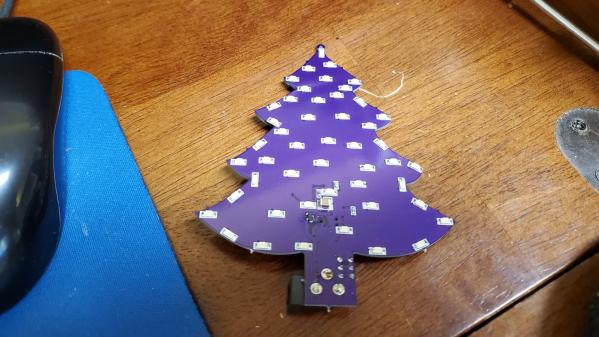
When the only tool you have is a hammer, every problem looks like a nail. An LED ornament for the Christmas tree can be built in any manner of simple, easy implementations. You certainly don’t need an ARM Cortex M4 CPU running at 120MHz having a mouthful of three letter features like FPU, ETM, ETB, ECC, RWW, TCM, EIC, AES, CAN bus and much, much more. But [Martin Held] built a super simple LED Christmas tree ornament using the ATSAME51 series micro-controller, which he regularly works with and had on hand, and lots of bi-color LEDs. He already had schematic symbols and programmers for the device from other projects where he uses it more extensively, so putting it all together in time for the festive season was that much faster for him, despite the fact that the micro-controller was most likely the cheapest part of the BOM, besides the passives.

At this point it might be tempting to argue that it would have been so much simpler to use addressable LED’s, such as the WS2812B or the APA102C. You can drive them using a more basic micro-controller, and not require so many GPIO pins. But using such “smart pixel” LED’s for hand assembled prototypes can sometimes lead to unexpected results. If they are not stored in sealed tape/reel form, then storage conditions can have an adverse effect leading to dead pixels. And, they need a specific baking procedure before being soldered. Doing that for a few LEDs at home can be tricky.

So for the LED’s, he again went a bit off the beaten path, selecting to use three different color styles of bi-color LED’s with easy to hand-solder, 1206 footprints. This allows him to get a fairly random mix of colors in the completed ornament.
The LED array is pseudo-charlieplexed. One terminal of each LED goes to a GPIO pin on the micro-controller and the other terminal of all the LED’s are connected to a single complimentary pair of N-channel/P-channel MOSFETs — connected in totem-pole fashion. Depending on which MOSFET is switched on via a GPIO pin driving the gate pin high or low, the second terminal of each LED gets connected to either supply or ground. In combination with the GPIO pins being driven high/low, this allows the bi-color LED to be biased in either direction. Getting each LED to emit one color is simple enough — setting all LED GPIOs low, and MOSFET gate GPIO high will bias the LEDs in one direction. Reverse the GPIO logic, and the LEDs will be biased in the other direction. If this is done slow enough, the two colors can be differentiated easily. If the driving logic is made fast, changing states every 10us, the two separate colors merge to form a third hue. With some clever bit of code, he also adds some randomness in the GPIO output states, resulting in a more appealing twinkling effect. [Martin] does a detailed walk through in the video embedded below.

If you have the same bunch of parts lying around and wish to replicate the project, be warned that the KiCad source files will need some work to clean up errors — [Martin] was in a hurry and knew what he was doing so there are some intentional mistakes in the schematic such as using the same symbol for the N-channel and P-channel MOSFETs, and uni-directional LED symbol in place of the bi-directional one. And for programming, you will need one of these pricey pogo-pin style cables, unless you decide to edit the PCB before sending off the Gerbers.

[Martin] built just three of these bespoke ornaments, retaining one and giving away the other two to a neighbour and a co-worker. But if you would really like to build a tree ornament with addressable LEDs, then check out the Sierpinski Christmas Tree which can be cascaded to form an array of tree ornaments.

Continue reading “Simple Christmas Tree Christmas Tree Ornament”

A Fresh Linux For The Most Unexpected Platform – The Nintendo 64

Though it was famously started by Linus Torvalds as “a (free) operating system (just a hobby, won’t be big and professional like gnu) for 386(486) AT clones“, the Linux kernel and surrounding operating system ecosystems have been ported to numerous architectures beyond their x86 roots. It’s therefore not unusual to hear of new ports for unsupported platforms, but it is extremely unexpected to hear of one when the platform is a games console from the mid-1990s. But that’s what [Lauri Kasanen] has done, announcing a fresh Linux port for the Nintendo 64.

This isn’t a Linux from 1996 either. The port builds on an up-to-date kernel version 5.10 with his N64 branch and a tantalising possibility that it might be incorporated into the main Linux source for the MIPS-64 processor architecture. That’s right, the Nintendo 64 could be an officially supported Linux platform.

It would be stretching the story a long way to call this any kind of distro, for what he’s produced is a bootloader that loads the kernel and creates a terminal with busybox loaded. With this on your flashcart you won’t be replacing that Raspberry Pi any time soon, so why other than [Lauri]’s “because I can” would you be interested in it? He supplies the answer and it lies in the emulation scene, because having a Linux for the platform makes it so much easier to port other software to it. If this tickles your fancy you can see the source in his GitHub repository, and we’re certainly looking forward to what the community will do with it.

We are more used to seeing the N64 as a subject for case-modding, whether it be as a handheld or a an all-in-one console.

Via Phoronix, and thanks [David Beckershoff] for the tip.

Header image: Evan-Amos, Public domain.

DIY Injection Molding Press

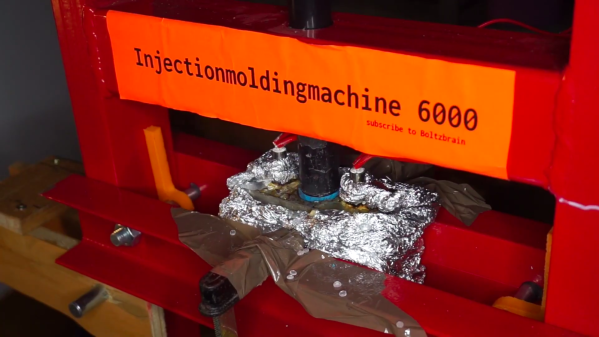
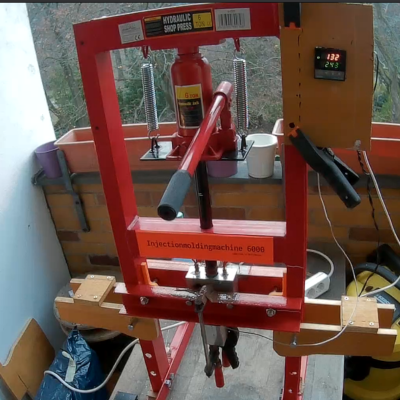
While 3D printing has now become easily accessible and cheap, there are still several use cases where you need the advantages offered by injection molding, even for small batch runs. Professional small-batch injection molding can be pretty expensive, and buying a manual machine can cost quite a bit. Of course, there are a number of DIY injection molding projects to choose from, but they usually involve a fair amount of tools and labour. [Bolzbrain] wanted to bypass all of the heavy cutting, welding and frame assembly work, so he’s built himself a DIY Injection Molding Press for cheap using an off the shelf, six ton hydraulic press. At final count, he ended up spending about €150 for the machine and another €120 for tools to build the machine. He also managed to locate a cheap, local CNC service that gave him a good deal on machining the Dies. But of course you can’t put a price on the lessons learnt and the satisfaction of having built it by hand.

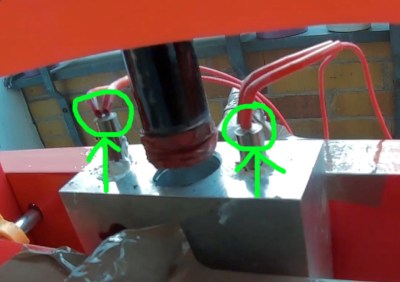
Choosing the hydraulic press is a great idea as it provides the high pressure needed for the job without the operator having to exert a lot of effort, which is a big drawback with some of the other DIY machines. As a bonus, the structural frame is quite sturdy and well suited for this purpose. The other main part of such a machine is the heated injection block and there are several different ways of doing it. After some amount of studying probable solutions, he decided to build a heated aluminium block through which the plastic granules can be rammed using the hydraulic piston. Heating is provided by a pair of 500W heaters and a type ‘k’ thermocouple does temperature sensing. An industrial PID controller adjusts the block temperature via a solid state relay. Overall, the electrical and mechanical layout cannot get any simpler.

[Bolzbrain] did a great job of documenting his build over a series of videos and more wizened hackers watching them will squirm in their seats spotting the numerous fails. He bought the cheapest pedestal drill machine that he could buy and watching the drill struggle while making a 26mm hole in the aluminium block is quite jarring.

The electrical wiring has a lot of scope for improvement – with 220V AC heaters, exposed wiring and jury rigged panel held up with a pair of clamps. Installing and removing the die is a task and requires a lot of fiddling with several C-clamps — something which needs to be repeated for every shot. Maybe toggle clamps could help him to ease die fixing and removal. Once he figures out about mold release agents and wall draft angles, he won’t have to struggle trying to remove the molded article from the die. Then there’s the issue of proper runner design so that the thermo-plastic can quickly fill the mold cavity completely without any pockets.

But in the end, all that matters is that he is getting reasonably good molded parts for his purposes. With more tweaking and incremental improvements, we’re sure he’ll get better results. The video after the break is a short overview of his build, but the project page has a series of detailed videos covering all aspects of the project. And if you’d like to get an introduction to desktop injection molding, check out “Benchtop Injection Molding for the Home Gamer

Continue reading “DIY Injection Molding Press”

The Internet Of Christmas Tree Watering

There’s nothing quite like a real Christmas tree, but as anyone who’s had one will know there’s also nothing like the quantity of needles that a real tree can shed when it runs short of water. It’s a problem [RK] has tackled, with a Christmas tree water level monitor that has integration with Adafruit’s cloud service to give a handy phone notification when more watering is required.

The real interest in this project lies in the sensor development path. There are multiple ways of water level sensing from floats and switches through resistive and light scattering techniques, but he’s taken the brave step of using a capacitive approach. Water can be used as a dielectric between two parallel metal plates, and the level of the water varies the capacitance. Sadly the water from your tap is also a pretty good conductor, so the first attempt at a capacitive sensor was not effective. This was remedied with a polythene “sock” for each electrode constructed with the help of a heat sealer. The measurement circuit was simply a capacitive divider fed with a square wave, from which an Adafruit Huzzah board could easily derive an amplitude reading that was proportional to the water level. The board then sends its readings to Adafruit.io, from which a message can be sent to a Slack channel with the notification enabled. All in all a very handy solution.

Plant care is a long-running theme in Hackaday projects, but not all of them need a microcontroller.

Domino Layer Lets You Focus On Toppling

Knocking dominoes down is a fun pastime for a rainy afternoon, but setting them all up can be a drag. Thankfully, [Lewis] of [DIY Machines] has built a helpful machine to do the job for you, letting you focus on the fun part instead!

The machine is run by an Arduino Uno, that can be pre-programmed with a layout or controlled over Bluetooth in real time. It uses a geared-down DC motor to drive around a smooth surface, with a servo for steering. A second servo is used to turn a carousel loaded with up to 130 dominoes, allowing the machine to lay long runs without needing a refill. It’s designed to be easy to change so multiple carousels can be printed to quickly run courses of extended lengths.

The build is a great example of a machine capable of doing a tricky task with ease, thanks to 3D printing and smart design. We’re particularly impressed with the simple domino transport mechanism integrated into the drive system without requiring extra motors or servos. It’s not the first domino layer we’ve seen, either. Video after the break.

Continue reading “Domino Layer Lets You Focus On Toppling”

Number Bases Stretch The Mind

Some of us might solve crossword puzzles or Sudoko games to exercise our minds, but [Nathan Nichols] plays with exotic number systems to keep the brain cells in shape. He wrote the Hanoi C99 library while in high school, implementing several of his favorites.

We have all been using decimal (base 10) and duodecimal (base 12, as in clocks) since before grade school. Us computer geeks are also adept at various computer-friendly systems like binary, octal, and hexadecimal. The true nerds among us will be familiar with systems like vigesimal (base 20 Mayan numerals) and sexagesimal (base 60 Babylonian numbers). We ourselves espoused the virtues of seximal (base 6) a couple of years ago. But if you really want to stretch your mind, take a dive into the weird number systems that [Nathan] has been exploring.

Negabinary (base -2)

The lowest level of weirdness in the group, this one is almost normal. Its the same as binary, except the bit weights have alternating signs: { 1, -2, 4, -8, ... }.

Binarions (base -1+i)

Or base -1+j if you studied electrical engineering. The use of complex numbers as radices was proposed by Donald Knuth way back in 1955. We find it really hard to imagine this one being helpful.

Fibonacci base

Numbers can also be represented by the summation of a sequence of Fibonacci numbers. Using this system, a number can sometimes be represented more than one way, so watch out.

Stern-Brocot tree

A number is represented by its path down the Stern-Brocot tree. One feature of this system is that numbers can be exact. For example, the Stern-Brocot tree representation of one-third has a finite number of digits.

While [Nathan]’s library only performs conversion at input or output, we wonder if someone will take this further and implement an arithmetic unit inside an FPGA. Besides being a fun exercise, it would baffle someone casually trying to reverse engineer your secret calculations. Let us know of any strange number systems you have used or encountered.