Domino Ring Machine Tips Tiles In A Never-ending Wave

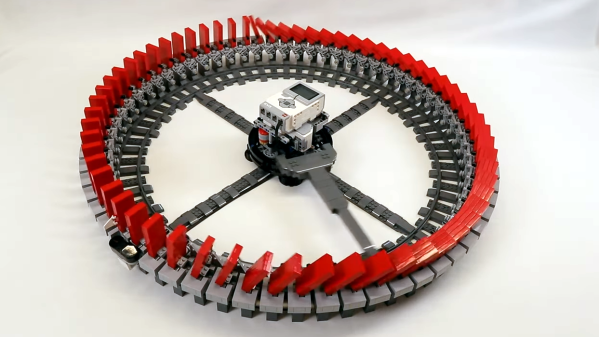
Like to see dominoes fall? [JK Brickworks] has got what you need, in the form of a never-ending ring of falling and resetting tiles. LEGO pieces are the star in this assembly, which uses a circular track and moving ramp to reset tiles after they have fallen. Timed just right, it’s like watching a kinetic sculpture harmoniously generating a soliton wave as tiles fall only to be endlessly reset in time to fall again.
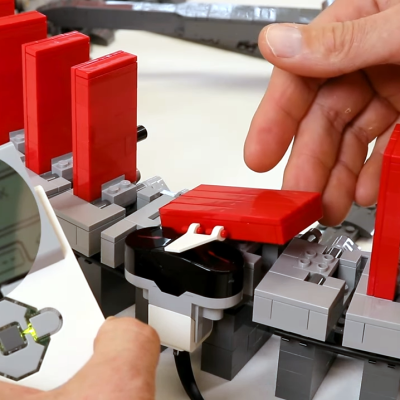
A Mindstorms IR sensor monitors a tile’s state for timing.

It’s true that these chunky tiles aren’t actually dominoes — not only are they made from LEGO pieces and hinged to their bases, they have a small peg to assist with the reset mechanism. [JK Brickworks] acknowledges that this does stretch the definition of “dominos”, but if you’re willing to look past that, it’s sure fun to see the whole assembly in action.

The central hub in particular is a thing of beauty. For speed control, an IR sensor monitors a single domino’s up/down state and a LEGO Mindstorms EV3 with two large motors takes care of automation.

The video does a great job of showing the whole design process, especially the refinements and tweaks, that demonstrate the truly fun part of prototyping. [JK Brickworks] suggests turning on subtitles for some added details and technical commentary, but if you’re in a hurry skip directly to 4:55 to see it in action.

Want to see more automated domino action? This domino-laying robot sets them up for you to knock down at your leisure, and this entirely different robot lays out big (and we do mean BIG) domino art displays.

Continue reading “Domino Ring Machine Tips Tiles In A Never-ending Wave”

Domino Layer Lets You Focus On Toppling

Knocking dominoes down is a fun pastime for a rainy afternoon, but setting them all up can be a drag. Thankfully, [Lewis] of [DIY Machines] has built a helpful machine to do the job for you, letting you focus on the fun part instead!

The machine is run by an Arduino Uno, that can be pre-programmed with a layout or controlled over Bluetooth in real time. It uses a geared-down DC motor to drive around a smooth surface, with a servo for steering. A second servo is used to turn a carousel loaded with up to 130 dominoes, allowing the machine to lay long runs without needing a refill. It’s designed to be easy to change so multiple carousels can be printed to quickly run courses of extended lengths.

The build is a great example of a machine capable of doing a tricky task with ease, thanks to 3D printing and smart design. We’re particularly impressed with the simple domino transport mechanism integrated into the drive system without requiring extra motors or servos. It’s not the first domino layer we’ve seen, either. Video after the break.

Continue reading “Domino Layer Lets You Focus On Toppling”

Domino Clock Tells The Time In Style

It seems there are as many ways to display the time as there are ways to measure it in the first place. [Kothe] saw a fancy designer domino clock, and wanted a piece of the action without the high price tag. Thus, the natural solution was to go the DIY route.

An Arduino Nano is the heart of the build, paired with a DS1307 RTC for accurate timekeeping. The case of the clock consists of a 3D printed housing, fitted with layers of lasercut acrylic. Behind this, a smattering of WS2812B addressable LEDs are fitted, which shine through the translucent grey plastic of the front panel. This enables each LED to light up a dot of the domino, while remaining hidden when switched off. Reading the time is as simple as counting the dots on the dominoes. The first domino represents hours, from 1 to 12, while the second and third dominoes represent the minutes.

As a timepiece, the domino clock serves well as a stylish decor piece, and could also be a fun way to teach kids about electronics and telling the time. Makers do love a good timepiece, and our clock tag is always overflowing with fresh hacks on a regular basis. If you’ve got your own fancy build coming together at home, you know who to call!

One-Motor Domino Laying Machine Works For Tips

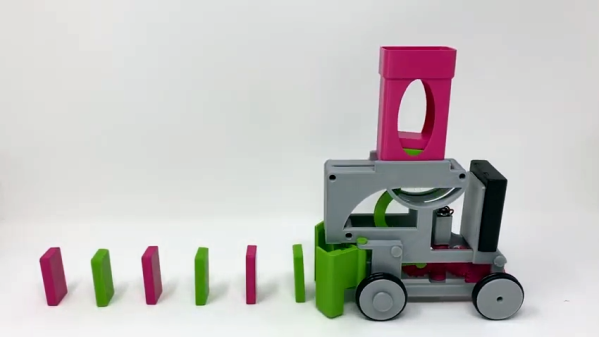
[Gzumwalt] did things a little differently with his Pink and Green Domino Machine II, a 3D printed device that drops dominoes in a neat row ready for toppling over. Unlike his earlier version, this one holds dominoes laying flat in a hopper that’s accessible from the top for easy loading. The previous unit had an elegance to it, but it was more limited with respect to how many dominoes it could hold at a time. This new version solves that problem while also showing off a slick mechanism that gracefully slides a domino from the bottom of the hopper, then gently positions it standing on end before opening a rear door to let it out as it moves to the next position. One of the interesting things [gzumwalt] discovered when designing this device was that there isn’t really a “standard” size of domino. That’s one of the reasons the demo uses 3D printed blocks.

Pulling this off with a single small DC motor is a remarkable achievement; the mechanism even stably ejects a positioned domino from the rear without halting its forward motion in the process. An animation of how the mechanism works is embedded below, be sure to check it out!

Continue reading “One-Motor Domino Laying Machine Works For Tips”

Wooden domino row setup machine

Wooden Domino Laying Machine

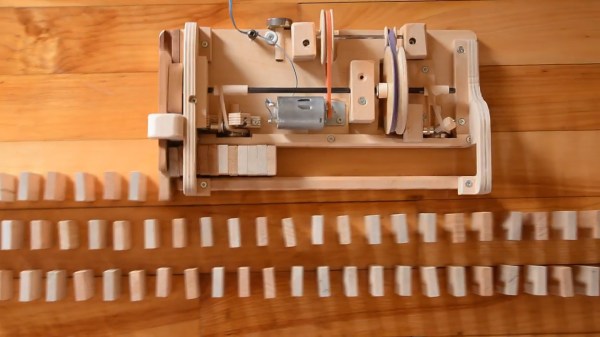
[Matthias Wandel]  has come up with another awesome machine, this time a machine that sets up neat rows of dominos. If you’ve followed [Matthias]’s work over the years then you’ll know that this is a wooden version of one he made out of LEGO® back in 2009.

In true [Matthias] fashion he uses just the one motor both for moving the machine along and for pushing the dominos in place. Not satisfied with that efficient use of parts, the rubber band belts that transfer rotation from the motor shaft to the wheels (bearings) double as the rubber surfaces for those wheels. One of many joys from watching [Matthias] work is seeing how he forms wood into shapes that most people would have trouble sculpting from clay. In this case he does this when he needs parts for reaching over his domino magazine to hold a guide rail in place, and of course the parts are well-rounded and clean-looking.

You might also ask, where did he get all the wooden blocks for dominos? He made them of course, all 300 or so.

Be sure to check out the video below of both the build, and of it in action.

Continue reading “Wooden Domino Laying Machine”

Making Metal Dominoes

Nearly as versatile as a deck of playing cards, dominoes are a great addition to any rainy-day repertoire of game sets. [Apollo] from the Youtube channel [carbide3d] has manufactured for themselves a custom set of domino tiles replete with brass pips.

Cutting the bar stock to the appropriate size, [Apollo] ran a few test engravings and hole sizes for the brass pips. That done, all they had to do was repeat the engraving and milling process another couple dozen times, as well as all the requisite wet and dry sanding, and buffing. [Apollo] opted to use paint marker to add a little extra style to the tiles, and advises any other makers who want to do the same to set their engraving depth to .01″ so  the paint marker won’t be rubbed off when buffing the pieces.

When it came to installing the brass balls, [Apollo] undersized the holes by .001″-.002″ for a snug press fit — adding that the hole depth is a little greater than half the ball’s diameter. They used 1/8″ balls for the pips, and 3/16 balls for the center of the tiles which also allows the tiles to be spun for a bit of fidgeting fun during play. Check out the build video after the break.

Continue reading “Making Metal Dominoes”

Kickstarting Router-Based Development Boards

[Squonk] is rather famous in the world of repurposed routers, having reverse engineered the TL-WR703N wireless router from TP-Link a few years ago. With that knowledge, he’s developed an open platform for Things on the Internet called Domino. It’s pretty much exactly what you would get by cracking open a router bought on AliBaba, only in a much more convenient package with many more pins broken out.

The Domino builds on [Squonk]’s reverse engineering efforts of the TP-Link TL-WR703N wireless router, the router that has stolen the thunder from the Linksys WRT54G for all those sweet, sweet, embedded hacks. Both the 703N and the Domino are built around the Atheros AR9331. While the router version of this chipset only breaks out a few GPIOs and other interesting pins, the Domino breaks out just about everything – GPIO, JTAG, I2S, UART, SPI, USB, and Ethernet can be found on the device.

The basic Domino can hopefully be had with a $25 pledge to the Kickstarter campaign. That’s a little less than the normal price for a WR-703N, and if you’re putting a router in a hat it might be worth your while. There are a few advanced versions that include an ATMega32u4 microcontroller, making it compatible with the Arduino Yun as well.