Resin casting is a fantastic way to produce highly detailed parts in a wide variety of colors and properties, and while the process isn’t complicated, it does require a certain amount of care and setup. Most molds are made by putting a part into a custom-made disposable box and pouring silicone over it, but [Foaly] was finding the process of making and re-making those boxes a bit less optimized than it could be. That led to this design for a re-usable, modular, adjustable mold box that makes the workflow for small parts considerably more efficient.
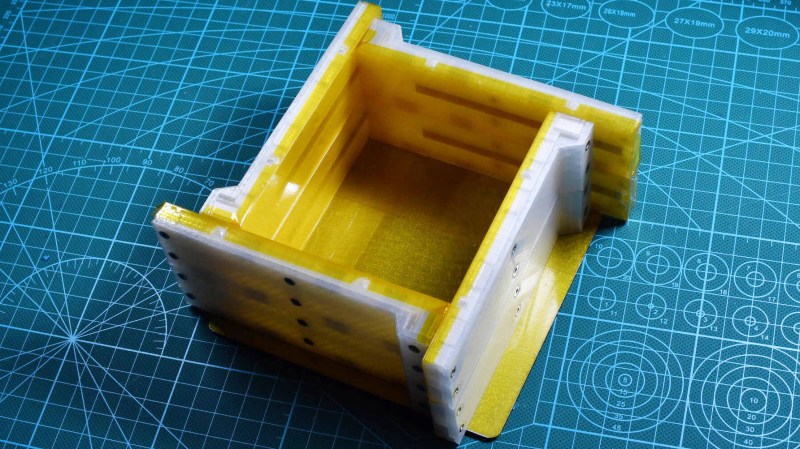
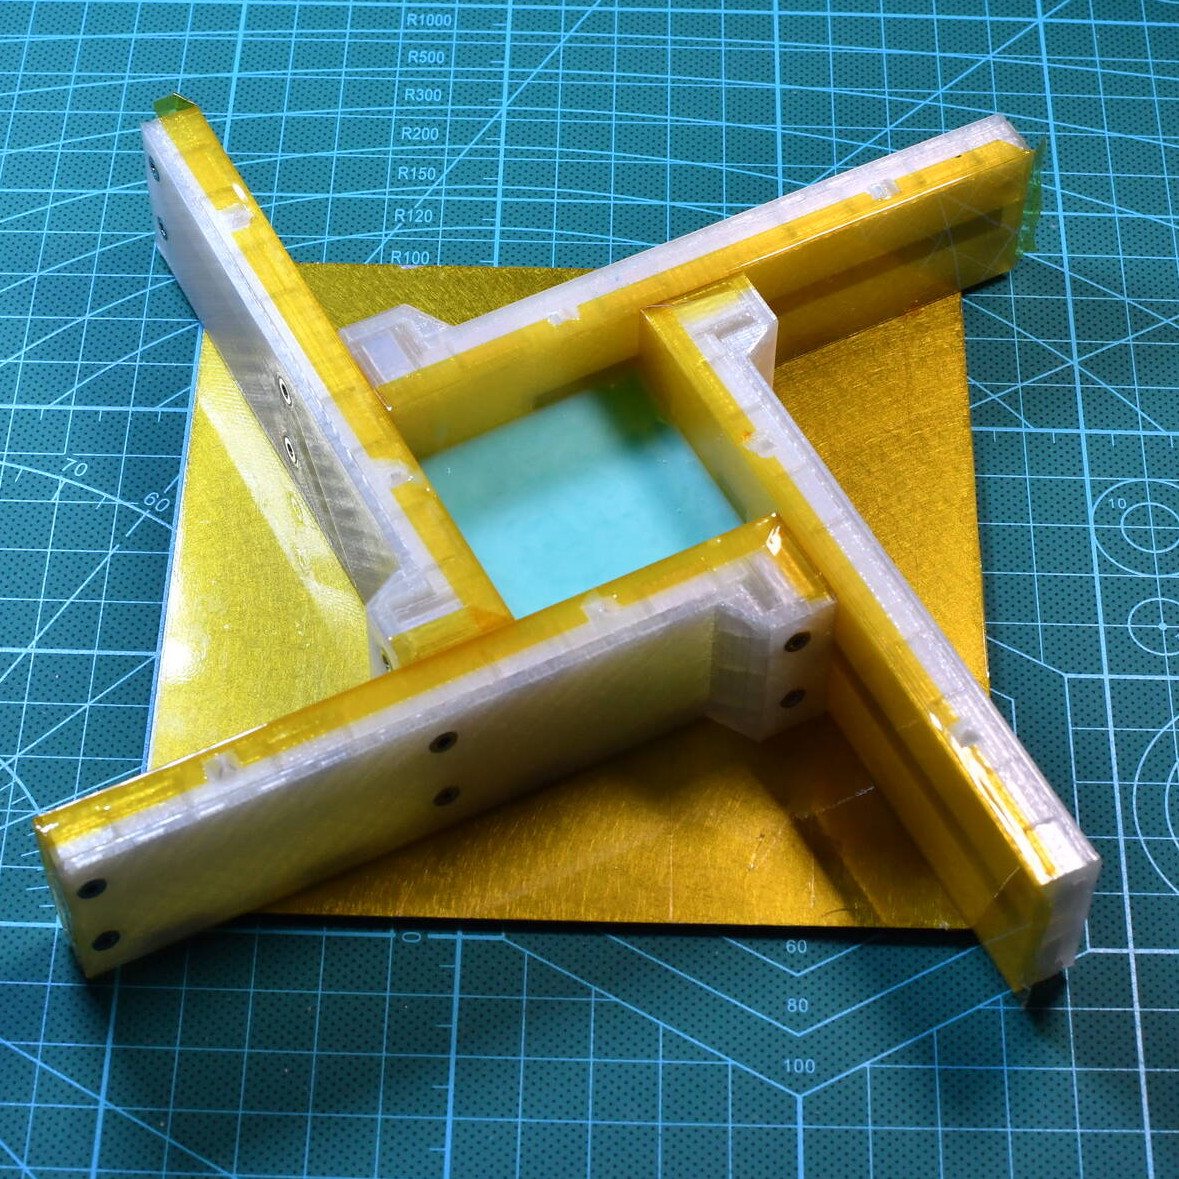 The walls of the adjustable box are four identical 3D-printed parts with captive magnets, and the base of the box is a piece of laser-cut steel sheet upon which the magnetic walls attach. The positioning and polarity of the magnets are such that the box can be assembled in a variety of sizes, and multiple walls can be stacked to make a taller mold. To aid cleanup and help prevent contamination that might interfere with curing, the inner surfaces of each piece are coated in Kapton tape.
The result is a modular box that can be used and re-used, and doesn’t slow down the process of creating and iterating on mold designs. The system as designed is intended for small parts, but [Foaly] feels there is (probably) no reason it can’t be scaled up to some degree. Interested? The design files are available from the project’s GitHub repository, and if you need to brush up a bit on how resin casting works, you can read all about it here.


Legos and a plastic bag is the correct answer.
This is probably cheaper.
Dunno you can get a 1lb bag of “locking bricks” at the dollar store
Lego and food packing film (this thin thing for sandwitches) ;)
I’ve used old Lego before, it certainly works quite well. But it takes time to build, any silicon that manages to find a way can really seep into the cracks and gum everything up. This should make much cleaner molds having so few joints etc, which is great if you have many of them to store, and is just good and speed and convenience in production, which Lego really isn’t.
This also has an easy use after the mold making – supporting and holding the mold together neatly – to get a perfect distortion free casting means very thick molds or having something that can constrain the mold to its correct size (and not crush it itself). This looks like it should be great for that, Perhaps make the foot part that joins each side a little longer so it is more stable and can have and extra set of magnets (if needed) when stood on the baseplate upright – you often pour the resin in perpendicular to the plane you poured the silicon so with this system could end up with very long molds you want to stand upright and just putting one side as a clamp upright to hold each half would be good. And that is something you can rarely do with Lego – as its just to awkward to work around Lego’s geometry.
As someone who makes molds with multiple media for both glass casting and ceramics, I LIKE this. I’ve pondered how to make something similar, and have always gotten distracted, never finishing the thought experiments. Some 3D printing and I’m on my way to cast in silicone, refractory investment products and plaster of paris. Very cool!
Great modern take on the cottle board. I definitely see this being useful for small molds.
I didn’t know it had a name, thanks !
Cheapest and easiest method is to cover corrugated cardboard with clear packing tape then hot glue together. You can make any size mold you need and do things like angled corners to save on silicone. I pressure cast all my silicone molds. Zero bubbles without needing to put the silicone in a vacuum chamber and absolutely no voids left at sharp inside corners.
Back when I started doing silicone mold making, I made myself a few different sized set of these L boards and held them together with C clamps. Didn’t matter how much I put the silicone under vacuum or how I poured it in, the molds almost always had issues that negatively affected the urethane resin castings. So I thought? “What if I put the molds into the pressure tank?”. Perfection! Haven’t used my Gast rotary vane vacuum pump in nearly 20 years. The motor got taken from it as part of refurbishing an antique metal lathe.
What I noticed about RTV silicone is that any tiny bubbles in it will “stick” on vertical surfaces of the item the mold is being made from. But they don’t make contact with the item, they hang just beneath the surface rather than floating up to the top. then when resin is pressure cast in the mold those bubbles collapse. That causes bumps and spikes on the casting, or if the bubble breaks, resin flows in to form a little ball connected to the casting. When demolded, those balls tear the mold.
A pressure pot and a small air compressor are your two best tools for silicone mold making and resin casting. Use them well and say buh-bye to bubbles.
I’ve never had that issue, perhaps you are pressure casting at too high a pressure (it really doesn’t need all that much), or pouring the silicon badly mixing in lots of air. I found the vacuum the silicon before the pour, then pour at a very slow rate from large height off to one side and let it flow works best for the mold, no need to do anything else while it cures, then pressure or vacuum cast the part – choice depending on which seems best for that part.
Still find a method that works for you and the supplies you can get (all the issues could just be different grades of raw materials too) – doesn’t matter what it is as long as its safe and effective enough.
Sounds interesting. Do you have any of your work posted online anywhere? I’m just starting to experiment with silicone molding, and I’d love to see videos or photos of your work flow for reference.
Pressure casting is a must for good results.
Pressure pots seem to be readily available in the US, but here in Europe they are way harder to find and prohibitively expensive, so I built mine. It’s based around an old fire extinguisher, I cut the top and had someone weld a 10mm laser-cut steel plate as a base, onto which the (again, laser-cut steel plate) door is bolted with 16 8mm bolts. More recently, I improved the design by making a new front end that is permanently bolted on the base and features a large opening in a kind of half-circle shape, and the door is a 10mm acrylic plate with a handle as well as magnets and a silicone seal on the side that slides into the opening and rests on the inside of the front plate. The seal is compressed by the air pressure pushing on the door, which makes for an excellent airtightness, and more importantly opening and closing the pressure chamber is a lot quicker now that I don’t have to tighten and release 16 bolts every time. It allows me to use some quick resins (~3min pot life) that I couldn’t pressure-cast before because of this.
I might write a post to explain and illustrate that design some day in case someone is interested, but until now I resisted the idea because home-made pressure pots can be very dangerous if not done properly and I wouldn’t want someone to hurt themself trying to replicate the idea badly.
That was meant to be a reply to [Gregg Eshelman] above…