Retrotechtacular: Discovering Aerodynamics With The Chrysler Airflow

When you think about it, for most of human history we’ve been a pretty slow bunch. At any time before about 150 years ago, if you were moving faster than a horse can run, you were probably falling to your death. And so the need to take aerodynamics into consideration is a pretty new thing.

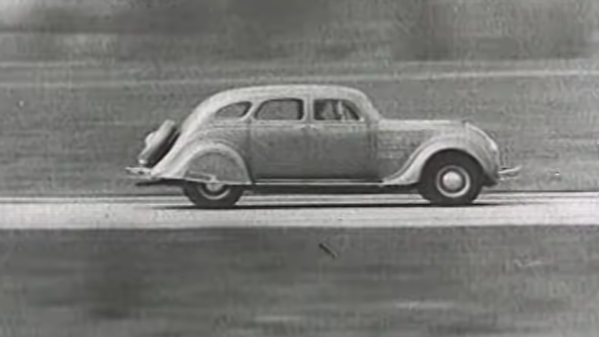
The relative novelty of aerodynamic design struck us pretty hard when we stumbled across this mid-1930s film about getting better performance from cars. It was produced for the Chrysler Sales Corporation and featured the innovative design of the 1934 Chrysler Airflow. The film’s narration makes it clear why the carmaker would go through the trouble of completely rethinking how cars are made; despite doubling average engine horsepower over the preceding decade, cars had added only about 15% to their top speed. And while to our 21st-century eyes, the Chrysler Airflow might look like a bulked-up Volkswagen Beetle, compared to the standard automotive designs of the day, it was a huge aerodynamic leap forward. This makes sense with what else was going on in the technology world at the time — air travel — the innovations of which, such as wind tunnel testing of models, were spilling over into other areas of design. There’s also the influence of [Orville Wright], who was called in to consult on the Airflow design.

While the Airflow wasn’t exactly a huge hit with the motoring public — not that many were built, and very few remain today; [Jay Leno] is one of the few owners, because of course he is — it set standards that would influence automotive designs for the next 80 years. It’s fascinating too that something seemingly as simple as moving the engine forward and streamlining the body a bit took so long to hit upon, and yet yielded so much bang for the buck.

Continue reading “Retrotechtacular: Discovering Aerodynamics With The Chrysler Airflow”

Wood And Brass Drink Temperature Monitor Looks Good, Has Class

We’ve all been there. Your current project has hit a wall, or the next step will take days to complete, and you need something to do in the meantime. So you start a project that you envision will fit nicely in the gap, and then, inevitably, it doesn’t. Maybe it even takes so long that the original project gets finished first. So what? There’s nothing wrong with that, especially when the filler project turns out as well as this drink temperature monitor disguised as a circuit sculpture (video, embedded below). Just put your mug on the coaster, and the weight of it activates a hidden switch, which causes the sculpture to display its secret LEDs.

[MakeFunStuff] wanted to make something that looked less like a circuit and more like art, while building a tool that could determine the relative hotness of a beverage. Such a a useful circuit sculpture sounds like a tall order to us, but [MakeFunStuff] pulled it off with finesse and style.

The circuit is based around this Sputnik-looking standalone IR temperature sensor which, as [MakeFunStuff] aptly describes, is “a single-pixel infrared camera that picks up everything in a 90° cone starting at the sensor.”

[MakeFunStuff] paired this easy-to-use sensor with an Arduino Nano and five LEDs that show how hot a beverage is on a scale from 1 to 5. The sensor is hidden in plain sight, suspended from the top of the brass rod sculpture and blending in perfectly. We love that the LEDs are hidden behind a thin layer of carefully-drilled wood and agree that a drill press would have been much easier.

The code is set up for just about every temperature scale from Celsius to Rømer, so that solves that argument. [MakeFunStuff] went with the Kelvin scale because science. Our favorite thing about this video is that [MakeFunStuff] shared their failures and fixes as they built their way toward answering the questions of how to suspend the sensor over the drink, and how best to display the heat level while hiding the electronics. Go grab a hot cup of something and check it out after the break while you let it cool off the normie way.

We admit that we would likely zone out while waiting for the LEDs to disappear. Here’s a smart coaster that uses an ESP8266 to send a message to Discord when your beverage has reached the perfect drinking temperature.

Continue reading “Wood And Brass Drink Temperature Monitor Looks Good, Has Class”

Repairing A 300W CO2 Laser, One Toasted Part At A Time

A couple months back, [macona] got his hands on a 300 watt Rofin CO2 laser in an unknown condition. Unfortunately, its condition became all too known once he took a peek inside the case of the power supply and was confronted with some very toasty components. It was clear that the Magic Smoke had been released with a considerable bit of fury, the trick now was figuring out how to put it back in.

The most obvious casualty was an incinerated output inductor. His theory is that cracks in the ferrite toroid changed its magnetic properties, ultimately causing it to heat up during high frequency switching. With no active cooling, the insulation cooked off the wires and things started to really go south. Maybe. In any event, replacing it was a logical first step.

If you look closely, you may see the failed component.

Unfortunately, Rofin is out of business and replacement parts weren’t available, so [macona] had to wind it himself with a self-sourced ferrite and magnet wire. Luckily, the power supply still had one good inductor that he could compare against. After replacing the coil and a few damaged ancillary wires and connectors, it seemed like the power supply was working again. But with the laser and necessary cooling lines connected, nothing happened.

A close look at the PCB in the laser head revealed that a LM2576HVT switching regulator had exploded rather violently. Replacing it wasn’t a problem, but why did it fail to begin with? A close examination showed the output trace was shorted to ground, and further investigation uncovered a blown SMBJ13A‎ TVS diode. Installing the new components got the startup process to proceed a bit farther, but the laser still refused to fire. Resigned to hunting for bad parts with the aid of a microscope, he was able to determine a LM2574HVN voltage regulator in the RF supply had given up the ghost. [macona] replaced it, only for it to quickly heat up and fail.

This one is slightly less obvious.

Now this was getting ridiculous. He replaced the regulator again, and this time pointed his thermal camera at the board to try and see what else was getting hot. The culprit ended up being an obsolete DS8922AM dual differential line transceiver that he had to source from an overseas seller on eBay.

After the replacement IC arrived from the other side of the planet, [macona] installed it and was finally able to punch some flaming holes with his monster laser. Surely the only thing more satisfying than burning something with a laser is burning something with a laser you spent months laboriously repairing.

We love repairs at Hackaday, and judging by the analytics, so do you. One of this month’s most viewed posts is about a homeowner repairing their nearly new Husqvarna riding mower instead of sending it into get serviced under the warranty. Clearly there’s something about experiencing the troubleshooting and repair process vicariously, with our one’s own hardware safely tucked away at home, that resonates with the technical crowd.

Sunlight-Based Life Clock Predicts Your Darkest Hour

The past year has been quite a ride for everyone on Earth. But you never know which day is going to be your last, so you might as well live a little, eh? This clock doesn’t actually know when you’ll kick off, either. But just for fun, it predicts the number of years remaining until you go to that hackerspace in the sky by hazarding a guess that’s based on your current age and the latest life expectancy tables. Don’t like the outcome? It’s completely randomized, so just push the button and get a set of numbers: the age you might die, and the percentage of life elapsed and remaining.

We love the design of this calculated doom clock, and it’s quite simple inside — an Arduino Pro Mini outputs the graph on an 2.9″ e-paper display, and both are powered with a 5.5 V solar panel. Just suction cup that puppy to the window and you’ll get automatic updates about your impending demise on sunny days, and none on cloudy days.

Want a more realistic picture of your mortality? Here’s a clock that counts down to your 80th birthday.

The Other First Computer: Konrad Zuse And The Z3

Bavarian Alps, Dec. 1945:

Since 1935, Berlin engineer Konrad Zuse has spent his entire career developing a series of automatic calculators, the first of their kind in the world: the Z1, Z2, Z3, S1, S2, and Z4. He accomplished this with a motley group of engineers, technicians, and mathematicians who were operating against all odds. With all the hardships and shortages of war and the indifference of their peers, the fact that they succeeded at all is a testament to their dedication and resourcefulness. And with the end of the war, more hardships have been piling on.

Two years ago, during the Battle of Berlin, bombers completely destroyed the Zuse family home and adjacent workshops on the Methfesselstraße, where they performed research and fabrication. All of the calculators, engineering drawings, and notes were lost in the rubble, save for the new Z4 nearing completion across the canal in another workshop on Oranienstraße. In the midst of all this, Zuse married in January of this year, but was immediately plunged into another crisis when the largest Allied air raid of the war destroyed the Oranienstraße workshop in February. They managed to rescue the Z4 from the basement, and miraculously arranged for it to be shipped out of the Berlin. Zuse, his family, and colleagues followed soon thereafter. Here and there along the escape route, they managed to complete the final assembly and testing of the Z4 — even giving a demonstration to the Aerodynamics Research Institute in Göttingen.

On arrival here in the Bavarian Alps, Zuse found a ragtag collection of refugees, including Dr Werner Von Braun and a team of 100 rocket scientists from Peenemünde. While everyone here is struggling just to stay alive and find food and shelter, Zuse is further worried with keeping his invention safe from prying eyes. Tensions have risen further upon circulation of a rumor that an SS leader, after three bottles of Cognac, let slip that his troops aren’t here to protect the scientists but to kill them all if the Americans or French approach.

In the midst of all this madness, Zuse and his wife Gisela welcomed a baby boy, and have taken up residence in a Hinterstein farmhouse. Zuse spends his time working on something called a Plankalkül, explaining that it is a mathematical language to allow people to communicate with these new machines. His other hobby is making woodblocks of the local scenery, and he plans to start a company to sell his devices once the economy recovers. There is no doubt that Konrad Zuse will soon be famous and known around the world as the father of automatic computers. Continue reading “The Other First Computer: Konrad Zuse And The Z3”

Printable Hot-Swap Sockets Make Keyboard Building Even Cooler

Okay, so you want to build a keyboard — something crazy-curvy like the dactyl or dactyl manuform. The kind of keyboard that has to be hand-wired, because key wells and rigid PCBs do not play well together. You want to build this keyboard, but all that hand-wiring would mean that you can’t easily swap switches later. And it will means hours and hours of fiddly soldering. What do you do? You could buy or design your own switch PCBs, but again, those are rigid and space is limited inside of most of these designs.

If you’re [stingray127], you trade those hours of soldering for a week of designing and printing some sweet little hot-swap sockets with wire guides. This is version four, which is easier to print than earlier versions. They are designed to use through-hole diodes and 24 AWG solid-core wire and give a tight fit. Can’t figure out how to use them? [stingray127] has a wiring guide with plenty of pictures.

We really like this idea, and it makes the end result feel more like a totally hand-wired keyboard than individual switch PCBs would As you can see, it involves little solder. The only downside is that you can only swap a few switches at a time, otherwise the matrix might fall apart. But that’s hardly even a downside.

Just want to make a macropad? You can easily print your way out of using a PCB for those, too.

Via KBD and r/mk

Review: Battery Spot Welders, Why You Should Buy A Proper Spot Welder

Making battery packs is a common pursuit in our community, involving spot-welding nickel strips to the terminals on individual cells. Many a pack has been made in this way, using reclaimed 18650 cells taken from discarded laptops. Commercial battery spot welders do a good job but have a huge inrush current and aren’t cheap, so it’s not uncommon to see improvised solutions such as rewound transformers taken out of microwave ovens. There’s another possibility though, in the form of cheap modules that promise the same results using a battery pack as a power supply.

With a love of putting the cheaper end of the global electronic marketplace through its paces for the entertainment of Hackaday readers I couldn’t resist, so I parted with £15 (about $20), for a “Mini Spot Welder”, and sat down to wait for the mailman to bring me the usual anonymous grey package.

Continue reading “Review: Battery Spot Welders, Why You Should Buy A Proper Spot Welder”