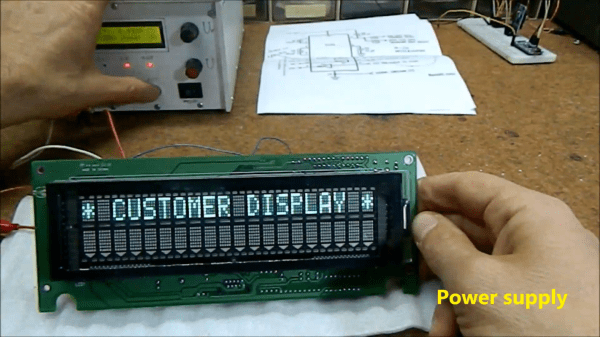
Using Arduinos To Drive Undocumented Displays

For those of us old enough to remember the VCR (and the difficulty of programming one), the ubiquitous vacuum fluorescent display, or VFD, is burned into our memories, mostly because of their brightness and contrast when compared to the superficially-similar LCD. These displays are incredibly common even apart from VCRs, though, and it’s easy to find them for next to no cost, but figuring out how to drive one if you just pulled it out of a 30-year-old VCR is going to take some effort. In this build, [mircemk] shows us how he drives unknown VFD displays using an Arduino in order to build his own weather forecasting station.

For this demonstration [mircemk] decided to turn a VFD into a weather forecasting station. First of all, though, he had to get the VFD up and running. For this unit, which came from a point-of-sale (POS) terminal, simply connecting power to the device turned on a demo mode for the display which let him know some information about it. From there, and with the knowledge that most POS terminals use RS232 to communicate, he was able to zero in on the Rx and Tx pins on the on-board microcontroller and interface them with an Arduino. From there it’s a short step to being able to output whatever he wanted to this display.

For this project, [mircemk] wanted the display to output information about weather, but rather than simply pull data from some weather API he is actually using a sensor suite connected to the Arduino to measure things like barometric pressure in order to make a 12-hour forecast. The design is inspired by old Zambretti weather forecasters which used analog wheels to input local weather data. It’s an interesting build not only for the VFD implementation but also for attempting to forecast the weather directly with just a tiny sensor set instead of downloading a forecast to display. To do any better with your own forecasts, you’d likely need your own weather station.

Continue reading “Using Arduinos To Drive Undocumented Displays”

Counting Down To The Final Atlas Rocket

The Atlas family of rockets have been a mainstay of America’s space program since the dawn of the Space Age, when unused SM-65 Atlas intercontinental ballistic missiles (ICBMs) were refurbished and assigned more peaceful pursuits. Rather than lobbing thermonuclear warheads towards the Soviets, these former weapons of war carried the first American astronauts into orbit, helped build the satellite constellations that our modern way of life depends on, and expanded our knowledge of the solar system and beyond.

SM-65A Atlas ICBM in 1958

Naturally, the Atlas V that’s flying today looks nothing like the squat stainless steel rocket that carried John Glenn to orbit in 1962. Aerospace technology has evolved by leaps and bounds over the last 60 years, but by carrying over the lessons learned from each generation, the modern Atlas has become one of the most reliable orbital boosters ever flown. Since its introduction in 2002, the Atlas V has maintained an impeccable 100% success rate over 85 missions.

But as they say, all good things must come to an end. After more than 600 launches, United Launch Alliance (ULA) has announced that the final mission to fly on an Atlas has been booked. Between now and the end of the decade, ULA will fly 28 more missions on this legendary booster. By the time the last one leaves the pad the company plans to have fully transitioned to their new Vulcan booster, with the first flights of this next-generation vehicle currently scheduled for 2022.

Continue reading “Counting Down To The Final Atlas Rocket”

Fire-breathing dragon head, side view

Flame-Spitting Dragon Head Heats Up Halloween

Halloween is looming, and [Jonathan Gleich] decided that an ideal centerpiece would be a flame-spitting dragon’s head. It started with an economical wall-mount dragon’s head, combined with a variety of off-the-shelf components to become something greater.

Dragon head with arc ignitor lit
Spark from high-voltage ignitor, right at the torch opening.

The fire comes from a kind of propane torch sold as a weed killer set, which looks a little like a miniature tiger torch. The flow of propane is limited by a regulator (which keeps the flame short and fixed), and controlled with a gas-rated 12 V solenoid valve. Ignition is done with the help of a spark igniter that fires up on demand, fed by a high-voltage ignition coil. The two combine at the Dragon’s mouth, where the flame originates, but the electrical components are otherwise isolated from the gas elements as much as possible.

The dragon head is made of acrylic, and if exposed to enough heat acrylic will first melt, then burn. To help avoid a meltdown, the dragon breathes fire only intermittently.  [Jonathan] also gave the mouth area a heat-resistant barrier made from generous layers of flame-blocking mortar and sealants from the hardware store. The finishing touch comes in the form of bright red LEDs in the eyes, which give the head a bit more life.

Watch the ignitor in action and see the head spewing flames in the two short videos embedded below. The head should make for some good pictures come Halloween, and is a good example of how repurposing off-the-shelf items can sometimes be just what is needed for a project.

Interested in something smaller, but still fiery? Check out this pet fire-breathing dragon project for all your robotic animal companion needs. Continue reading “Flame-Spitting Dragon Head Heats Up Halloween”

This Audio Mixer Is A Eurorack

Music making and DJing have both become arts predominantly pursued in a computer, as the mighty USB interface has subsumed audio, MIDI, and even DJ turntable interface controllers. There was a time though when an indispensable part of any aspiring performer’s equipment would have been an analog mixer, a device for buffering and combining multiple analog audio signals into a single whole. A mixer is still a useful device though, and [Sam Kent] has produced a very nice one that takes the form of a set of Eurorack modules made from PCB material. There are two types of modules, the main channel module which you can think of as the master module, and a series of isolator modules that handle the individual inputs.

Mixer preferences are as individual as each user, so for example where we’d expect sliders he’s used rotary potentiometers, and for us placing the master channel on the left-hand side is unfamiliar. But that’s the beauty of a modular design, there’s nothing to stop anyone building one of these to simply configure it as they wish. We notice that for a mixer described as for DJs there’s no RIAA preamp for the turntable fans, but it’s not impossible to fix with an off-board preamp. Otherwise, we like it and have a sudden hankering for it to be 1992 again with a pair of Technics SL1200s and a room full of people.

Designing a mixer, even a simple one, isn’t easy. Our own [Lewin Day] wrote a retrospective of his experiences with one.