Blinky Business Card Plays Snake And Connect Four

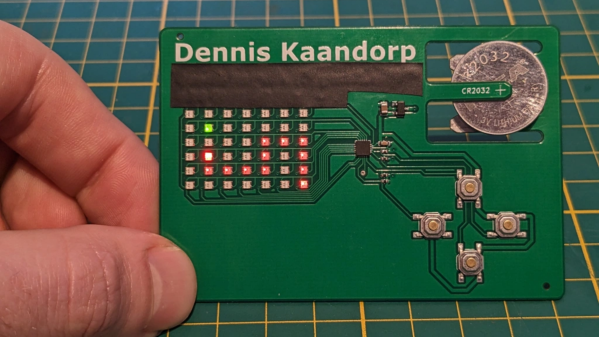
There’s no better way to introduce yourself than handing over a blinky PCB business card and challenging the recipient to a game of Connect Four. And if [Dennis Kaandorp] turns up early for a meeting, he can keep himself busy playing the ever popular game of Snake on his PCB business card.

The tabs are 19 mm long and 4 mm wide.

Quite wisely, [Dennis] kept his design simple, and avoided the temptation of feature creep. His requirements were to create a minimalist, credit card sized design, with his contact details printed on the silk legend, and some blinky LED’s.

The tallest component on such a design is usually the battery holder, and he could not find one that was low-profile and cheap. Drawing inspiration from The Art of Blinky Business Cards, he used the 0.8 mm thin PCB itself as the battery holder by means of flexible arms.

Connect-Four is a two player game similar to tic-tac-toe, but played on a grid seven columns across and six rows high. This meant using 42 dual-colour LED’s, which would require a large number of GPIO pins on the micro-controller. Using a clever combination of matrix and charlieplexing techniques, he was able to reduce the GPIO count down to 13 pins, while still managing to keep the track layout simple.

It also took him some extra effort to locate dual colour, red / green LED’s with a sufficiently low forward voltage drop that could work off the reduced output resulting from the use of charlieplexing. At the heart of the business card is an ATtiny1616 micro-controller that offers enough GPIO pins for the LED matrix as well as the four push button switches.

His first batch of prototypes have given him a good insight on the pricing and revealed several deficiencies that he can improve upon the next time around. [Dennis] has shared KiCad schematic and PCB layout files for anyone looking to get inspired to design their own PCB business cards.

Continue reading “Blinky Business Card Plays Snake And Connect Four”

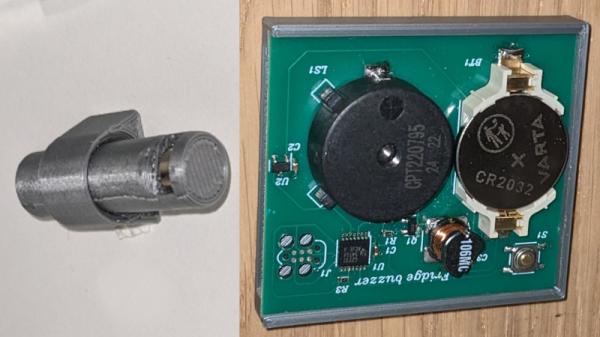
A composite picture with a 3D printed cylinder with a magnet at one end held in a 3D printed housing ring on the left composite picture and a fridge buzzer board with buzzer, CR2032 battery, MCP430 microcontroller and hall effect sensor slid into a 3D printed base on the right part of the composite picture

Don’t Lose Your Cool With This Fridge Buzzer

[CarrotIndustries] wanted to add an audible warning for when the refrigerator door was left open. The result is a fridge buzzer that attaches to the inside of a fridge door and starts buzzing if the door is left ajar for too long.

The main components of the fridge buzzer consist of an MSP430G2232 low-power MCU connected to a SI7201 hall sensor switch, along with a CR2032 battery holder, push button and buzzer. The MSP430’s sleep mode is used here, consuming less than 3 µA of current which [CarrotIndustries] estimates lasting 9 years on a 235 mAh CR2032 battery.

A 3D printed housing is created so that the board slides into a flat bed, which can then be glued onto to the fridge door. The other mechanical component consists of a cylinder with a slot dug out for a magnet, where the cylinder sits in a mounting ring that’s affixed to the side of the fridge wall that the end of the door closes on. The cylinder can be finely positioned so that when the refrigerator is closed, the magnet sits right over the hall sensor of the board, allowing for sensitivity that can detect even a partial close of the fridge door.

All source code is available on [CarrotIndustries] GitHub page, including the Horizon EDA schematics and board files, the Solvespace mechanical files, and source code for the MSP430. We’ve featured an IoT fridge alarm in the past but [CarrotIndustries]’ addition is a nice, self contained, alternative.

Ring In The New Year With This Cute Cat Doorbell

What better way to ring in the new year than with [iSax Laboratories]’ charming little project that replaces a doorbell with a Maneki-Neko cat figurine to ring a physical bell?

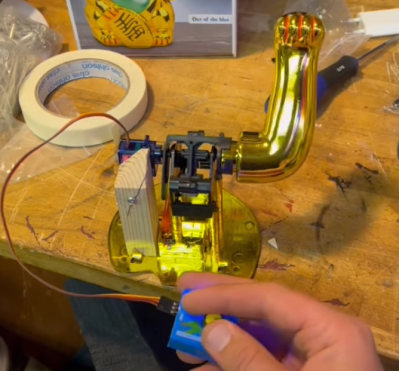
A golden maneki-neko cat arm mechanism attached to a servo on a workbench with a hand controlling a servo motor tester that's plugged into the servo attached to the arm.

Details are unfortunately a bit light, but it looks like the Maneki-Neko cat was disassembled to allow for a small SG92R servo motor to attach to the arm pendulum mechanism. [iSax Laboratories] added wooden platform where the Maneki-Neko cat figurine is mounted along with some indicator lights, switches and the physical bell, with a cavity routed out in the base to allow for the Arduino Nano microcontroller.

[iSax Laboratories] has what looks to be an Assa Abloy Svara 23 wired answering machine, which has one of its output lines connected to the Nano to sense when a doorbell signal has come in.

The Maneki-Neko cats are cute, easily hackable figurines and we’ve featured them in the past, using them as everything from hit counters to POV displays.

Be sure to check out the demo video after the break!

Continue reading “Ring In The New Year With This Cute Cat Doorbell”