Blinky Business Card Plays Snake And Connect Four

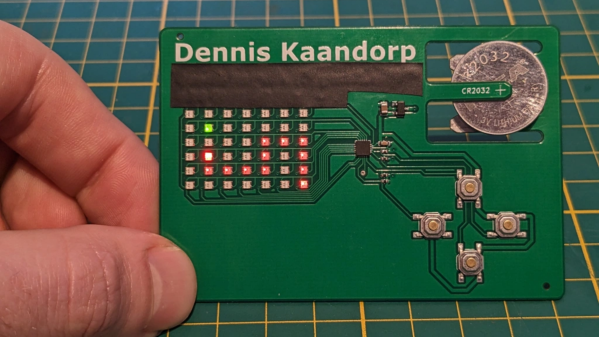
There’s no better way to introduce yourself than handing over a blinky PCB business card and challenging the recipient to a game of Connect Four. And if [Dennis Kaandorp] turns up early for a meeting, he can keep himself busy playing the ever popular game of Snake on his PCB business card.
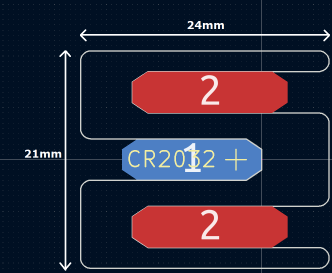
The tabs are 19 mm long and 4 mm wide.

Quite wisely, [Dennis] kept his design simple, and avoided the temptation of feature creep. His requirements were to create a minimalist, credit card sized design, with his contact details printed on the silk legend, and some blinky LED’s.

The tallest component on such a design is usually the battery holder, and he could not find one that was low-profile and cheap. Drawing inspiration from The Art of Blinky Business Cards, he used the 0.8 mm thin PCB itself as the battery holder by means of flexible arms.

Connect-Four is a two player game similar to tic-tac-toe, but played on a grid seven columns across and six rows high. This meant using 42 dual-colour LED’s, which would require a large number of GPIO pins on the micro-controller. Using a clever combination of matrix and charlieplexing techniques, he was able to reduce the GPIO count down to 13 pins, while still managing to keep the track layout simple.

It also took him some extra effort to locate dual colour, red / green LED’s with a sufficiently low forward voltage drop that could work off the reduced output resulting from the use of charlieplexing. At the heart of the business card is an ATtiny1616 micro-controller that offers enough GPIO pins for the LED matrix as well as the four push button switches.

His first batch of prototypes have given him a good insight on the pricing and revealed several deficiencies that he can improve upon the next time around. [Dennis] has shared KiCad schematic and PCB layout files for anyone looking to get inspired to design their own PCB business cards.

Continue reading “Blinky Business Card Plays Snake And Connect Four”

Self-Propelled Chainsaw Reduces Injuries

[Advoko] is an expert at milling logs into various sizes of boards. He typically uses nothing but a chainsaw to enable him to mill on-site without needing to bring any large or expensive equipment. The only problem is that sometimes he gets a little carried away running his mill non-stop until he has enough lumber for whatever project he is building, which has led to some repetitive strain injuries. To enable him to continue to run his mill, he’s created this self-propelled chainsaw jig.

The creation of the self-propelled chainsaw was a little serendipitous. [Advoko] needed to mill a tree which had fallen on a slope, and he couldn’t move the large trunk before starting to mill. To avoid fatigue while pulling his chainsaw upwards, he devised a system of rubber belts that would help pull the weight of the chainsaw up the hill. Noticing that if the chainsaw could have been operated downhill, it would essentially pull itself along the cut, he set about building a carriage for the mill to hold the chainsaw in place while it semi-autonomously milled lumber for him.

The chainsaw jig isn’t fully autonomous; [Advoko] still needs to start and stop the chainsaw and set up the jig. It does have a number of safety features to prevent damage to the jig, the chainsaw, and himself too, and over a number of iterations of this device he has perfected it to the point where he can start it on a cut and then do other tasks such as move boards or set up other logs for cutting while it is running, saving him both time and reducing his risk of other repetitive strain injuries. If you don’t fully trust the automatic chainsaw jig, take a look at this one which requires a little more human effort but still significantly reduces the strain of milling a large log.

Continue reading “Self-Propelled Chainsaw Reduces Injuries”

Electronic Catan Game Board Is Modular

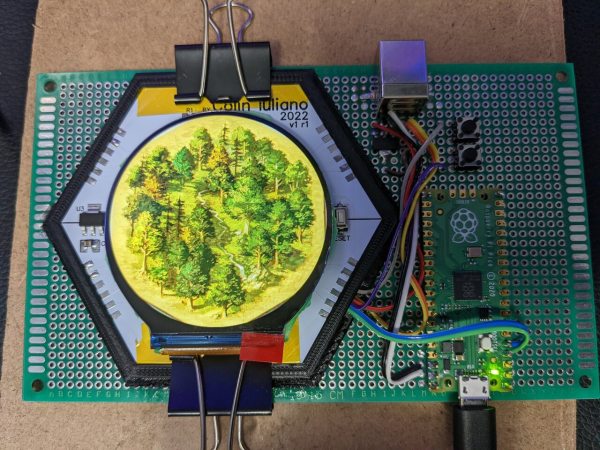
Plenty of gamers around these parts require an expensive PC to play games, often spending thousands of dollars for a gaming machine. Believe it or not, though, there are entire classes of games that don’t require any electronics at all, but that doesn’t mean that they don’t benefit from the addition of some neat gadgets. This Settlers of Catan game uses custom LCD tiles with a built-in custom mesh network.

The tiles for the game board themselves are hexagonal and snap together using magnetic pogo pins in order to form a board of any size or shape. The pogo pins also allow communication for a pseudo-mesh network to operate with each tile’s built-in PCB to allow the game board to know exactly which tiles are placed where and to display the correct image on each one. Each tile contains it own RP2040 microcontroller, keeping the overall cost of each tile to a minimum.

For those regularly hosting game night, a project like this could really change the traditionally analog game’s dynamic for the better. It was mostly a project that [Colin Iuliano] built just for fun, and if he ever builds a second one he does plan on some improvements, but we’d say that it looks like a success already. For other Catan-based electronic design inspiration, take a look at this complete and non-modular electronic game board.

A Guide For Driving LED Matrices

Building an LED matrix is a fun project, but it can be a bit of a pain. Usually it starts with hand-soldering individual LEDs and resistors together, then hooking them up to rows and columns so they can be driven by a microcontroller of some sort. That’s a lot of tedious work, but you can order an LED matrix pre-built to save some time and headache. You’ll still need a driver though, and while building one yourself can be rewarding there are many pitfalls and trade-offs to consider when undertaking that project as well. Or, you can consider one of a number of drivers that [deshipu] has outlined in detail.

The hangups surrounding the driver board generally revolve around the issue of getting constant brightness from LEDs regardless of how many in the row or column are illuminated at one time. Since they are typically driven one row or column at a time, the more that are on the lower the brightness each LED will have. Driver boards take different approaches to solving this problem, which usually involve a combination of high-speed scanning of the matrix or using a constant-current source in order to eliminate the need for resistors. [deshipu] outlines four popular chips that achieve these purposes, and he highlights their pros and cons to help anyone looking to build something like this.

Most of these boards will get you to an 8×8 LED matrix with no problem, with a few going a few pixels higher in either direction. That might be enough for most of our needs, but for something larger you’ll need other solutions like the one found in this 64×32 LED matrix clock. There are also even more complicated drivers if you go into extra dimensions.

Photo credit: Komatta [Public domain], from Wikimedia Commons

Play Chess Against A Ghost

While chess had long been a domain where humans were superior to computers, the balance has shifted quite substantially in the computers’ favor. But the one thing that humans still have control over is the pieces themselves. That is, until now. A group has built a robot that both uses a challenging chess engine, and can move its own pieces.

The robot, from creators [Tim], [Alex S], and [Alex A], is able to manipulate pieces on a game board using a robotic arm under the table with an electromagnet. It is controlled with a Raspberry Pi, which also runs an instance of the Stockfish chess engine to play the game of chess itself. One of the obvious hurdles was how to keep the robot from crashing pieces into one another, which was solved by using small pieces on a large board, and always moving the pieces on the edges of the squares.

This is a pretty interesting project, especially considering it was built using a shoestring budget. And, if you aren’t familiar with Stockfish, it is one of the most powerful chess engines and also happens to be free and open-source. We’ve seen it used in some other chess boards before, although those couldn’t move their own pieces.

Continue reading “Play Chess Against A Ghost”

The Art Of Blinky Business Cards

Business cards are stuck somewhere between antiquity and convenience. On one hand, we have very convenient paperless solutions for contact swapping including Bluetooth, NFC, and just saying, “Hey, put your number into my phone, please.” On the other hand, holding something from another person is a more personal and memorable exchange. I would liken this to the difference between an eBook and a paperback. One is supremely convenient while the other is tactile. There’s a reason business cards have survived longer than the Rolodex.

Protocols and culture surrounding the exchange of cards are meant to make yourself memorable and a card which is easy to associate with you can work long after you’ve given your card away. This may seem moot if you are assigned cards when you start a new job, but personal business cards are invaluable for meeting people outside of work and you are the one to decide how wild or creative to make them.

Continue reading “The Art Of Blinky Business Cards”

Oscillating Fan Controller Used As Relay

The most brilliant hacks we see aren’t always the thousand-dollar, multi-year projects spanning every facet of engineering. Rather, the most ingenious projects are ones that take an everyday thing and use it in a simple but revolutionary way. By that measure, it’ll be hard to top [Robert]’s latest hack which uses the controller board from an everyday oscillating fan to build a three-way remote-controlled relay board.

Most oscillating fans have a speed selector switch. What that does might be somewhat different between different types of fan, but in general it will select either a smaller portion of the fan’s motor to energize or switch in a resistor which will have the same speed-lowering effect. [Robert]’s fan had little more than a triple-throw switch on the control board, so when he decided the fan wasn’t worth keeping anymore, he was able to re-purpose the control board into a general-use relay. As a bonus, the fan could be controlled by infrared, so he can also remote control whatever he decides to plug into his new piece of equipment.

While this simple hack might not change the world, it may give anyone with an old fan some ideas for other uses for its parts. If you want to do a little more work and get the fan itself running again, though, it is possible to rebuild the whole thing from the ground up as well.