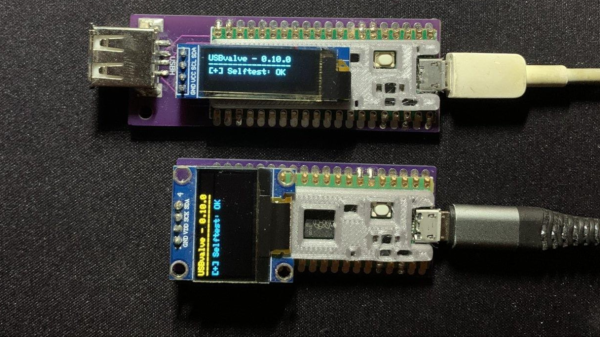
two USBValve devices on a table, both with a USB cable plugged in. The top one with a long narrow OLED display and the bottom one with a 128x64 OLED display.

Sleuth Untrusted USB Communication With USBValve

USB devices are now ubiquitous and, from an information security standpoint, this is a terrifying prospect as malicious software can potentially be injected into a system by plugging in a compromised USB stick. To help get some piece of mind, [Cesare Pizzi] created USBValve to help expose suspicious USB activity on the fly.

The idea behind USBValve is to have the onboard microcontroller advertise itself as a storage device, pretending to have a filesystem with some common files available. When an unknown USB device is first inserted into the USB port on the USBValve tool, USBValve displays usage information, via the attached OLED screen, on whether the USB device is accessing files it shouldn’t be or immediately trying to write to the filesystem, which is a clear sign of malicious behavior.

The USBValve hardware is a straight forward composition of a Raspberry Pi Pico, an tiny I2C OLED screen and an optional PCB carrier board with a 3D printed spacer. The software uses Adafruit’s Tiny USB library along with the SSD1306AsciiWire library to drive the OLED display. And it’s all open source, including the code and PCB design files.

There’s a lot of security fun to be had with USB, from DIY dirt cheap Rubber Duckies to open source hardware Rubber Duckies, to discussions on the BadUSB exploits. The simplicity of the USBValve project allows it to be low cost, easy to use and can provide concise, critical information for a variety of real world threats.

After the break, be sure to check out [Cesare Pizzi]’s talk about USBValve at the SCC Insomnihack conference which has a wealth of information on how it fares against some known malware attacks, discussions on some of its shortcomings and potential avenues for improvement.

Thanks to [watchdog] for the tip!

Continue reading “Sleuth Untrusted USB Communication With USBValve”

A view of the inside of a car, with drivers wheel on the left and control panel in the middle, with red LED light displayed in the floor area under the drivers wheel and passenger side.

Bass Reactive LEDs For Your Car

[Stephen Carey] wanted to spruce up his car with sound reactive LEDs but couldn’t quite find the right project online. Instead, he wound up assembling a custom bass reactive LED display using an ESP32.

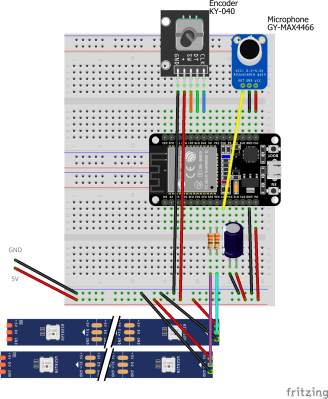
A schematic of the Bass LED reactive circuit, with an ESP32 on a breadboard connected to a KY-040 encoder module, a GY-MAX4466 microphone module and LED strips below.

The entirety of the build is minimal, consisting of a GY-MAX4466 electret microphone module, a KY-040 encoder for some user control and an ESP32 attached to a Neopixel strip. The only additional electronic parts are some passive resistors to limit current on the data lines and a capacitor for power line noise suppression. [Stephen] uses various enclosures from Thingiverse for the microphone, rotary encoder and ESP32 box to make sure all the modules are protected and accessible.

The magic, of course, is in the software, with the CircuitPythyon ulab library used to do the heavy lifting of creating the spectrogram and frequency filtering. [Stephen] has made the code is available on GitHub for those wanting to take a closer look.

It wasn’t very long ago that sound reactive LEDs used to be a heavy lift, requiring optimized FFT libraries or specialized components to do the spectrogram. With faster and cheaper microcontroller boards, we’re seeing many great projects, like the sensory bridge or Raspberry Pi driven LED spectrogram, that can now take spectrograms and Fourier transform calculations as basic infrastructure to build on top of them. We’re happy to see [Stephen] leverage the ESP32’s speed and various circuit Python libraries to create a very cool LED car hack.

Video after the break!

Continue reading “Bass Reactive LEDs For Your Car”

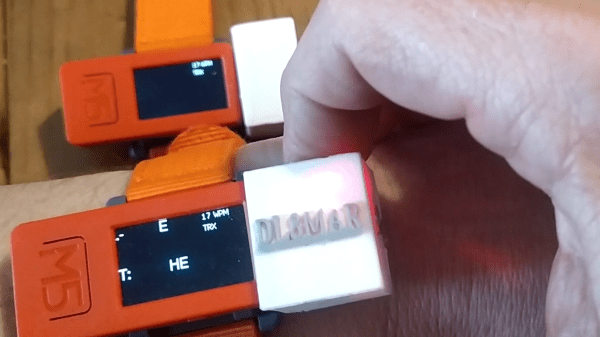
An orange m5stickc plus strapped to a wrist in the foreground with the persons other hand pressing down on the top of an installed hat, communicating with another m5stickc plus in the background on the table.

M5StickC Turned Wearable Morse Code Trainer

Have you ever felt the options for Morse code communication were too limited? Well, look no further than [marsPRE]’s open source WristMorse communicator that can connect over WiFi, can act as a Bluetooth keyboard or just be used as a Morse Code trainer.

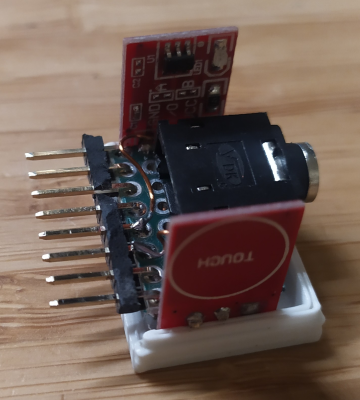
a 'hat' for an m5stickc plus with a single row pin header exposted, a 2.5mm jack and two capacitive touch buttons on the top and bottom of the hat.

[marsPRE] uses the M5StickC Plus as the base device and attaches a custom “hat” consisting of a 2.5 mm plug for a radio connection and two capacitive touch paddles that act as the Morse Code keyer. The add-on is housed in what looks like a custom 3D print and hangs off of the end of the M5StickC Plus, connecting the hat through an eight 0.1 inch pin header.

Using the M5StickC Plus allows [marsPRE] to focus on the software, providing different options for training, communication and even using the device as a Bluetooth keyboard. The two touch sensors allow for a semi automatic keying, with the top sensor used for long dashes and the bottom sensor used for short dashes.

[marsPRE] took inspiration from the Morserino-32 and has made the wrist morse code trainer open source software and available through GitHub for anyone wanting to take a look. Morse code may an old encoding method but it’s one that’s worthy of respect. You never know when you might need to send a message from your dreams or to translate spoken word Morse code.

Continue reading “M5StickC Turned Wearable Morse Code Trainer”

A wall mounted picture frame with an e-ink newspaper displayed.

A Wall Mounted Newspaper That’s Extra

E-Ink displays are becoming more ubiquitous and with their low power draw, high contrast and hackability, we see many projects use them in framed wall art, informational readouts and newspaper displays. [Sho] uses this idea to create a wall mounted newspaper packed full of features.

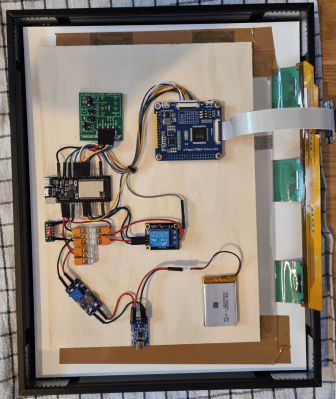
The back of a picture frame with the electronics for an e-ink newspaper display.

[Sho] describes using a 13.3 inch ED133UT2 1600×1200 E-Ink display with an ITE IT8951 electronic paper display (EPD) driver, controlled by an ESP32. An RV-3028-C7 real time clock (RTC) is used to keep time and to wake up the ESP32 and other devices for daily refreshes. A 3.7V 1100mAh LiPo battery provides power through an MT3608 boost converter module to provide the 5V needed, with the E-Ink display driver further isolated from the power behind a KY-019 5V relay module to avoid unnecessary power draw when not needed.

The backend software uses the OpenWeatherMap API to get daily weather reports and scrapes news websites which are then fed through an OpenAI ChatGPT API to provide summaries. [Sho] reports that text is formatted using a combination of LuaTeX, Ghostscript, ImageMagick and other scripts to format the eventual displayed graphics, including newspaper texture and randomely placed coffee stain effects.

Be sure to check out [Sho]’s project page for some more details. E-Ink displays are still a bit pricey but the effect is hard to beat and they make great options for projects like infinite generative landscapes or low power weather stations.

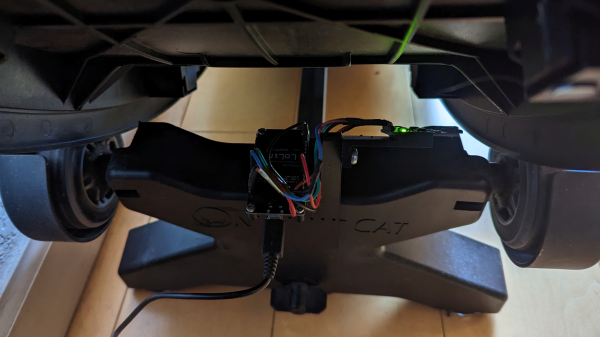
A shot of the underside of a "One Fast Cat" cat wheel with an installed ESP8266 and hall effect sensors attached to the base.

Spy On Your Cat To Make Sure It Gets Its Paws In

[Scott Cutler] has a young cat, [Cygnus], that loves to run on a cat wheel and [Scott] had some some important questions about [Cygnus]’s usage of the cat wheel like, how often it’s used, what direction is preferred and how fast does [Cygnus] go. To answer these questions, [Scott] put some telemetry sensors onto the cat wheel and analyzed the results.

An ESP8266 microcontroller and two 3144E hall effect modules were used to sense eight magnets glued onto the outer housing of a “One Fast Cat” cat wheel. [Scott] installed the ESP8266 and hall effect modules onto the base support for the wheels, using 3D printed brackets to secure them.

For the software side, the ESP8266 attaches an interrupt handler whenever a sensor passes by, recording a window of three previous measurements for valid sample determination and, if accepted, uses the time between samples to infer direction and speed. The ESP8266 connects to a pre-configured local WiFi network and has a telnet interface to extract stored log information, in the form of JSON data.

[Scott] has some nice graphs and other data visualizations on [Cygnus]’s usage, including a preference for running at 3 AM, achieving a maximum speed of 14 mph and an average of 4 seconds per run. The source is available on GitHub and the STL files are available embedded in [Scott]’s write-up. We’ve featured cat exercise trackers before with a giant hamster wheel outfitted with a Raspberry Pi and it’s nice to see some options that allow for a retrofit option in addition to a complete DIY solution.

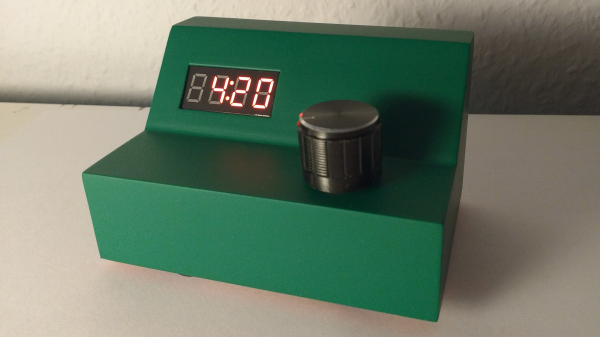
Kitchen timer project in a angled green 3d printed case with a 7 segment display and knob.

Printing A Brutalist Kitchen Timer

A kitchen timer is one of those projects that’s well defined enough to have a clear goal, but allows plenty of room for experimentation with functionality and aesthetics. [Hggh]’s exploration of the idea is a clean, Brutalist kitchen timer.

The case for [Hggh]’s kitchen timer is 3D printed with openings for a TM1637 four digit, seven segment display and for a KY-040 rotary encoder with knob attached. The internals are driven by an ATmega328P powered from a 18650 cell with a DW01-P battery protection chip and a TP4056 chip for charging. On the back of the case is a power switch and USB-C connector for power. It looks like the 3D printed case was sanded down to give it a smooth matte surface finish.

All the project files, including the STLs, OpenSCAD code, and KiCAD design, are available on GitHub. This Brutalist kitchen timer project is a nice addition to some of the kitchen timers we’ve featured in the past, including a minimalist LED matrix timer and a Nixie timer with keypad.

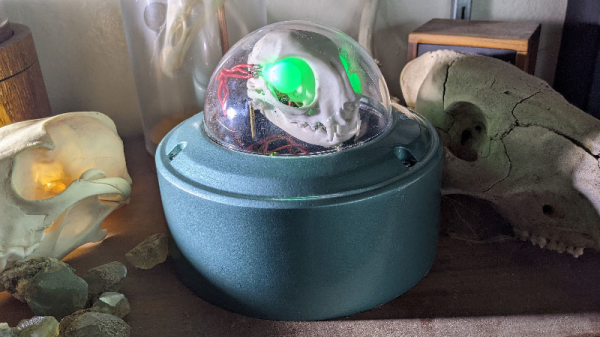
A cat skull enclosed in a domed security camera enclosure with green LEDs illuminating the eye sockets, sitting on a table with other skulls and rocks.

Cat Skull For Internet Connection Divination

[Emily Velasco] has an internet provider that provides sub-par connectivity. Instead of repeatedly refreshing a browser tab to test if the network is up, [Emily] decided to create an internet status monitor by embedding indicator lights in a cat skull…for some reason.

The electronics are straightforward, with the complete parts list consisting of an Arduino Nano 33 IoT device connected to a pair of RGB LEDs and 50 Ohm resistors. The Nano attempts to connect to a known site (in this case, the Google landing page) every two seconds and sets the LEDs to green if it succeeds or red if it fails.

The cat skull is thankfully a replica, 3D printed by one of [Emily]’s Twitter acquaintances, and the whole project was housed in a domed security camera enclosure. [Emily] mounts the LEDs into the skull to create a “brain in a jar” effect.

The source is available on GitHub for those wanting to take a look. We’ve featured internet connectivity status indicators in the form of traffic lights here before, as well as various network status monitors and videoconferencing indicator lights.