A white stairwell ceiling with a rack holding clothes. The rack follows the slope of the ceiling and is attached to a series of ropes and pulleys to let it got up and down.

Stairway Drying Rack Rises Above The Rest

Finding space to dry clothes can be challenging in smaller spaces. [Tom Parker] solved this conundrum in his one bedroom apartment by putting a drying rack in his stairwell.

By making the laundry rack fold up above the stairwell, [Parker] can dry his clothes without them taking up a lot of precious floor space. A pole is used to is raise and lower a dowel rod attached to two lines of paracord running over pulleys and to the end of the rack. Each moving corner of the rack also has a set length of cord attached to prevent the rack from rotating too far down as well as providing a safety mechanism should one of the other lines of cord snap.

The rack is bolted-together, laser cut 1.5mm thick mild steel with 15 mm dowels attached to the sides via threaded inserts. Spacing is set for the raised rack to put clothes at 75 mm apart. Plywood pieces interface the rack with the wall to avoid damaging the drywall.

If you’re looking for more laundry hacks, check out this Smart Clothes Dryer or How Robots Suck at Folding Laundry.

It’s Not Easy Counting Transistors In The 8086 Processor

For any given processor it’s generally easy to find a statistic on the number of transistors used to construct it, with the famous Intel 8086 CPU generally said to contain 29,000 transistors. This is where [Ken Shirriff] ran into an issue when he sat down one day and started counting individual transistors in die shots of this processor. To his dismay, he came to a total of 19,618, meaning that 9,382 transistors are somehow unaccounted for. What is going on here?

The first point here is that the given number includes so-called ‘potential transistors’. Within a section of read-only memory (ROM), a ‘0’ would be a missing transistor, but depending on the programming of the mask ROM (e.g. for microcode as with a CISC x86 CPU), there can  be a transistor there. When adding up the potential but vacant transistor locations in ROM and PLA (programmable logic array) sections, the final count came to 29,277 potential transistors. This is much closer to the no doubt nicely rounded number of 29,000 that is generally used.

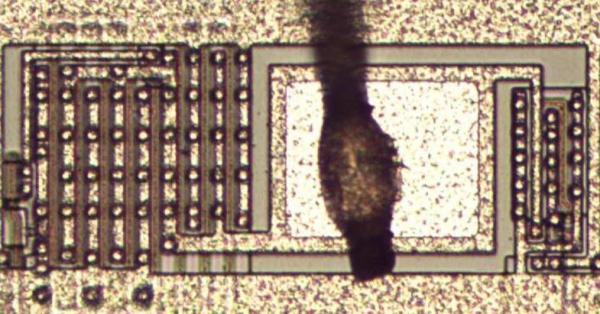
[Ken] also notes that further complications here are features such as driver transistors that are commonly found near bond wire pads. In order to increase the current that can be provided or sunk by a pad, multiple transistors can be grouped together to form a singular driver as in the above image. Meanwhile yet other transistors are used as (input protection) diodes or even resistors. All of which makes the transistor count along with the process node used useful primarily as indication for the physical size and complexity of a processor.

Impressive Sawdust Briquette Machine

When you are a life long carpenter with an amazing workshop, you’re going to make a lot of saw dust, and managing its collection and storage poses quite a challenge. [Russ] from [New Yorkshire Workshop] built an impressive Briquette press to handle the problem.

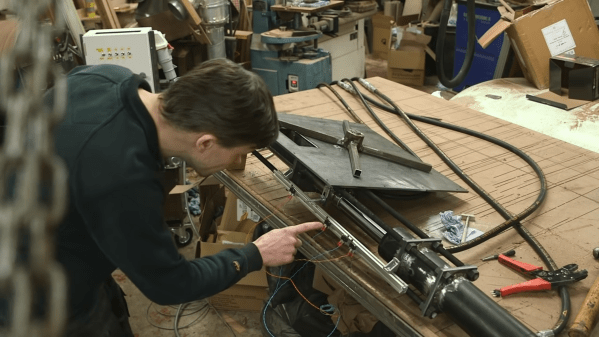
It’s a hydraulic press that ingests  saw dust and spits out compressed briquettes ready for fueling his rocket mass heater. The build starts with a batch of custom, laser cut steel parts received from Fractory. The heart of the machine is a 300 mm stroke hydraulic cylinder with a beefy 40 mm rod. The cylinder had to be taken apart so that the laser cut mounting flanges could be welded, slowly so as not to deform the cylinder. The intake feed tube was cut from a piece of 40 mm bore seamless tube. A window was cut in the feed tube and funnel parts were welded to this cutout. The feed tube assembly is then finished off with a pair of mounting flanges. The feed tube assembly is in turn welded to the main feed plate which will form the base of the saw dust container. The hydraulic cylinder assembly is mated to the feed tube assembly using a set of massive M10 high tensile class 10.9 threaded rods. The push rod is a length of 40 mm diameter mild steel bar stock, coupled to the hydraulic cylinder using a fabricated coupling clamp. On the coupling clamp, he welded another bracket on which a bolt can be screwed on. This bolt helps activate the limit switches that control the movement of the hydraulic cylinder and the feed motor. Continue reading “Impressive Sawdust Briquette Machine”

ZSWatch: This OSHW Smart Watch Is As DIY As It Gets

We say it often, but it’s worth repeating: this is the Golden Age of making and hacking. Between powerful free and open source software, low-cost PCB production, and high resolution 3D printers that can fit on your desk, a dedicated individual has everything they need to make their dream gadget a reality. If you ever needed a reminder of this fact, just take a look at the ZSWatch.
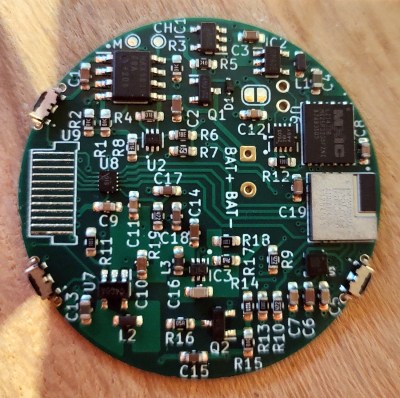
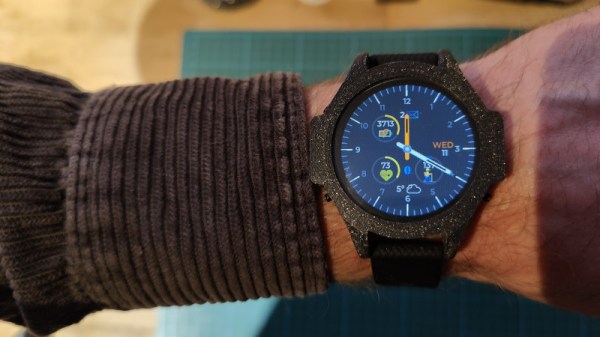
When creator [Jakob Krantz] says he built this MIT-licensed smart watch from scratch, he means it. He designed the 4-layer main board, measuring just 36 mm across, entirely in KiCad. He wrote every line of the firmware, and even designed the 3D printable case himself. This isn’t some wearable development kit he got off of AliExpress and modified — it’s all built from the ground up, and all made available to anyone who might want to spin up their own version.

The star of the show is the nRF52833 SoC, which is paired with a circular 1.28″ 240×240 IPS TFT display. The screen doesn’t support touch, so there’s three physical buttons on the watch for navigation. Onboard sensors include a LIS2DS12 MEMS accelerometer and a MAX30101EFD capable of measuring heartrate and blood oxygen levels, and there’s even a tiny vibration motor for haptic feedback. Everything’s powered by a 220 mAh Li-Po battery that [Jakob] says is good for about two days — afterwards you can drop the watch into its matching docking station to get charged back up.

As for the software side of things, the watch tethers to a Android application over Bluetooth for Internet access and provides the expected functions such as displaying the weather, showing notifications, and controlling music playback. Oh, and it can tell the time as well. The firmware was made with extensibility in mind, and [Jakob] has provided both a sample application and some basic documentation for would-be ZSWatch developers.

While an unquestionably impressive accomplishment in its current form, [Jakob] says he’s already started work on a second version of the watch. The new V2 hardware will implement an updated SoC, touch screen, and an improved charging/programming connector. He’s also looking to replace the 3D printed case for something CNC milled for a more professional look.

The ZSWatch actually reminds us quite a bit of the Open-SmartWatch project we covered back in 2021, in that the final result looks so polished that the average person would never even take it for being DIY. We can’t say that about all the smartwatches we’ve seen over the years, but there’s no question that the state-of-the-art is moving forward for this kind of thing in the hobbyist space.

Flappy Bird Drone Edition

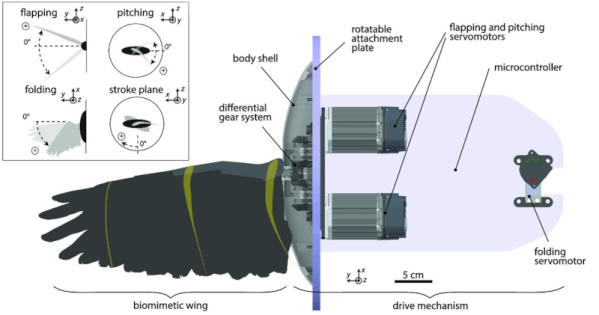
Ornithopters have been — mostly — the realm of science fiction. However, a paper in Advanced Intelligent Systems by researchers at Lund University proposes that flapping wings may well power the drones of the future. The wing even has mock feathers.

Birds, after all, do a great job of flying, and researchers think that part of it is because birds fold their wings during the upstroke. Mimicking this action in a robot wing has advantages. For example, changing the angle of a flapping wing can help a bird or a drone fly more slowly.

Continue reading “Flappy Bird Drone Edition”

2022 FPV Contest: Congratulations To The Winners!

We wanted to see what the Hackaday crowd was up to in first-person view tech, and you didn’t disappoint! Commercial FPV quads have become cheap enough these days that everyone and their mom got one for Christmas, so it was fantastic to see the DIY spirit in these projects. Thanks to everyone who entered.

The Winners

None of the entries do the DIY quite as thoroughly as [JP Gleyzes]’s “poor man’s FPV journey”. This is actually three hacks in one, with DIY FPV goggles made from cheap optics and 3D printed additions, a USB joystick to PPM adapter to use arbitrary controllers with an RC transmitter, and even a fully DIY Bluetooth-based controller for a popular flight simulator. [JP] has done everything but build his own drone, and all the files are there for you to use, whether you’re goal is to do it on the cheap, or to do something new.

If you want to build your own drone from scratch, though, ESP32 Drone project has you covered. At least, mostly. This build isn’t entirely finished yet, and it’s definitely got some crash-testing still in its future, but the scope and accessibility of the project is what caught our eyes. The goal is to make a lightweight indoor quad around parts we can all get easily and cheaply, completely scratch-built. This drone is meant to be controlled by a smartphone, and the coolest parts for us are the ESP_Drone and ESPStream software that run on the drone and your phone respectively. Congrats to [Jon VB]! Now get that thing in the air.

And if you’re looking for a tidy little build, [Tobias]’s Mini FPV Speed Tank doesn’t disappoint. It’s a palm-sized mini tank, but this thing hauls, and looks like a ton of fun to drive around. It uses an absolutely tiny RP2040 module, an equally tiny receiver, and a nano FPV camera and transmitter to keep it compact. The 3D-printed frame and tracks are so nice that we’re not even complaining that the FPV rig is simply rubber-banded on top of the battery. This looks like a super fun build.

Each of these three projects have won a $150 Digi-Key shopping spree to help out with parts in this, or your next project. Thanks again to Digi-Key for sponsoring!

Continue reading “2022 FPV Contest: Congratulations To The Winners!”

Machining With Electricity Hack Chat

Join us on Wednesday, January 18 at noon Pacific for the Machining with Electricity Hack Chat with Daniel Herrington!

With few exceptions, metalworking has largely been about making chips, and finding something hard enough and tough enough to cut those chips has always been the challenge. Whether it’s high-speed steel, tungsten carbide, or even little chunks of rocks like garnet or diamond, cutting metal has always used a mechanical interaction between tool and stock, often with spectacular results.

But then, some bright bulb somewhere realized that electricity could be used to remove metal from a workpiece in a controlled fashion. Whether it’s using electric sparks to erode metal — electric discharge machining (EDM) — or using what amounts to electroplating in reverse — electrochemical machining (ECM) — electrical machining methods have made previously impossible operations commonplace.

join-hack-chatWhile the technology behind ExM isn’t really that popular in the hobby machine shop yet, a lot of the equipment needed and the methods to make it all work are conceivably DIY-able. But the first step toward that is understanding how it all works, and we’re lucky enough to have Daniel Herrington stop by the Hack Chat to help us out with that. Daniel is CEO and founder of Voxel Innovations, a company that’s on the cutting edge of electrochemical machining with its pulsed ECM technology. There’s a lot to unpack, so make sure you stop by so we can all get up to speed on what’s up with using electricity to do the machining.

Our Hack Chats are live community events in the Hackaday.io Hack Chat group messaging. This week we’ll be sitting down on Wednesday, January 18 at 12:00 PM Pacific time. If time zones have you tied up, we have a handy time zone converter.