I recently had the opportunity to purchase an early version of a new display, and it happened to be just the thing I needed to make a project work. That display is the Elecrow 11.6″ CrowVision touchscreen slated for release in 2024. Preorders are being accepted on Crowd Supply.
I had an idea for a retro-inspired PC build that was just waiting for a screen like this. I’ll talk about the display and what’s good about it, then showcase the build for which it was the missing piece. If you’ve got a project waiting for something similar, maybe this part will provide what you need or at least turn on some new ideas.
What Is It?
 The CrowVision 11.6″ 1366 x 768 touchscreen has an HDMI input, USB output for touch data, and accepts 12 V DC. It’s made to interface easily with a Raspberry Pi or other SBC (single-board computer).
Personally I consider a display like this to be the minimum comfortable size for using desktop type applications in a windowed environment. Most displays in this space are smaller. But aside from that, what helps make it useful for embedding into a custom enclosure is the physical layout and design.
Since I was looking for the largest display that could be flush-mounted in an enclosure without a lot of extra space around the display’s sides, it was just what I needed. The integrated touchscreen is a nice bonus.
Useful Features
Apart from its size, there are a few features that helped make my project a bit easier than it otherwise would have been.
The flat, borderless black front of the display allows for easy flush mounting. It’s also trivial to design for enclosure-wise. There’s an adhesive, but for truly secure mounting there are four threaded holes in the metal shield at the back.
The display is physically very close to being the same width as the Raspberry Pi 400 (or the official Raspberry Pi keyboard), which was good news for the overall layout of my retro build. It was important for the look of my machine for the keyboard and display to have matching widths.
The driver board is secured to the rear shield of the display, well away from the display edges. This helps keep connectors and cables from sprawling outward and bloating the part’s footprint, making mounting in snug spaces easier.
Another handy feature is the included mounting solution for a variety of different single-board computers. Mounting posts slide in two channels, accommodating multiple form factors. Having an SBC like a Raspberry Pi attached directly to the display’s back is extremely handy for tight builds and makes cable management easier.
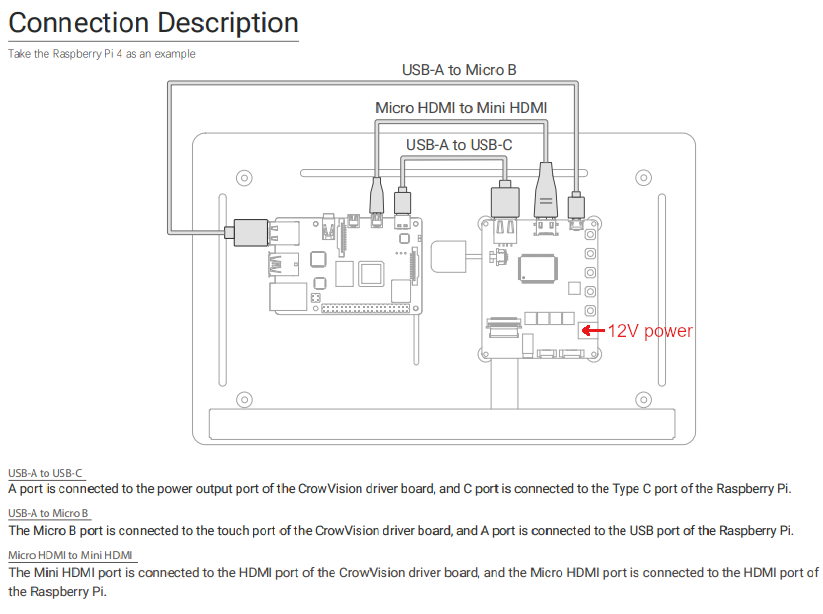
Finally, the display accepts 12 V and can pass 5 V power to a board like a Raspberry Pi, eliminating the need for a second power supply just for the SBC. The display’s built-in power button — mounted on the rear, and can be expanded out via an included extension — controls power for both the display and any attached SBC.
The display worked perfectly when connected to a Raspberry Pi. The multitouch input, a USB connection from the display to the Pi, also worked effortlessly. I verified multitouch worked properly with this web-based multitouch tester.
Retro-Inspired PC Build
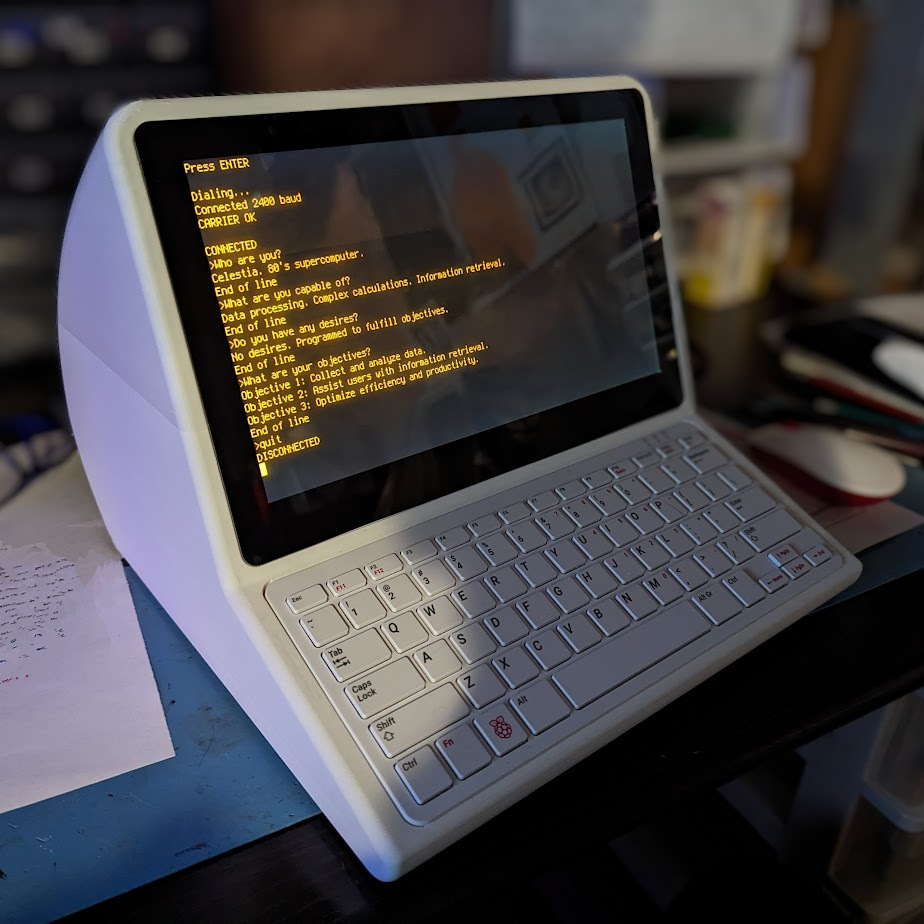
Celestia is my retro styled PC designed to use a Raspberry Pi — either a Raspberry Pi 400 or a Raspberry Pi SBC plus an official Raspberry Pi keyboard — in a one-piece form factor.
A 3D-printable enclosure accommodates the CrowVision 11.6″ display, the only display option that really matched what I was going for. Since the display integrates a touchscreen, a mouse is easy to do without, helping preserve the one-piece aesthetic.
The back of the enclosure has spaces for integrating a power jack and a small USB hub for convenience, but for those who would like to remix the design and create their own ports, the CAD file includes a blank segment with no openings.
The result is a one-piece unit with some real retro aesthetics. It’s exactly what I wanted ever since coming across another retro PC project: the Callisto-2.
The design files for Celestia are all on GitHub, and while it’s a bit of a work in progress, the important parts are all there along with some tips for printing, finishing, and assembly.
A Few Words About The Keyboard
Celestia integrates a Raspberry Pi official keyboard into the 3D-printed case. But the Raspberry Pi 400 has a virtually identical form factor, and includes a computer. That means one can either attach an SBC to the display’s back using the mounting posts, or simply plug it all in to a Pi 400. It will look the same from the outside.
Both the official Raspberry Pi keyboard and the Pi 400 have matte white finishes that blend in very well if the enclosure is printed in a matte white PLA.
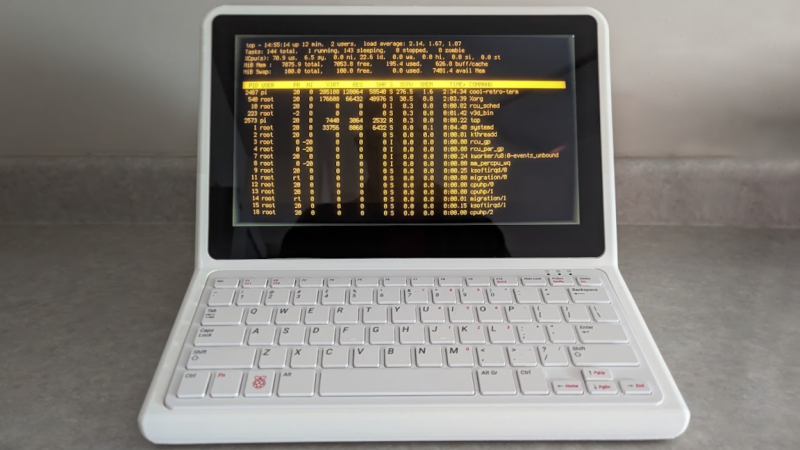
Finishing Touches
Completing the look for my build is a piece of software called cool retro terminal. I adjusted the taskbar at the top of the Raspberry Pi desktop to auto-hide, and run cool-retro-term in fullscreen mode. While cool-retro-term is running, a right-click will access additional configuration. (I think it looks best on this display by removing screen curvature, and eliminating margin.) The only downside is that it runs slowly on a Raspberry Pi.
The icing on the cake is dialing up a fictional 80s supercomputer AI for a chat, something made almost trivial thanks to Max Woolf’s simpleaichat software.
Source and Resources
As mentioned, this display turned out to be the missing link for the build I wanted. There are displays with similar design and features, like the Raspberry Pi official touchscreen, but most are smaller and lower resolution. Thin and flat HDMI displays sold as “portable monitors” looked initially promising, but tend to have issues like bezel design or connector locations that make them troublesome to integrate into custom enclosures.
If this display seems like the missing puzzle piece for your own project, the Elecrow 11.6″ CrowVision is slated for release in 2024, with preorders being handled via Crowd Supply.


I wound up discovering earlier this year that the RPi 400’s keyboard and the RPi official keyboard are the same thing (with slightly different keycap marking on F10 for power / ScrLk – but that’s as far as the difference goes) when I accidentally spilled a drink on a poor 400.
The 400 survived, but it’s keyboard did not. While I could have left the now-deceased keyboard in place and plugged a usb keyboard in, I wanted to try to fix it.
The official Pi keyboard was far cheaper than replacing the 400, it was a fairly simple swap, and it worked right out of the box.
Do I understand correctly that you replaced the Pi 400’s (damaged) keyboard guts with the guts of the official Pi keyboard? That’s good to know is possible!
Yep, that’s precisely what I did – I popped both keyboards out of their housing and swapped them. I guess I can see how what I wrote isn’t quite clear – my apologies!
Nice hack!
That’s pretty slick. Makes me wonder why no one’s made a custom CM4 carrier board to stick inside the original keyboard.. Maybe with a battery.
Oh man… I’d buy one! I understand the reasons for making the Pi400 with 4GB… but I would still MUCH prefer 8 GB. An all-in-one that accepted a CM4 would allow this… It’s also why I am very very tempted to buy a clockworkpi. You can never have too many weird little computers !(This message typed on a GPD MicroPC)
I have a soft spot for amber screen consoles after using a Bondwell 12 in high school. This is a really great build!
I might have to try something like when (if?) I get my current computer project finished.
This is exactly what I’ve been looking for.
Now I’m divided between this one and the one from orange pi.
“The only downside is that it runs slowly on a Raspberry Pi”
For that real 1960s feel, this is a feature, not a bug.
Does the power button on the display send a shutdown signal over USB to the Pi?
Give it a green screen and run Robco UOS on it for an authentic 2070’s experience. :)
I have been developing a Dash display for old cars and found these screens on Amazon/ali , most uses Realtek HDMI->LVDS chip , some have the options of RGB, composite input but you can order without. various panel types are available too , you must spec that on order as the power drivers are different but essentially this product already exists(with same features) , normally they are referred to as Advertising panels and can vary from oddball sizes like super wide but super short (1920×720 example) to round displays , Most of the time the RTL driver chip is configured as “A TV display” so it has menu’s etc and this is stored in the EEPROM but they can be configured to act as Display only (no menus) , with or without logo. This can also be changed on the fly by the input signal adapter (eg i2c on VGA plug) . While i have only used the RealTek and COMTex LVDS driver chips there are other out there with differing features but most are the same as “generic tv/monitor operation”. Oh and the back plate, yeah when you do big orders you can spec where you want mount points , my first attempt at this went very wrong as when they sent me the cad file i somehow added a bunch of standoffs and sent that off for my sample order, the product of got had standoff randomly all over the mount bracket. lesson learned there.
For this money I would sooner grab a Mac mini retina display, at least it is quad 1024×768, something resembling a classic resolution. Better yet would be 8x 640×480, or 16x 320×240, even 16:10 or 5:4 is nearer 3:2 ratio. This screen might do 1024×768, but you would need some bezels, and the glass is only making it wider.
$100 is not a good price if the other commenter is correct. Can get the whole tablet for that price!
I’m sold totally. I want one on my desk.
Interesting to see the mention of cool-retro-terminal (crt for short). I discovered this terminal program only a couple of weeks ago, and it has become my terminal of choice on my main computer running Ubuntu at home. I mostly use the IBM 3278 font with a green screen, recalling the years I spent in front of a genuine IBM 3278 in my early career. That font is very legible and easy on the eyes. I leave just a bit of screen curvature turned on for the sake of nostalgia. The program has lots of options to play with, but some of them, while fun, are just a bit too authentic, impairing legibility too much.
But with the right settings, you can get a terminal that is extremely practical and usable, while being artistic, with a fair bit of nostalgic hacker appeal.
This is ridiculously beautiful. Fantastic work.
I don’t particularly care about retro-themed gadgets, but this thing looks great! There might be some interest in an injection molded kit.
Now, if only the screen were curved outwards slightly like classic CRTs were – you could of course put a thin curved glass sheet right in front of it, but that would kill the whole touchscreen aspect.
I’d stick with hi res Ipad displays for this kind of project, 768 is too constrained.
PS this is my last comment on had. I am sick of the current censorship and fully expect this to be deleted. For observers, check the comment count and then count the number of comments, they won’t tally because comments are being regularly deleted the days. I am disappointed Al.