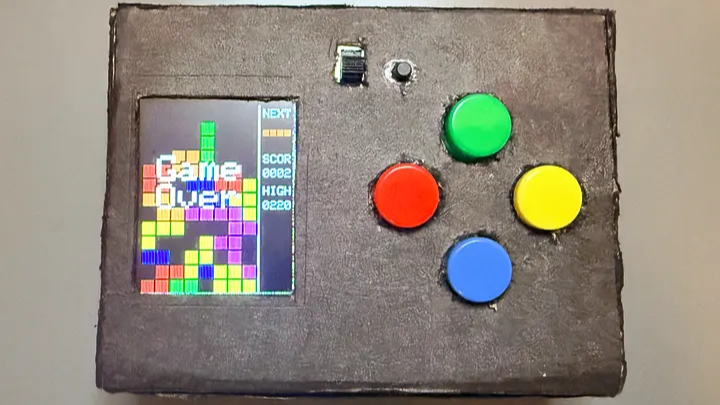
As anyone who’s made a thing knows, a lot of work goes into bringing something from idea to completion. But there’s also considerable satisfaction in the process. [Willian] recently did exactly that, and shares the joyful experience of creating a homebrew handheld game gadget from scratch. It runs a homebrewed Tetris clone (as well as Snake), and we love the results.
The game gadget uses an ATmega328P programmed via the Arduino IDE, and a 1.8″ TFT color LCD screen. It’s self-contained in a box with a few buttons as controls and runs off three AAA cells. [Willian] made the smart design choice to run the microcontroller at 8 MHz instead of the more common 16 MHz, because doing so meant the board can run at 3.3 V instead of 5 V. Why does this matter? The LCD display runs off 3.3 V as well, and if all components can run off the same supply and logic levels, it simplifies things considerably.
Also, creating a 3.3 V supply is a simple matter of three alkaline cells in series with an LDO (low drop-out) regulator, which is great for a handheld device. We do note that AA cells have a considerably higher energy density and capacity than AAA cells and are usually the better choice, but one works with what one has, and sometimes the space and weight saved by AAA is just too good to pass up.
The software has some notable approaches to keep things responsive and optimal. Instead of defining each of the Tetris pieces as a 2D shape, [Willian] instead pre-defines each piece (and their rotations) so that rotating a piece is just an index change in an array, instead of a transform implementing a rotation. Also, full-screen redraws are comparatively slow over SPI and caused flickering, so only cells that have changed are redrawn to the screen to keep things responsive. The code is all on GitHub, and it’s a great peek at how things get implemented under the hood.
The enclosure is just cardboard, and it does the job in [Willian]’s case. But we’ll point out that cardboard is actually a highly adaptable material from which to prototype. With just a few tips and a little care, paper products can be your new best friend when it comes to one-offs and prototypes.


Fun project.
That from-scratch enclosure might be a bit too scratchy for the times we live in. What say we chip in to buy Willian a second hand Ender 3?😉
It’s quite solid actually. I have it on my table and play with it from time to time.
I’m interested in this project. I’ve been recently playing with SSD1306s and only updating changed parts of the screen (since most common libraries work by doing full-screen refreshes, I had to write my own stuff). Right now I don’t have much except it works with page addressing and can draw blocks of arbitrary width up to 8 pixels high, including across page boundaries.) I’m figuring the author did something like that (ignoring for the moment that the color displays I don’t think normally have “page mode” like the ssd1306.
Also, the reason full-screen refreshes are slow has to be because of the 8MHz system clock used, which is fine. I’ll note that my immediate partial-screen code can draw so fast, even at 400khz, that you can visibly see the drawn portion flicker…which makes sense when you’re blasting bits out at that speed and only updating an 8×16 block, at most, at a time.
Cool project. I need to check out the code as a learning experience.
Well done