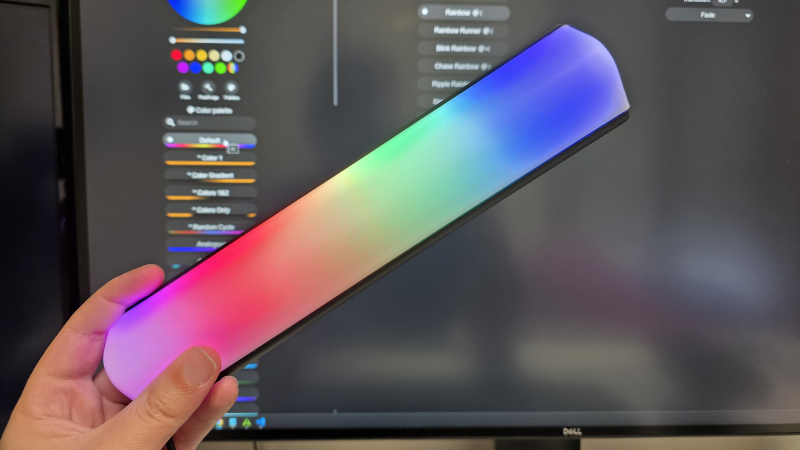
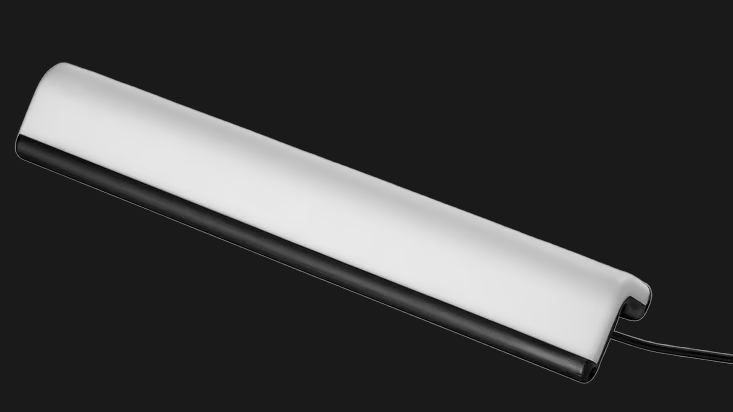
The IKEA SKAFTSÄRV is an economical LED accent lamp, but while highly affordable it has only fixed lighting options. [simoneluconi] shows how it can easily be turned into a fully-configurable, WLED-connected, WiFi-enabled RGB lamp with little more than an ESP32-based board.
To do this, the control board of the lamp gets replaced with an ESP32-C3 Super Mini board. Control and automation comes from WLED, open-source software that offers flexible automation and control for LED lights with a wide range of features, including native Android and iOS apps.
Modifying the SKAFTSÄRV lamp is fairly straightforward, but opening the unit does require breaking some glued seams to get inside. Once that’s done, the replacement board fits nicely into the housing and the unit can be closed back up. As far as WLED is concerned, the new lamp has 30 LEDs, WS281x type, GRB color order.
The end result is a stylish accent lamp with built-in diffusor and mount that can be controlled over WiFi with all the features WLED brings, such as easy integration with Home Assistant.
This isn’t the first time IKEA’s LED lighting has been given a powerup. Their pixel-style LED wall-mounted OBEGRÄNSAD, which displays a few canned animations out of the box, got considerably enhanced with a new controller.
Thanks [Crash] for the tip!


Perfect for warp nacelle models
Why is there a microphone in the lamp ?
Just a guess, but probably one of the baked in modes is sound reactive?
I have that lamp and yes it is. It also sucks – there’s noticeable delay and it adjusts sensitivity in a way that makes it basically useless outside of the very specific setting of a quiet ikea with music playing right next to it.
At first glance it looked to me like a FEA, a stress visualisation, in a bar. 😂
Not sure what a FEA is but if it’s anything like those “vibrating massagers” then I had the same thought. 😉
Can you hook up more than one to the same WLED controller?
As long as you have a way to carry the signal plus power wires across to the next unit, then yes. you can plug tens of these, better if you inject power every 100 or so LED.
alternatively give them an ESP32 each and synchronize them over WiFi
Hey thanks for this article and the detailed explanation in GitHub, much appreciated! I bought the lamp yesterday and it’s a part of my lighting scripts now. Stands to reason that the småsnöre lamp might be just as easy to brain transplant.
It’s weird to me that they so often make RGB lights diffuse to such an extend, either with straight plastic surfaces like this or with ping-pong balls and such.
Personally I like the RGB led best if they are more bright points, and I can see a slight diffusion being a thing, to get them to flow together more, but the extreme stuff generally favoured seems odd to me.
Is that just me or what?
I think LEDs without diffusion are cheaper than with, so you could just acquire those according to your preference.
Heads up – I fried 2 of these by plugging them into a higher-wattage usb-c plug. Don’t understand why they didn’t build these with a regulator.
Been to IKEA Saturday (16MAY2026) to buy a couple and try.
They refuse to sell me alleging they will recall for a problem with the stand (apparently, too fragile).
FEAR NOT! I bought online to collect and everything went well….
Thanks for this article. I followed the instructions on the Github page, ordered the ESP32 boards and converted 3 of these.
Programming the ESPs with WLED was easy via webserial (directly downloading the firmware and pushing it into the controllers, one by one in the browser).
Overall it was pretty easy. One of the hardest parts was carefully breaking the glue loose on the outer cover, but I got it done eventually.
The other tricky part is that you have to solder two wires to both the +5 and the ground pads, and the pads are tiny. I was able to grip the sets of two wires with hemostats squeeze them together, then solder them both on as if they were one. It helped a lot that I have a tiny Pinecil soldering iron that has very precise temp control and a tiny tip.
All three of the units are converted and operating. I’m going to control them all via Home Assistant, but you could control them with the WLED web interface itself just fine.
I can tell you, there’s NO WAY I’d want to try to hook multiple units up to one micro controller and deal with all of the inter-unit cabling that that would entail, much less all of the power of 90 LEDs getting pumped through one controller. It’s nice to be able to address them all separately and have different things going on on each if I want to too.
I should add that there’s no reason to use multiple units on one micro controller, since the WLED firmware has an option that lets you sync all other WLED controllers on the same subnet to the one you’re currently controlling, making them all act as one.
Several guitar picks, spudgers, tweezers and a few flat head bits later, and, I am left having to ask: Do you have more details on actually breaking the glue without breaking the plastic? All I seem to get to do is chip off bits of the seams.
The biggest tip I have for that is, start in the middle (try each side of the middle for a place to start a gap). Put something like a really thin guitar pick (or better yet, one of those phone disassembly toolkit tools, the thinner, the better) and very slowly work toward the ends, where the glue actually is.