Creative DRAM Abuse With Rowhammer

Project Zero, Google’s security analyst unit, has proved that rowhammer can be used as an exploit to gain superuser privileges on some computers. Row Hammer, or rowhammer is a method of flipping bits in DRAM by hammering rows with fast read accesses. [Mark Seaborn] and the rest of the Project Zero team learned of rowhammer by reading [Yoongu Kim’s] 2014 paper “Flipping Bits in Memory Without Accessing Them:
An Experimental Study of DRAM Disturbance Errors” (PDF link). According to [Kim], the memory industry has known about the issue since at least 2012, when Intel began filing patents for mitigation techniques.

Row hammer” by DsimicOwn work. Licensed under CC BY-SA 4.0 via Wikimedia Commons.

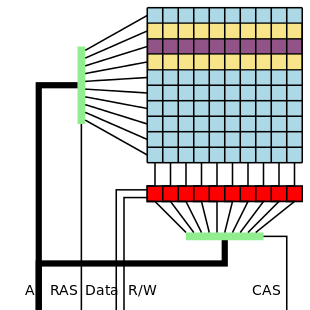
The technique is deceptively simple. Dynamic RAM is organized into a matrix of rows and columns. By performing fast reads on addresses in the same row, bits in adjacent rows can be flipped. In the example image to the left, fast reads on the purple row can cause bit flips in either of the yellow rows. The Project Zero team discovered an even more aggressive technique they call “double-sided hammering”. In this case, fast reads are performed on both yellow rows. The team found that double-sided hammering can cause more than 25 bits to flip in a single row on a particularly vulnerable computer.

Why does this happen? The answer lies within the internal structure of DRAM, and a bit of semiconductor physics. A DRAM memory bit is essentially a transistor and a capacitor. Data is stored by charging up the capacitor, which immediately begins to leak. DRAM must be refreshed before all the charge leaks away. Typically this refresh happens every 64ms. Higher density RAM chips have forced these capacitors to be closer together than ever before. So close in fact, that they can interact. Repeated reads of one row will cause the capacitors in adjacent rows to leak charge faster than normal. If enough charge leaks away before a refresh, the bit stored by that capacitor will flip.

Cache is not the answer

If you’re thinking that memory subsystems shouldn’t work this way due to cache, you’re right. Under normal circumstances, repeated data reads would be stored in the processor’s data cache and never touch RAM. Cache can be flushed though, which is exactly what the Project Zero team is doing. The X86 CLFLUSH opcode ensures that each read will go out to physical RAM.

Wanton bit flipping is all fine and good, but the Project Zero team’s goal was to use the technique as an exploit. To pull that off, they had to figure out which bits they were flipping, and flip them in such a way as to give elevated access to a user level process. The Project Zero team eventually came up with two working exploits. One works to escape Google’s Native Client (NaCL) sandbox. The other exploit works as a userspace program on x86-64 Linux boxes.

Native Client sandbox escape exploit

Google defines Native Client (NaCL) as ” a sandbox for running compiled C and C++ code in the browser efficiently and securely, independent of the user’s operating system.”  It was designed specifically as a way to run code in the browser, without the risk of it escaping to the host system.  Let that sink in for a moment. Now consider the fact that rowhammer is able to escape the walled garden and access physical memory. The exploit works by allocating 250MB of memory, and rowhammering on random addresses, and checking for bit flips. Once bit flips are detected, the real fun starts. The exploit hides unsafe instructions inside immediate arguments of “safe” institutions. In an example from the paper:

20EA0: 48 b8 0f 05 EB 0C F4 F4 F4 F4 movabs $0xF4F4F4F40CEB050F,%rax 

Viewed from memory address 0x20EA0, this is an absolute move of a 64 bit value to register rax. However, if we move off alignment and read the instruction from address 0x20EA02, now it’s a SYSCALL – (0F 05).  The NaCL escape exploit does exactly this, running shell commands which were hidden inside instructions that appeared to be safe.

Linux kernel privilege escalation exploit

The Project Zero team used rowhammer to give a Linux process access to all of physical memory. The process is more complex than the NaCL exploit, but the basic idea revolves around page table entries (PTE). Since the underlying structure of Linux’s page table is well known, rowhammer can be used to modify the bits which are used to translate virtual to physical addresses. By carefully controlling which bits are flipped, the attacking process can relocate its own pages anywhere in RAM. The team used this technique to redirect /bin/ping to their own shell code. Since Ping normally runs with superuser privileges, the shell code can do anything it wants.

The TL;DR

Rowhammer is a nasty vulnerability, but the sky isn’t falling just yet. Google has already patched NaCL by removing access to the CLFLUSH opcode, so NaCL is safe from any currently known rowhammer attacks. Project Zero didn’t run an exhaustive test to find out which computer and RAM manufacturers are vulnerable to rowhammer. In fact, they were only able to flip bits on laptops. The desktop machines they tried used ECC RAM, which may have corrected the bit flips as they happened. ECC RAM will help, but doesn’t guarantee protection from rowhammer – especially when multiple bit flips occur. The best protection is a new machine – New RAM technologies include mitigation techniques. The LPDDR4 standard includes “Targeted Row Refresh” (TRR) and “Maximum Activate Count” (MAC), both methods to avoid rowhammer vulnerability. That’s a good excuse to buy a new laptop if we ever heard one!

If you want to play along at home, the Project Zero team have a rowhammer test up on GitHub.

[James] Multiplies His Floor Sander By Four

Hackaday contributor and new homeowner [James Hobson] had a dilemma on his hands. He had rented a commercial drum sander to begin a floor refinishing project. Like many before him, James was a bit too aggressive with the drum sander in places. The uneven stripes didn’t show up until the sander was returned and the floor was stained. Renting the sander again would be an expensive prospect. There had to be a better answer…

That’s when [James] put on his [Hacksmith] cape and got to work. He built himself a DIY floor sander (YouTube Link) using four Ryobi orbital sanders, some scrap wood, and a bit of ingenuity. [James] screwed the four sanders to a plywood sub plate, then added a top plate with a handle. He even gave the sander its own outlet strip so he wouldn’t be dragging four power cords behind him.

[James] found that synthetic steel wool pads weren’t cutting through the floor very well, so he upgraded to 220 grit sandpaper. That did the trick, and the sander worked great. Now he won’t have to rent a drum sander when it comes time to refinish the first floor of his new house!

Continue reading “[James] Multiplies His Floor Sander By Four”

Caption CERN Contest Rolls Into Week 6

The Caption CERN Contest has been rolling along since the first week of February. We’re in our 6th week now, and the users over at Hackaday.io have given us some great captions!

Here are the results from Week 5:

The Funnies:

Guy #1 “Pay close attention: If anything goes wrong, press this BIG RED BUTTON. Then count to ten.”
Guy #2″ What does it do?”
Guy #1 “Absolutely nothing… it just gives you something to do while you’re dying a horrible, painful death.” – [Lorin Briand]
“We’ve miniaturized the mainframe – only 21,480 tubes!.” – [Tim]
“Watch my finger…now, you are getting very sleepy…fund this project…sleeeeepy…” – [Erik Ratcliffe]

The winner this week is [johnowhitaker] with the following caption:

‘Any moment now…’ An elderly visitor waits skeptically for the ‘funny tingling’ experienced by anyone within 3m of the machine as it runs a specific program.

Congrats  [johnowhitaker], you’re getting a free CRT Android T-shirt from The Hackaday Store!

Week 6 just started! Caption the image for your chance to win a T-shirt of your own!

cern-6-sm
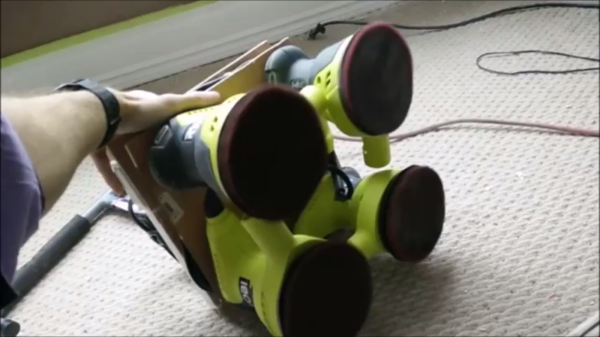
CERN scientists and engineers often find themselves in interesting positions. However, we’re not sure if this CERN staffer ever expected to be quite where he is now!

The only hard information we have to go on is the album this title of the image: “SEPARATEURS ELECTRO STATICS MONTAGE DES ELECTRODES”. Our French isn’t as good as our C++ or x86 assembly, but that sounds like electrostatic separators. Which separators, on which beamline, and in what decade? Your guess is as good as our’s, or CERN’s for that matter.

Add your humorous caption as a comment to this project log. Make sure you’re commenting on the project log, not on the project itself. As always, if you actually have information about the image or the people in it, let the folks at CERN know on the original image discussion page.

If you really want to see what’s happening at CERN, enter The Hackaday Prize! You could win a trip to Geneva, Switzerland to visit CERN yourself (not to mention a trip to space)!

Good Luck!


Hacklet 37 – Nixie Projects

Nothing quite beats the warm glow of a tube. What better way to enjoy that glow than to use it to read numbers? Nixie tubes were created by Haydu Brothers Laboratories, and popularized by Burroughs Corp in 1955. The name comes from NIX I – or “Numeric Indicator eXperimental No. 1”. By the mid 1970’s, seven segment LED’s were becoming popular and low-cost alternatives to Nixies, but they didn’t have the same appeal. Nixie tubes were manufactured all the way into the 1990’s. There’s just something about that tube glow that hackers, makers, and humans in general love. This week’s Hacklet highlights the best Nixie (and Nixie inspired) projects on Hackaday.io!

temperatureDisplayWe start with [Sascha Grant] and Nixie Temperature Display. [Sascha] mixed an Arduino, a Dallas DS18B20 Temperature sensor, and three IN-12A Nixie tubes to create a simple three digit temperature display. We really love the understated laser-cut black acrylic case. An Arduino Pro Micro reads the Dallas 1-wire sensor and converts the temperature to BCD. High voltage duties are handled by a modular HV power supply which bumps 9V up to the required 170V.  Controlling the Nixie tubes themselves are the classic K155ID1 BCD to decimal converter chips – a favorite for clock builders.


driverNext up is [Christoph] with Reading Datasheets and Driving Nixie Tubes. Chips like the K155ID1, and the 74141 make driving Nixie tubes easy. They convert Binary Coded Decimal (BCD) to discrete outputs to drive the cathodes of the Nixie. More importantly, the output drivers of this chip are designed to handle the high voltages involved in driving Nixie tubes. These chips aren’t manufactured anymore though, and are becoming rare. [Christoph] used more common parts. His final drive transistor is a MPSA42 high voltage NPN unit. Driving the MPSA42’s is a 74HC595 style shift register. [Christoph] used a somewhat exotic Texas Instruments TPIC6B595 with FET outputs, but any shift register should work here. The project runs on a Stellaris Launchpad, so it should be Arduino compatible code.

fixietube[Davedarko] has the fixietube clock. Fixietube isn’t exactly a Nixie. It’s an LED based display inspired by Nixie tubes. Modern amber LEDs aren’t quite the same as classic Nixies, but they get pretty darn close. [Dave] designed a PCB with a 3×5 matrix of LEDs to display digits. A few blue LEDs add a bit of ambient light. The LEDs are driven with a 74HC595 shift register. The entire assembly mounts inside a tiny glass jam jar, giving it the effect of being a vacuum tube. The results speak for themselves – fixietubes certainly aren’t Nixies, but they look pretty darn good. Add a nice 3D printed case, and you’ve got a great project which is safe for anyone to build.

openNixieFinally, we have [Johnny.drazzi] with his Open Nixie Clock Display. [Johnny] has been working on Open Nixie for a few years. The goal is to create a Nixie based clock display which can be driven over the SPI bus. So far, [Johnny] has 6 Russian IN-12 tubes glowing with the help of the ubiquitous K155ID1 BCD to decimal converter. The colons of the clock are created with two INS-1 neon indicators. [Johnny] spends a lot of time analyzing the characteristics of a Nixie tube – including the strike voltage, and steady state current. If you’re interested in building a Nixie circuit yourself, his research is well worth a read!

Not satisfied? Want more Nixie goodness? Check out our Nixie tube project list!

That’s about all the time we have for this week’s Hacklet. As always, see you next week. Same hack time, same hack channel, bringing you the best of Hackaday.io!

Origami Busts A Move With Dancing Paper

Origami cranes are cool, but do you know what’s cooler? Origami cranes dancing to the beat. That’s the challenge [Basami Sentaku] took on when he created Dancing Paper (YouTube link). You might remember [Basami] from his 8 bit harmonica hack. In Dancing Paper, paper cranes seem to dance all on their own – even performing some crazy spinning moves. Of course, the “magic” is due to some carefully written code, and magnets, lots of magnets.

Using magnets to move objects from below isn’t a new concept. Many of us have seen the “ice skating pond” Christmas decoration which uses the same effect. Unlike the skating pond,Dancing Paper has moving parts (other than the cranes themselves). Under the plastic surface are a series of individually controlled electromagnets. Each of the supporting dancers has a line of four magnets, while the featured dancer in the center has a 5×5 matrix. The 41 electromagnets were wound around bolts with the help of a Tamiya motor and gearbox.

The actual dance moves are controlled by C code which appears to be running on an Atmel microcontroller. Of course a microcontroller wouldn’t be able to drive those big coils, so some beefy TO-220 case transistors were employed to switch the loads. The cranes themselves needed a bit of modification as well. Thin pieces of wire travel from the neodymium magnets on their feet up to the body of the crane. The wire provides just enough support to keep the paper from collapsing, while still being flexible enough to boogie down.

Click past the break to see Dancing Paper in action!

Continue reading “Origami Busts A Move With Dancing Paper”

Beating Super Hexagon With OpenCV And DLL Injection

Every few months a game comes along which is so addictive, players can’t seem to put it down – no matter how frustrating it may get. Last year one of those games was Super Hexagon. After fighting his way through several levels, [Val] decided that designing a bot to beat the game would be more efficient than doing it himself. Having played a few rounds of Super Hexagon ourselves, we can’t fault him on that front!

At its core, Super Hexagon is a simple game. Walls move from the screen edges toward a ship located near the center of the screen. The player uses the arrow keys to “orbit” the ship around a central shape. Avoid getting crushed by the walls, and you’re golden. However, the entire game board is constantly spinning, expanding, contracting, flashing, and generally doing things to disorient the player while ever more complex wall patterns move in to kill you. In short, Super Hexagaon makes Touhou bullet hell games look like a cakewalk.

The first step in beating the game is to capture the screen. [Val] tried Fraps and VLC, but lags of 2 seconds or more were not going to work. Then [Val] turned to DLL Injection. Super Hexagon calls the OpenGL function glutSwapBuffers() to implement double buffering. Every frame of the game is rendered in the background. Once rendering is complete glutSwapBuffers() is called to swap the buffers, and the process starts over again. [Val] changed the game code such that his own frame capture function would be called instead of glutSwapBuffers(). Once he was done capturing the game’s video buffer, [Val] then called the real glutSwapBuffers() function. It worked perfectly.

Now that he had an image, [Val] used OpenCV to process it. Although game is graphically very noisy, there are only a few colors used at any one time. It didn’t take much work to come up with an algorithm which would create a binary image of the walls and the ship itself.

step5
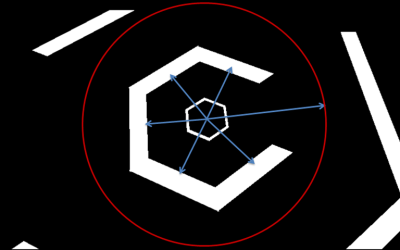
[Val] cast rays from the center of each wall through the center of the screen. The ray which was longest before intersecting another wall would be the best escape route. This simple solution worked, but only for about 40 seconds. At that point, Super Hexagon would start throwing more complex patterns, and the AI would fail. The final solution was to create an accessibility condition which also took into account how much space was available between the various approaching walls. This new version of the AI was able to beat the game.

So was this a more efficient method than grinding through Super Hexagon manually? Since [Val] now knows all about DLL injection and OpenCV, we sure think it was!

Click past the break to see the [Val’s] bot in action!

Continue reading “Beating Super Hexagon With OpenCV And DLL Injection”

Hacklet 36 – Oscilloscope Projects

Oscilloscopes are one of the most often used tools of the engineer, hacker, or maker. Voltmeters can do a lot, but when you really need to get a good look at a signal, a good scope is invaluable. This week’s hacklet is triggered by the rising slope of some of the best Oscilloscope projects on Hackaday.io!

rigol500We start with [DainBramage’s] recent project Stretching the Limits of a Rigol DS-1102E Scope. The new Rigol ds1054z may be getting all the press lately, but the older DS-1102E (100 MHz) model is still a very capable scope. [DainBramage] broke out his vintage Singer CSM-1 service monitor to generate frequencies all the way up to 500 MHz. The Rigol did admirably well, detecting a sine wave all the way up to 500 MHz. This is in part due to the scope’s 1 gigasample-per-second sampling rate. Once things got beyond the specified limit of 100 MHz though, the signal began to attenuate.  Not bad for pushing a low-end scope way beyond its limits!


cornel-scopeNext up is [Bruce Land] with his PIC32 oscilloscope. Microcontroller scope projects are nothing new, but one that runs at nearly 1 MHz sampling rate while generating NTSC composite video is nothing to sneeze at. [Bruce] pulled this off by using Direct Memory Access (DMA) to move the data from the ADC to memory, and to get the video data from memory to the I/O pins used to generate video. The video itself is created by a resistor tree DAC. All you need to make black and white video is three resistors and two I/O pins. [Bruce] says the entire scope cost about $4.00 us in parts!

scope-hand[Jacob Christ] mixed art and science with his chipKIT Oscilloscope Plotter. [Jacob] used a Microchip PIC32 based Fubarino to draw patterns on his scope. To do this the scope must be set to X-Y mode. [Jacob] paired his Fubarino with a MCP4902 Digital to Analog Converter (DAC). Using a dedicated DAC is a great way to do this. [Jacob’s] images are a testament to that, as they’re some of the cleanest “scope art” drawings we’ve seen. Much like [Bruce Land], [Jacob] used his project as the basis for a college class. In fact, the image to the left was created by one of his students!

Want more scope goodness? Check out our new Oscilloscope Projects List!

Hackaday.io Update!

Hackaday.io is getting new features every day. Our dev team has just rolled out a new gallery view. Just click on a project’s featured image, or the “View Gallery” button, and you will be taken to a gallery view of every image used in the project – including log images. YouTube videos will render in the gallery as well. It’s a great way to view a timeline of progress for some of the projects on hackaday.io. For a great example of this, check out OpenMV’s gallery.

In other Hackaday.io news, check out the Caption CERN Contest! Every week we put up a new image from CERN’s archives. The Hackaday.io user who comes up with the funniest caption wins a T-Shirt from The Hackaday Store!

Looks like we’ve hit the end of the trace for this Hacklet. Same hack time, same hack channel, bringing you the best of Hackaday.io!