Repair And Calibration Of Valhalla Programmable Precision Standard

Precision standards are the pinnacle of test and measuring instrumentation. Well engineered, sure, but also beautifully built and a feast to look at, no matter how old they are. [Shahriar] at “The Signal Path” often gives us the skinny on such equipment. In the latest episode, we get a look inside a Valhalla 2701C Programmable Precision DC Voltage Standard.

Even by 1990 standards, it is a fairly basic instrument, capable of producing just DC Voltages from 100nV up to 1200V. But it is a reference standard, so the output is highly stable, accurate and precise.  He snagged it from eBay on the cheap but transport seemed to have caused some damage. It would switch on and relays would click when he pressed buttons, but the 7-segment LED display was blank. Luckily, opening the top cover fixes that problem – just a loose connection between the front display and the main board. Examination also shows that adding a 120mA DC current range would require adding additional components on the main board so his hope of doing a quick firmware upgrade is short lived.

[Shahriar] takes the opportunity to walk us through the various sections of the well built unit. It’s apparently seen some repairs during it’s life. A few capacitors look changed, and a relay housing has seen damage from a soldering iron. The digital section is mainly the 6800 micro controller, an EPROM and a NVRAM, and it generates the PWM signals needed for producing the output voltages. A highly precise reference signal is essential for such equipment, and this one uses the LM299 with a “custom” suffix meaning it was specially screened and binned. He does a quick calibration run, but it’s obviously rushed and doesn’t produce stable results. But that could also be due to the low quality cables he used, or a number of other factors. Calibrating such equipment is a job demanding both time and patience.

While this may not knock your socks off. For that, check out this post where [Shahriar] does a tear down of the one million dollar Labmaster 10-100zi Oscilloscope, or this other one where he plays around with a half a million dollar oscilloscope you’ll probably never use, much less own.

Continue reading “Repair And Calibration Of Valhalla Programmable Precision Standard”

The Toy Maker

A large part of the world still educates their kids using a system that’s completely antiquated. Personal choices and interests don’t matter, and learning by rote is the norm. Government schooling is woefully inadequate and the teachers are just not equipped, or trained, to be able to impart useful education. [Arvind Gupta], a science educator, is trying to change this by teaching kids how to build toys. His YouTube channel on Toys for Science and Math Education has almost 100,000 subscribers and over 44 million views. It’s awesome.

matchstickmecanno01[Arvind] graduated from one of the finest engineering schools in India, the Indian Institute of Technology in Kanpur, and joined the TATA conglomerate at their heavy-vehicles plant helping build trucks. It didn’t take him long to realize that he wasn’t cut out to be building trucks. So he took a year off and enrolled in a village science program which was working towards changing the education system. At the weekly village bazaar, he came across interesting pieces of arts and crafts that the villagers were selling. A piece of rubber tubing, used as the core of the valve in bicycle tubes, caught his eye. He bought a length and a couple of matchboxes, and created what he calls “matchstick Meccano”.
This was in the 1970’s. Since then, he has been travelling all over India getting children to learn by building fun toys. The toys he designs are made from commonly available raw material and can be easily built with minimum resources. These ingenious DIY toys and activities help make maths and science education fun and interesting for children at all levels of schooling. All of his work is shared in the spirit of open source and available via his website and YouTube channels. A large body of his work has been translated in to almost 20 languages and you are welcome to help add to that list by dubbing the videos.

Check out the INK Conference video below where he shares his passion for education and shows simple yet entertaining and well-designed toys built from trash and recycled materials.

Continue reading “The Toy Maker”

Fail Of The Week : Watt A Loss

This one is a bit dated, but the lessons are still relevant. [Zach Hoeken] posted about the challenges he faced building a CNC stepper driver. He was experimenting with Toshiba motor drivers back in 2012.

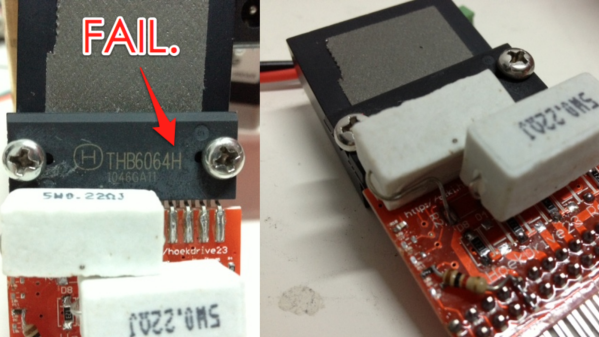
The modular motor driver boards he built were based on the THB6064AH – capable of 1/64th step, and 4.5 Amps at up to 50V. [Zach] built a test jig to run the boards through their paces. A couple of messed tracks was the least of his problems – easily fixed by cutting traces and using jumper wires to correct the errors. But the header footprints for the motor drive boards got reversed. The only way out was to solder the headers on the back side.

LESSON : Always check footprint orientation and pin numbering before sending boards to fab.

The surprising part was when someone as experienced as [Zach] messed up on Ohms Law. Based on the current he wanted the motors to run at, his sense resistors needed to be 3.2W, but he’d used SMD footprints (0805 likely) instead. Those tiny resistors couldn’t be used at all, and the 5W resistors plonked on looked like an ugly hack.

Continue reading “Fail Of The Week : Watt A Loss”

Developed On Hackaday : HaDge Update – It’s A HACK

Work on HaDge – the Hackaday con badge, continues in bits and spurts, and we’ve had some good progress in recent weeks. HaDge will be one conference badge to use at all conferences, capable of communicating between badges.

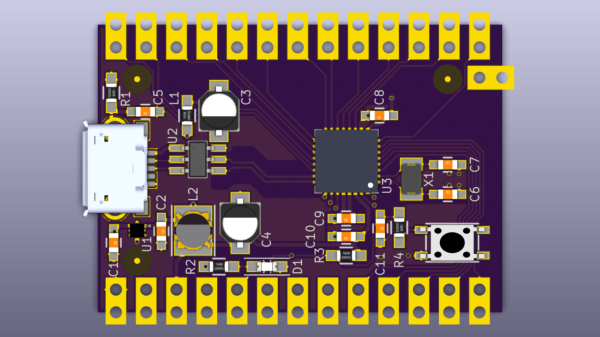
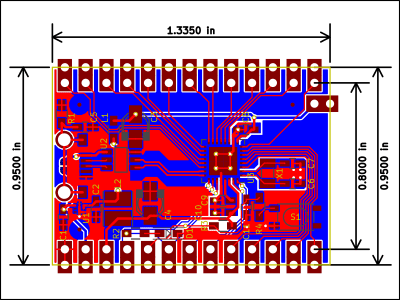
Picking up from where we left off last time, we had agreed to base it around the Atmel D21, a 32-bit ARM Cortex M0+ processor. To get some prototype boards built to help with software development, we decided to finish designing the HACK before tackling HaDge. HACK is a project that [Michele Perla] started that we have sort of assimilated to act as the prototyping platform for HaDge. We wanted a compact micro-controller board and hence opted for the SAM D21E – a 32 pin package with 26 IO’s.

[Michele Perla] had earlier designed HACK based on the larger 32 pin SAM D21G and used Eagle to hack-brddraw the schematic and layout. Using the Eagle to KiCad script, he quickly converted the project and got on to making the board layout. I took up the rear guard, and worked on making his schematic (pdf) “pretty” and building up a schematic library of symbols. While [Michele] finished off the board layout, I worked on collecting STEP models for the various footprints we would be using, most of which I could get via 3dcontentcentral.com. The few I couldn’t were built from scratch using FreeCAD. The STEP models were converted to VRML using FreeCAD. Using [Maurice]’s KiCad Stepup script, we were able to obtain a complete STEP model of the HACK board.

HACK is now ready to go for board fabrication and assembly. We plan to get about 20 boards made and hand them out to developers for working on the software. The GitHub repository has all the current files for those who’d like to take a look – it includes the KiCad source files, PDFs, gerbers, data sheets and images. The board will be breadboard compatible and also have castellated pads to allow it to be soldered directly as a module. Let us know via group messaging on the HACK project page if you’d like to get involved with either the software or hardware development of HaDge.

In a forthcoming post, we’ll put out ideas on how we plan to take forward HaDge now that HACK is complete. Stay tuned.

Hacking Education – A Makerspace Experiment

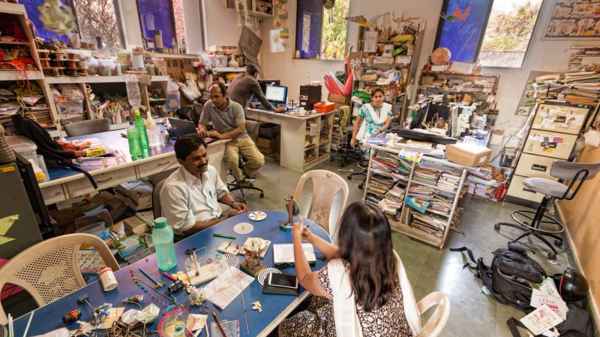
This is an Education hack, and it’s pretty awesome. [Abhijit Sinha] received an Engineering degree and took up a run-of-the mill IT job in Bangalore, considered India’s IT hub. 7 months down the line on Dec 31st, he gave notice to the company and quit his “boring” job. He ended up in Banjarpalya, a village just 30 kms out of Bangalore. But it could well have been 30 years back in time. The people there had never come across computers, and there wasn’t much sign of other modern technology. So he set up Project DEFY – Design Education for You.

He bought a few refurbished laptops, took a room, and put kids and computers together. Except, these kids just knew a smattering of English. They went to the village school, run by the government and staffed by teachers whose training was basic, at best. He told the kids there are games in those boxes for them to play, but they’d have to figure it out on their own, without help from him. Pretty soon, all of them were playing games like they were pros. That’s when [Abhijit] stepped in and told them that they’d created a base line for having fun. Everything else they did from now on had to be more fun than what they had just done. If they were interested, he would show them how.

He had a gaggle of kids waiting to hear him with rapt attention. He showed them how to look online for information. He showed them how they could learn how to build fun projects by looking up websites like Instructables, and then use locally available materials and their own ingenuity to build and modify. Once a project was done, he showed them how to post details about what they had done and learnt so others around the world could learn from them. The kids took to all this like fish to water. They couldn’t wait to get through 5 hours of school each day, and then head over to their makerspace to spend hours tinkering. Check out their Instructable channel – and see if you can give them some guidance and advice.

A year onwards, on Dec 31st again, [Abhijit] gathered the kids, and several adults who had joined in during the year, telling them he had news. He had figured they were independent enough to run the space on their own now, without any help from him. He would still get them the 500 odd Dollars they needed each month to keep it operational. Other than that, they were on their own. He’s been monitoring their progress, and from the looks of it, the hack seems to have worked. More power to [Abhijit] and others like him around the world who are trying to bring the spirit of making to those who probably stand to benefit from it the most. Check out the videos below where they show off their work.

PS : Here’s the latest update from [Abhijit] : “Got back to the Banjarapalya Makerspace after quite a while, and this is what they show me – they built a little plane. Of course it crash lands, and needs a better programming, but I am super impressed that they are ready to fly.
Anyone who wants to help them technically? Financially? With parts and components ?”

Continue reading “Hacking Education – A Makerspace Experiment”

Father And Son Fix A Scale

It’s awesome when you can tag-team with your dad to fix stuff around the house. [Ilias Giechaskiel], with help from his dad, did a complete refurbishing of a broken bathroom weighing scale, but not before trying to fix it first. The voltage regulator looked bust. Powering the rest of the circuit directly didn’t seem to work, and none of the passives looked suspect. Most of the chips had their markings scratched off and the COB obviously couldn’t be replaced anyway.

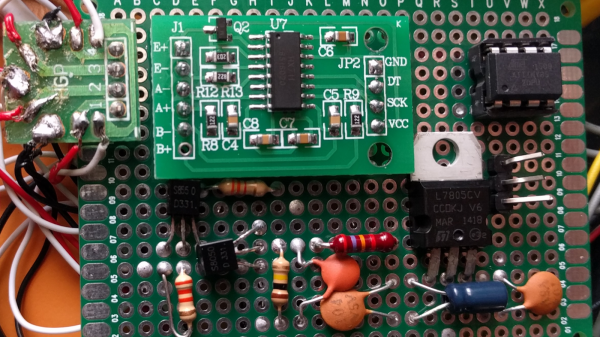
Instead of reverse engineering the LCD display, they decided to retain just the sensor and the switches, and replace everything else. The ATtiny85 seemed to have enough IO pins to do the job. But the strain-gauge based load cell, connected in a bridge configuration, did not have a signal span large enough to be measured using the 10 bit ADC on the ATtiny. Instead, they decided to use the HX711 (PDF) – a 24 bit ADC with selectable gain, specifically meant for use in weighing scales. Using a library written for the HX711 allowed interfacing it to the Arduino easy. The display was built using a 4 digit 7 segment display driven by the MAX7219. A slightly modified LEDcontrol library made it easy to hook up the display to the ATtiny. The circuit was assembled on a prototyping board so that it could be plugged in to another Arduino for programming.

Since they were running out of pins, they had to pull out a trick to use a single pin from the ATtiny to act as clock for the display driver and the ADC chip. Implementing the power-on and auto-off feature needed another interesting analog circuit block. Dad did the assembly of the circuit on a prototype board. In hindsight, the lack of IO pins on the ATtiny limited the features they could implement, so the duo are planning to put in an Arduino Nano to improve the hack. If you’re ever stuck with a broken scale, he’s made the schematic (PNG) and code available for use.

My Payphone Runs Linux

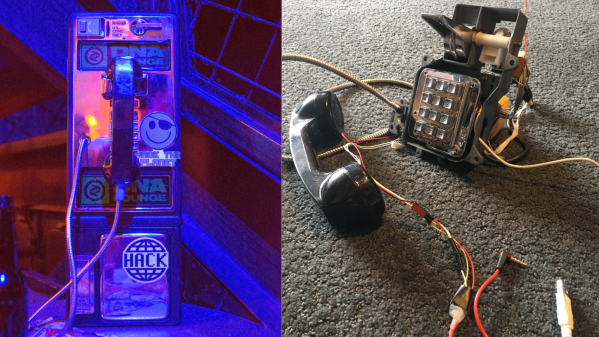
For the 20th anniversary of the Movie “Hackers” [Jamie Zawinski], owner of DNA Lounge in San Francisco, threw an epic party – screening the movie, setting up skating ramps and all that jazz. One of the props he put up was an old payphone, but he didn’t have time to bring it alive. The one thing he didn’t want this phone to do was to be able to make calls. A couple of weeks later, he threw another party, this time screening “Tank Girl” instead. For this gathering he had enough time to put a Linux computer inside the old payphone. When the handset is picked up, it “dials” a number which brings up a voice mail system that announces the schedule of events and other interactive stuff. As usual, this project looked simple enough to start with, but turned out way more complicated than he anticipated. Thankfully for us, he broke down his build in to bite sized chunks to make it easy for us to follow what he did.

This build is a thing of beauty, so let’s drill down into what the project involved:

Continue reading “My Payphone Runs Linux”