It Might Be Possible To Build A Stingray With A Raspberry Pi

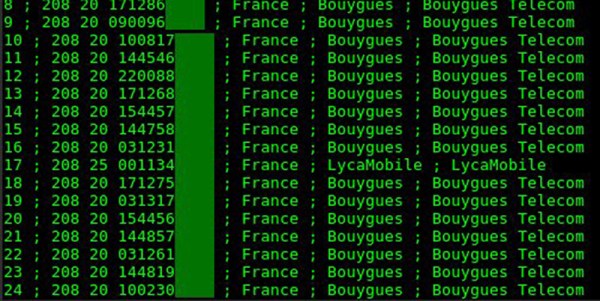
If there’s one thing that’s making you insecure, it’s your smartphone. Your smartphone is constantly pinging the cell towers, giving out your location and potentially leaking your private information to anyone with a radio. This is the idea behind an IMSI catcher, or Stingray in common parlance, and now you too can build one with parts you can buy off of Amazon.

The key to this hack is a software defined radio dongle, or RTL-SDR, that has been repurposed to listen in on a GSM network. Literally the only hardware required is an RTL-SDR that can be bought online for less than fifteen dollars, and you can identify the IMSI, or unique ID linked to every SIM card, in smartphones around you. The only bit of software required is a small Python script from [Oros42], freely available on GitHub.

Of course, building an IMSI catcher with a desktop is of limited utility, and using a laptop is still a bit too bulky to surreptitiously conceal in a public location. No, to really get the bang for your buck out of this, you need to do this with a small single-board computer running off a battery pack. Luckily, [Joseph Cox] over at Motherboard reports, “It is likely possible” to run this on a Raspberry-Pi. We’re guessing it’s even more than “likely” possible.

Fail Of The Week: When The Epoxy-Coated Chip Is Conductive

Every once in a while, you’ll find some weirdness that will send your head spinning. Most of the time you’ll chalk it up to a bad solder joint, some bad code, or just your own failings. This time it’s different. This is a story of weirdness that’s due entirely to a pin that shouldn’t be there. This is a package for an integrated circuit that has a pin zero.

The story begins with [Erich] building a few development boards for the Freescale Kinetis K20 FPGA. This is a USB-enabled microcontroller, and by all accounts, a worthwhile effort. So far, so good. The problem with the prototype boards was soon apparent. On some of the boards, the external 32 kHz oscillator was not starting. Resoldering the oscillator or microcontroller sometimes solved the problem, but not always. This is troubling, because that means the issue isn’t code, and it’s not the PCB. This is going to take a deep dive and a good inspection microscope.

One of [Erich]’s friends, [Christian B] somehow found the problem. When the Freescale K40 is manufactured, the die is carefully laid in a chip carrier and coated with epoxy, putting it in a small QFN package. The problem is, there’s an extra connection sticking out of one corner of this chip. This is just an artifact of the chip carrier, but if you leave exposed metal connected to ground, something is eventually going to go wrong.

The best guess [Erich] has is that this additional connection is from the manufacturing and packaging process, with the exposed metal pad in this application being bridged to an adjacent pad. Now, if there’s one failure to [Erich]’s design, it’s that the trace comes out of the pin on the adjacent pad at 90 degrees; this isn’t a best practice, but most of the time you can get away with it. This time, though, somebody got burned.

We don’t know how [Christian] ever found this issue. When you look at a tiny QFN package, you don’t expect there to be an extra pin attached to ground that can be easily bridged with a bit of solder paste. It’s either a lot of luck or skill to find this problem, but it’s a great example of the weird things you have to look out for.

Hackaday Links Column Banner

Hackaday Links: November 18, 2018

The greatest bit of consumer electronics is shipping and the reviews are out: Amazon’s Alexa-enabled microwave is a capable microwave, but befuddling to the voice-controlled-everything neophyte. Voice controlled everything is the last hope we have for technological innovation; it’s the last gasp of the consumer electronics industry. This is Amazon’s first thing with a built-in voice assistant, and while this is a marginally capable microwave at only 700 Watts — fine for a college dorm, but it’s generally worth shelling out a bit more cash for a 1000 Watt unit — the controls are befuddling. The first iteration is always hard, and we’re looking forward to the Amazon Alexa-enabled toaster, toothbrush, vacuum cleaner, and Bezos shrine.

Need a laser cutter, like crowdfunding campaigns, and know literally nothing about laser cutters? Have we got something for you. The Etcher Laser crowdfunding campaign has been pinging my email non-stop, and they’ve got something remarkable: a diode laser cutter engraver for $500. It comes in a neat-looking enclosure, so it’s sure to raise a lot of money.

A while back [Paulusjacobus] released an Arduino-based CNC controller for K40 laser cutters. There were a few suggestions to upgrade this to the STM32, so now this CNC controller is running on a Blue Pill. Yes, it’s great and there’s more floating points and such and such, so now this project is a Kickstarter project. Need a CNC controller based on the STM32? Boom, you’re done. It’s also named the ‘Super Gerbil’, which is an awesome name for something that is effectively a GRBL controller. Naming things is the hardest problem in computer science, after all.

The Gigatron computer is a ‘home computer’ without a microprocessor or microcontroller. How does it do this? A metric butt-load of ROM and look-up tables. This is cool and all, but now the Gigatron logo is huge. we’re talking 18 μm by 24 μm. This was done by etching a silicon test wafer with electron beam lithography.

Etch Your Own Circuit Boards In Your Kitchen

Right now, you can design a PCB, send it off to a PCB fab, and get professional finished boards in a few days for less than a dollar per square inch. This is fantastic, and it’s the driving force behind ever-dropping costs of hardware development. That’s great and all, but you can make circuit boards at home, easily, and without involving too many toxic chemicals. That’s exactly what [videoschmideo] did, and the results are pretty good.

The process starts with a single-sided copper clad board that would be readily obtainable at Radio Shack if there were any of those around anymore. Once the circuit is designed, the traces and pads are printed (mirrored) out onto sticker backing paper. The toner from your laser printer is transferred to the copper with a clothes iron.

The tricky part about creating a PCB is taking away all the copper you don’t want, and for this tutorial [videoschmideo] is using a vinegar and hydrogen peroxide process. If you’re using stuff you can buy at the grocery store, you’re only getting 3% acetic acid and 3% peroxide, but given enough time and enough peroxide, it’ll do the job. After the board is etched, [videoschmideo] neutralizes the copper acetate produced with aluminum foil. The end product isn’t the safest thing in the world, but aluminum salts are much more environmentally friendly than copper compounds.

Making PCBs at home isn’t anything new, but it’s nice to be reminded that you can do so even with minimal effort and chemicals that you could rinse your mouth with. Once you do, though, you’ll probably have to drill some holes in the board. Yes, you could use a dremel, but a nice small drill press is a pleasure, and well worth the investment.

Turning A Rotary Tool Into A CNC

Now that 3D printers are everywhere, electronics are cheap, and open source software is extremely capable, just about anyone can build a CNC machine. That’s exactly what [Nikodem] did by turning a Dremel tool into an extremely capable CNC machine that’s able to cut MDF and acrylic and can engrave aluminum.

The electronics for the build are just an Arduino Uno, a motor driver sheld running GRBL, a relay for the Dremel, a few motor drivers, and a big ‘ol 30 A power supply. The build uses NEMA 17 motors, two on the Y-axis and one each on the X and Z. The CNC has a fantastically strong frame despite the 3D printed parts. It is constructed out of aluminum extrusion, with the carriages riding on some nice straight rods.

As for how well this CNC machine works, it’s pretty good. With the Gcode to cut an 80mm diameter circle out of MDF, this machine managed to cut a circle that was 80.02 mm in diameter. That’s pretty good, and getting into the territory that the error is probably in the cheap set of calipers, not the finished part itself. It’s an awesome build, and [Nikodem] has everything documented in his four-part video series. You can check the end of that out below.

Continue reading “Turning A Rotary Tool Into A CNC”

Supercon: Designing Your Own Diffractive Optics

Kelly Peng is an electrical and optical engineer, and founder of Kura AR. She’s built a fusion reactor, a Raman spectrometer, a DIY structured light camera, a linear particle accelerator, and emotional classifiers for likes and dislikes. In short, we have someone who can do anything, and she came in to talk about one of the dark arts (pun obviously intended): optics.

The entire idea of Kura AR is to build an immersive augmented reality experience, and when it comes to AR glasses, there are two ways of doing it. You could go the Google Glass route and use a small OLED and lenses, but these displays aren’t very bright. Alternatively, you could use a diffractive waveguide, like the Hololens. This is a lot more difficult to manufacture, but the payoff will be a much larger field of view and a much more immersive experience.

Continue reading “Supercon: Designing Your Own Diffractive Optics”

Adding Linux To A PDP-11

The UNIBUS architecture for DEC’s PDPs and Vaxxen was a stroke of genius. If you wanted more memory in your minicomputer, just add another card. Need a drive? Plug it into the backplane. Of course, with all those weird cards, these old UNIBUS PDPs are hard to keep running. The UniBone is the solution to this problem. It puts Linux on a UNIBUS bridge, allowing this card to serve as a memory emulator, a test console, a disk emulator, or any other hardware you can think of.

The key to this build is the BeagleBone, everyone’s second-favorite single board computer that has one feature the other one doesn’t: PRUs, or a programmable real-time unit, that allows you to blink a lot of pins very, very fast. We’ve seen the BeagleBone be used as Linux in a terminal, as the rest of the computer for an old PDP-10 front panel and as the front end for a PDP-11/03.

In this build, the Beaglebone’s PRU takes care of interfacing to the UNIBUS backplane, sending everything to a device emulator running as an application. The UniBone can be configured as memory or something boring, but one of these can emulate four RL02 drives, giving a PDP-11 an amazing forty megabytes of storage. The real killer app of this implementation is giving these emulated drives a full complement of glowing buttons for load, ready, fault, and write protect, just like the front of a real RL02 drive. This panel is controlled over the I2C bus on the Beaglebone, and it’s a work of art. Of course, emulating the drive means you can’t use it as the world’s largest thumb drive, but that’s a small price to pay for saving these old computers.