Controlling Alphanumeric LCDs With Two Wires

LCD

The Hitachi HD44780 LCD controller is the most common interface to all those alphanumeric LCDs out there, and there are a million and one tutorials for connecting these displays to any microcontroller imaginable. This still doesn’t mean hooking up these displays is necessarily simple, though: you still need at least four wires for the data, at least two for control signals, and power and ground lines for connecting the LCD the traditional way.

Here’s a neat trick for connecting HD44780 displays that only needs two wires. In this setup there’s only a ground and power+data wire. The interesting part of this build is using the power pin to transmit serial data with an RS-232-like format. The only difference is keeping the data line at +5 V when idle; a reasonable-sized cap keeps the display and controller alive when the master microcontroller is transmitting.

This technique does require a bit of logic on the receiving end, which a small 8-pin PIC can handle with ease. Communication between a microcontroller and this “smart” LCD is done at 2400 bps, which even the wimpiest micro can handle. All the software to make this setup work are available here, and we expect an Atmel-based version to hit the Hackaday tip line shortly.

DUO Portable: A Homebrew Computer With Keyboard And Display

duo

[Jack] is famous ’round these parts for his modern reinterpretations of very early computers. He’s created a computer entirely out of logic chips, a microcontroller-powered multicore box, and even a very odd one-instruction computer. For his latest project, he’s stepped up his game and made something that’s actually fairly useful: a microcontroller-powered system with an integrated keyboard and display.

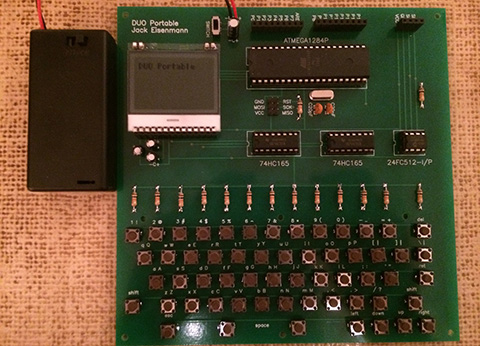
The DUO Portable, as [Jack] calls his new toy, is built around an ATMega1284P microcontroller. Also on this board is a serial EEPROM that acts as a very small drive, a 102×64 pixel graphic display, and enough tact switches to create a QWERTY keyboard.

The DUO Portable boots to a primitive operating system where files can be created, edited, and saved. The programming language for this computer  is called DCPL – the DUO Portable Command Language – and can be used to create anything from a simple ‘Hello World’ program to a block-building game.

Like all of [Jack]’s homebrew computer projects, he’s written an emulator that can be run in a browser. There’s also video of [Jack] playing around with the DUO Portable available below.

Continue reading “DUO Portable: A Homebrew Computer With Keyboard And Display”

ATMega & ATtiny Core Temperature Sensors

temp

We don’t know if this will come as a surprise to the regular Hackaday reader, but a whole bunch of Atmel microcontrollers have a very cool feature hidden away in their datasheets. Most of them – everything from the ATMega 168, 328, 32u4, to the ATtiny85 and  84 have a temperature sensor right on the chip. [Connor] did a little bit of research on this sensor and came up with a little bit of code that spits out the core temperature of these Atmel chips over the serial port.

The temperature sensor on these Atmel chips is accessed by writing a code – ‘100111’ for the Mega32u4 and ‘100010’ for the tiny84, for example – into the ADMUX register on the chip. According to the datasheet, the returned temperature is accurate to +- 10°C, but that can be easily calibrated by holding an ice cube (in a plastic bag, of course) up to the chip.

With a little more code, [Connor] is able to output the temperature of the microcontroller core over a serial port. In testing, his chip started out at 20°C and reached equilibrium at 24°C after about a minute. Pretty neat, and could be used as a temperature sensor for a project in a pinch.

Verifying A Wireless Protocol With RTLSDR

rtlsdr_nrf905_rtlizer

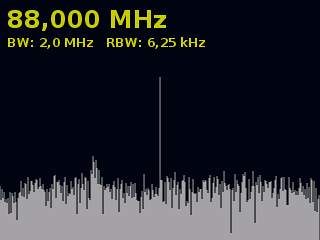
[Texane] is developing a system to monitor his garage door from his apartment. Being seven floors apart, running wires between the door and apartment wasn’t an option, so he turned to a wireless solution. Testing this wireless hardware in an apartment is no problem, but testing it in situ is a little more difficult. For that, he turned to software defined radio with an RTLSDR dongle.

The hardware for this project is based around a TI Stellaris board and a PTR8000 radio module. All the code for this project was written from scratch (Github here), making it questionable if the code worked on the first try. To test his code, [Texane] picked up one of those USB TV tuner dongles based around the RTL2832U chipset. This allowed him to monitor the frequencies around 433MHz for the packets his hardware should be sending.

After that, the only thing left to do was to write a frame decoder for his radio module. Luckily, the datasheet for the module made this task easy.

[Texane] has a frame decoder for the NRF905 radio module available in his Git. It’s not quite ready for serious applications, but for testing a simple radio link it’s more than enough.

[CNLohr] Demos His Photoetch PCB Process

etch

If you’re going to learn something, it only makes sense to learn from a master. [CNLohr] is known around these parts for his fablous PCBs, and he’s finally started to document his entire fabrication process.

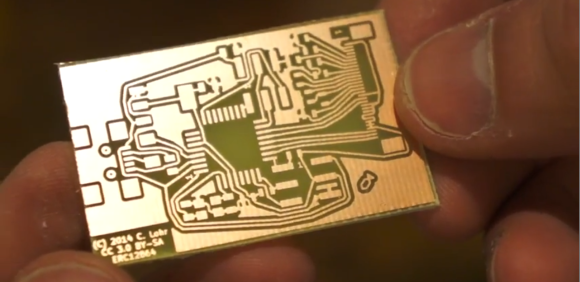
[CNLohr] is using a photoetch process, where a mask is created with a laser printer on overhead transparencies. He covers the copper clad boards with a Riston photosensitive mask—available here, and they accept Bitcoin—sent through a laminator, and exposed with the laser printed mask and a UV grow bulb. After the mask has developed, [CNLohr] drops his boards into a ferric chloride bath that eats away the unexposed copper. He then removes the photomask with acetone and cuts the boards with a pair of aircraft snips, and they’re ready to be soldered up with components.

Yes, home PCB etching tutorials are pretty much a solved problem, but [CNLohr]’s work speaks for itself. He’s also the guy who made a microcontroller/Linux/Minecraft thing on a glass microscope slide. Learning from a guy with these skills means you’re learning from one of the best.

Video below, and there’s also a video going over the design of a PCB using KiCAD (!) and TopoR (!!!) available here.

Continue reading “[CNLohr] Demos His Photoetch PCB Process”

FFT On The Raspi’s GPU

fft

The Raspberry Pi has been around for two years now, and still there’s little the hardware hacker can actually do with the integrated GPU. That just changed, as the Raspberry Pi foundation just announced a library for Fourier transforms using the GPU.

For those of you who haven’t yet taken your DSP course, fourier transforms take a function (or audio signal, radio signal, or what have you) and output the fundamental frequency. It’s damn useful for everything from software defined radios to guitar pedals, and the new GPU_FFT library is about ten times faster at this task than the Raspi’s CPU.

You can get a copy of  the GPU_FFT library by running rpi-update on your pi. If you happen to build anything interesting – something with a software defined radio or even a guitar pedal – you’re more than welcome to send it in to the Hackaday tips line. We’d love to see what you’re up to.

Drilling Custom Standoffs

standoff

Every electronics project of sufficient complexity needs standoffs – little plastic or metal cylinders – to mount boards to one another. Keeping hundreds of little plastic trinkets around doesn’t really fit with the hacker mentality, though: it would be far simpler to keep some Delrin rod stock around to drill and cut standoffs as needed. [HomeCSP] created a device to do just that, allowing him to turn 1/4″ Delrin rod stock into any size standoff he needs.

Before building this device, [HomeCSP] was taking plastic rods to the drill press fitted with a very tiny drill bit for a #2 screw. The problems with that technique should be evident to anyone. The new solution uses an old cordless drill and a 6 inch piece of linear rail, effectively turning some bits of scrap into a horizontal drill press with a stationary bit.

The end result is a machine that can bore a hole straight down a 1/4″ rod. With a box of screws these homebrew plastic rods are much cheaper than off-the-shelf parts and can be made in any length desired.