Print Huge Stuff With The Makerbot Replicator

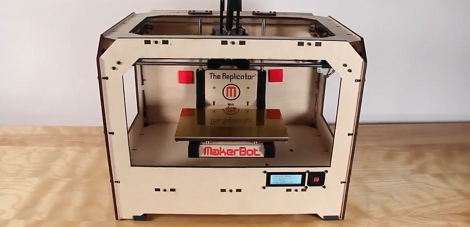
The folks at MakerBot Industries are introducing their new 3D printer at CES this week. It’s called the MakerBot Replicator and features dual heads for 2-color prints and a huge build envelope for huge objects

From [Bre Pettis]’ introduction video (available after the break), the build area is about 9x6x6 inches, compared to the about four-inch cube-sized volume for the MakerBot Cupcake and Thing-O-Matic. The Replicator also features optional dual Makerbot Mk. 8 extruders for two-colored printing. We’ve seen valiant attempts at printing multicolored objects with one extruder, and if you’d ever want to print with two filaments dual extruders are the way to go.

The replicator also features a nice control panel (which includes a Snake game), something that’s relatively rare on the 3D printers we’ve seen. The single extruder model will set you back $1750, while the dual extruder adds another $250 to the price. We really want one of these, but don’t take our word – check out [Bre]’s intro.

Continue reading “Print Huge Stuff With The Makerbot Replicator”
The Matrix Reloaded: Now Better Than The Movie

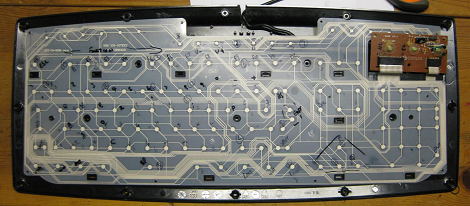
If you’re looking for a custom controller for a MAME cabinet build, CNC machine, or just want to control a robot build, you’re going to need to wire up some buttons. You could wire up a bunch of buttons to a microcontroller, but if you use an old computer keyboard the work is already done for you.

[Rupert] sent in a great tutorial on repurposing old keyboards. The build is very, very simple: just take a multimeter to each contact and measure the rows and columns for continuity. Once [Rupert] had the matrix codes for every button on the keyboard, he wired up a length of ribbon cable to the keyboard PCB. From there, a small breakout board provides all the connections that a MAME cabinet would need.

Opposed to a custom keyboard encoder like an I-PAC or a homebrew solution, [Rupert]’s build is very easy and can be built for only the dignity required to dumpster dive for a keyboard.

DIY Fresnel Reflector

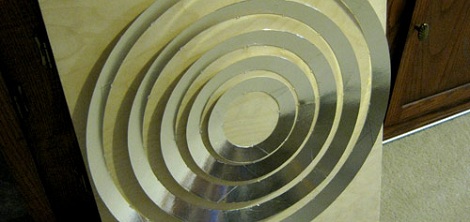
Just like destroying an ant colony with a magnifying glass, there’s nothing like cooking hot dogs and roasting marshmallows with a nice parabolic reflector. Of course covering an old satellite dish with mylar or aluminum tape doesn’t take much skill, however cool it is. [Uwe] came up with a much more technical means of building a Fresnel reflector that will cook your hot dogs in seconds, but only on sunny days.

[Uwe] channeled a little bit of [Apollonius] when he realized that a flat cardboard ring with a section removed could be joined together into a conic section. The resulting section looks just like one concentric ring in a Fresnel reflector. [Uwe] wrote a small program in Visual Basic to calculate the necessary diameter and angle of his conic sections.

A bit of cardboard was cut out and pieced together with some very reflective aluminum tape. The resulting Fresnel reflector concentrates 117 times the normal solar radiation onto a small point. It’s more than enough to burn holes in construction paper, but we’ll be using a microwave for our lunch today.

Rainbow Board Of Many Ping-pong Balls

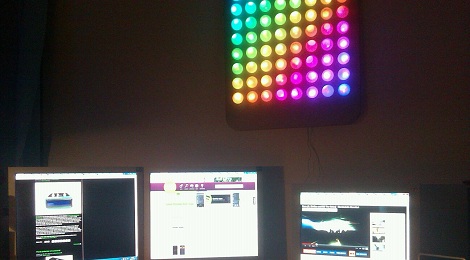
[George] just finished his first project: an 8×8 matrix “Board of Many Ping-Pong Balls” with 64 RGB LEDs. He started this project when he was 14 years old and finished the build over this last Christmas break. We won’t make any presumptions about [George]’s age, but we couldn’t think of a better project to start out on.

For the build, [George] used a Colorduino LED driver shield for his Arduino. This made the wiring simple, but the finished product is where this project really shines. For the base, [George] got a board laser cut at his school and used ping-pong balls to diffuse the LEDs. We’ve seen this many times but with this build there’s a neat way to drill a hole in a ping-pong ball; simply put the drill into reverse. The friction is enough to open the ball up, and the chips of plastic come outside instead of remaining in.

We’re really impressed with [George] and his winter break project. He’s lucky enough to have access to a laser cutter at school, and from a look at his monitor, he’s reading the right websites. You can check out his demo rainbow pattern after the break.

Continue reading “Rainbow Board Of Many Ping-pong Balls”

Ancient Mouse Teardown And Repair

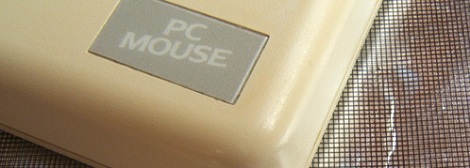
For a young geek in the 80s, the it computer was the IBM PCjr. On paper, it was a truly remarkable leap in technology. With a wireless keyboard, light pen, and optical mouse it was an impressive, if maligned, piece of hardware. There was a small problem with the optical mouse, though; it required a special mousepad. [Michael], a PCjr aficionado, decided to make his own optical mousepad. It works, and was a lot easier to build than finding a used one for sale.

The PCjr mouse used two photodectors – a red LED and photodector for the horizontal axis, and an IR LED setup for the vertical. Light is shot through two holes in the bottom of the mouse and reflects back onto the photodetectors. [Michael] emulated the old mousepad with a sheet of aluminum foil and a transparency with a printed grid pattern. Surely not as elegant as an original, but it does the job nonetheless.

This clever-for-its-day optical mouse setup wasn’t limited to the lowly PCjr. A number of old Sun workstations had a similar setup that used small dots on the mousepad. There were several generations of mousepads that were generally incomparable with each other (because one type of mousepad wasn’t proprietary enough for Sun), but we would assume a similar build would work for these forgotten mice.

Thanks to [josh] for sending this one in.

3D Printing Minecraft Worlds

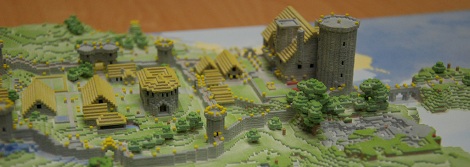
If you’ve ever wanted to build an awesome tabletop game or model train layout scenery, you probably couldn’t do better than printing Minecraft worlds on a RepRap. This guide comes courtesy of [Nudel] who figured out how to use Mineways with his RepRap. While [Nudel]’s landscape print doesn’t have the full color of something from Shapeways, he only spent $3 in materials. Not bad if you’d like to print out your server’s world.

We have to give a shout out to [erich666] for his amazing work on Mineways. He bills his work as a bridge between Minecraft and a 3D printer or Blender. You can check out [erich]’s demo of Mineways after the break.

Of course the state of printing voxels wouldn’t be where it is today without the work of two guys at the MIT Media Lab and their work on Minecraft.Print(). If you manage to print out your base/castle/village, add it to the Mineways Flickr group.

Continue reading “3D Printing Minecraft Worlds”

Followup: Reproducing Impossible Circuits

Last month we caught wind of an impressive display of troll physics. [Fredzislaw100] out of Poland posted a video of a circuit that should not exist. As expected, the comments in our coverage blew up with 200 posts. About half the commenters called a little Adobe After Effects trickery, while the other half offered up an electrical explanation. We’re happy to report that [Alan] successfully reproduced the impossible circuit and earned an incredible amount of electronic wizard points in the process.

[Alan]’s solution uses low-frequency AC with the first two LEDs. The first LED points forwards and the second diode is reversed. Easy enough. For the third LED, [Alan] used high frequency AC with an inductor wired in parallel with the LED and the third switch. For those of you keeping track, that means [Fredzislaw100] put an SMD diode in two LEDs and two switches and an inductor in one LED and one switch.

[Alan]’s build is just a proof of concept – It’s still on a breadboard and doesn’t have the incredible level of polish that [Fredzislaw100]’s has. That being said, [Alan]’s build is most likely very similar given the small glitch at 2:05 in the original video.

Check out [Alan]’s build video below, and for an added treat check out his 2011 Advent Calendar of Circuits.

Continue reading “Followup: Reproducing Impossible Circuits”