Build A Parametric Speaker Of Your Own

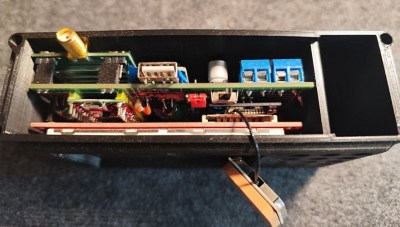
The loudspeaker on your home entertainment equipment is designed to project audio around the space in which it operates, if it’s not omnidirectional as such it can feel that way as the surroundings reflect the sound to you wherever you are. Making a directional speaker to project sound over a long distance is considerably more difficult than making one similar to your home speaker, and [Orange_Murker] is here with a solution. At the recent Hacker Hotel conference in the Netherlands, she presented an ultrasonic parametric speaker. It projects an extremely narrow beam of sound over a significant distance, but it’s not an audio frequency speaker at all.

Those of you familiar with radio will recognize its operation; an ultrasonic carrier is modulated with the audio to be projected, and the speaker transfers that to the air. Just like the diode detector in an old AM radio, air is a nonlinear medium, and it performs a demodulation of the ultrasound to produce an audio frequency that can be heard. She spends a while going into modulation schemes, before revealing that she drove her speaker with a 40 kHz PWM via an H bridge. The speaker itself is an array of in-phase ultrasonic transducers, and she demonstrates the result on her audience.

This project is surprisingly simple, should you wish to have a go yourself. There’s a video below the break, and she’s put all the files in a GitHub repository. Meanwhile this isn’t the first time we’ve seen a project like this.

Continue reading “Build A Parametric Speaker Of Your Own”

It’s 2025, And Here’s A New Film Format

We love camera hacking here at Hackaday, and it’s always fascinating to see new things being done in photography. Something rather special has come our way from [Camerdactyl], who hasn’t merely made a camera, instead he’s created an entirely new analogue film format. Move over 35mm and 120, here’s the RA-4 cartridge!

RA-4 is the colour print chemistry many of you will be familiar with from your holiday snaps back in the day. Normally a negative image is projected onto it from the negative your camera took, and the positive image is developed on the paper as the reverse of that.  It can also be developed as a reversal process similar to slide film, in which the negative image is developed and bleached away leaving an unexposed positive image, which can then be exposed to light and developed to reveal a picture. This means that with carefully chosen colour correction filters it can be shot in a camera to make normal colour prints with this reversal process.

The new film format is a 3D printed cartridge system holding a long roll of RA-4 paper, which slots into a back for standard 5 by 4 inch cameras. He’s also made a modular developing machine for the process, and can get over 100 shots on a roll. A portion of the video below deals with how he wants to release it; since it has taken a huge amount of development resources he intends to release the files to the public in stages as he reaches sales milestones with his work. It’s an unusual strategy that we hope works for him, though we suspect that many camera hackers would be prepared to pay him directly for the files.

Either way, it’s a reminder that there’s still plenty of fun to be had with analogue film, and also that reversal development of RA-4 is possible. Some of us here at Hackaday have been known to hack a few cameras, we guess it’s another one to add to the “one day” list.

Continue reading “It’s 2025, And Here’s A New Film Format”

It’s SSB, But Maybe Not Quite As You Know It

Single Sideband, or SSB, has been the predominant amateur radio voice mode for many decades now. It has bee traditionally generated by analogue means, generating a double sideband and filtering away the unwanted side, or generating 90 degree phase shifted quadrature signals and mixing them. More recent software-defined radios have taken this into the CPU, but here’s [Georg DG6RS] with another method. It uses SDR techniques and a combination of AM and FM to achieve polar modulation and generate SSB. He’s provided a fascinating in-depth technical explanation to help understand how it works.

The hardware is relatively straightforward; an SI5351 clock generator provides the reference for an ADF4351 PLL and VCO, which in turn feeds a PE4302 digital attenuator. It’s all driven from an STM32F103 microcontroller which handles the signal processing. Internally this means conventionally creating I and Q streams from the incoming audio, then an algorithm to generate the phase and amplitude for polar modulation. These are fed to the PLL and attenuator in turn for FM and AM modulation, and the result is SSB. It’s only suitable for narrow bandwidths, but it’s a novel and surprisingly simple deign.

We like being presented with new (to us at least) techniques, as it never pays to stand still. Meanwhile for more conventional designs, we’ve got you covered.

Bringing A Current Dumping Amplifier Back To Life

Over the years there have been many different audio amplifier designs which have found favour for a while and then been supplanted by newer ideas. One of them has crossed the bench of [Jazzy Jane], it’s a current dumping amplifier from the mid-1980s. A nicely-done home-made project on stripboard mounted on a wooden base board, it sports a power supply, RIAA pre-amp board, and the amplifier itself.

The current dumping amplifier is one that combines a small class A amplifier with a hefty class B one, and through feedback trickery uses the combination to remove the crossover distortion of the class B stage. It’s a simple yet elegant circuit with fewer parts than an equivalent class AB amplifier, and there was a time back in the day when it was all the rage. This one has an op-amp providing the class A part and a complimentary pair of Darlington pairs as the class B.

The video below the break shows the process of bringing the amp back to life, a process mostly concerned with the power supply. There are a set of tantalum capacitors which have failed, and the replacements she’s using turn out to have problems too. They’re a period part for a project of this age, but we might have been tempted to go for another capacitor type here.

The result is an unusual amplifier, brought back to life. You may have seen [Jane] feature here before, with her 1950s signal generator.

Continue reading “Bringing A Current Dumping Amplifier Back To Life”

SHOUT For Smaller QR Codes

QR codes have been with us for a long time now, and after passing through their Gardenesque hype cycle of inappropriate usage, have now settled down to be an important and ubiquitous part of life. If you have ever made a QR code you’ll know all about trying to generate the most compact and easily-scannable one you can, and for that [Terence Eden] is here with an interesting quirk. Upper-case text produces smaller codes than lower-case.

His post takes us on a journey into the encoding of QR codes, not in terms of their optical pattern generation, but instead the bit stream they contain. There are different modes to denote different types of payload, and in his two examples of the same URL in upper- and lower- cases, the modes are different. Upper-case is encoded as alphanumeric, while lower-case, seemingly though also containing alphanumeric information, is encoded as bytes.

To understand why, it’s necessary to consider the QR codes’ need for efficiency, which led its designers to reduce their character set as far as possible and only define uppercase letters in their alphanumeric set. The upper-case payload is thus encoded using less bits per character than the lower-case one, which is encoded as 8-bit bytes. A satisfying explanation for a puzzle in plain sight.

Hungry for more QR hackery? This one contains more than one payload!

A Ten Band SDR Transceiver For Homebrewers

Making a multi-band amateur radio transceiver has always been a somewhat challenging project, and making one that also supported different modes would for many years have been of almost impossible complexity best reserved for expensive commercial projects. [Bob W7PUA] has tackled both in the form of a portable 10-band multi-mode unit, and we can honestly say he’s done a very good job indeed.

As you might expect in 2025 it’s a software defined radio (SDR), but to show how powerful the silicon available today is, it’s all implemented on a microcontroller. There’s a Teensy 4 with an audio codec board that does all the signal processing heavy lifting, and an RF board that takes care of the I/Q mixing and the analogue stuff.

Band switching is handled using a technique from the past; interchangeable plug-in coil and filter units, that do an effective job. The result is a modestly-powered but extremely portable rig that doesn’t look to have broken the bank, and since the write-up goes into detail on the software side we hope it might inform other SDR projects too. We might have gone for old-school embossed Dymo labels on that brushed aluminium case just for retro appeal, but we can’t fault it.

It’s not the first time we’ve looked at a small multi-band SDR here, but we think this one ups the game somewhat.

Thanks [Pete] for the tip!

BlackBerry Keyboard Makes This Handheld Pi Stand Out

In the decade or more since small inexpensive Linux-capable single board computers such as the Raspberry Pi came to the mainstream, many a hardware hacker has turned their attention to making a portable computer using one. With such a plethora of devices having been made one might think that the Pi handheld was a done deal, but every so often along comes a new one of such quality to re-ignite the genre. So it is with [Taylor Hay]’s BlackberryPi Handheld. As you might guess from the name, it uses a BlackBerry keyboard along with a square LCD screen to create a beautifully executed Pi handheld in an almost GameBoy-like form factor.

It starts with a beautifully designed and executed case that holds a Pi and a Pimoroni HyperPixel screen. Unexpectedly this is a full-size Pi, we think a Pi 4. The keyboard is a USB enhanced Blackberry module which also has the famous trackpad, and there’s a bezel on the front to protect the screen. The power meanwhile comes from three 18650 cells inside the back of the case, with a power bank PCB. The surprise here is how simple he’s made it by careful choice of modules, the usual rats-nest of wires is missing.

The files are available so you can make your own, and he’s actively encouraging people to remix and improve it. We like this project, a lot, and after you’ve seen the video below the break, we think you will too. Oddly, this isn’t the first time we’ve seen someone try this combination.

Continue reading “BlackBerry Keyboard Makes This Handheld Pi Stand Out”