The Poynting Vector Antenna

Radio amateurs are inventive people, and though not all of them choose to follow it there is a healthy culture of buildng radio equipment among them. In particular the field of antennas is where you’ll find a lot of their work, because the barrier to entry can be as low as the cost of a reel of wire.

Over the years a number of innovative antenna designs have come from radio amateurs’ experimentation, and it’s one of the more recent we’d like to share with you today following a [Southgate ARC] story about a book describing its theory (Here’s an Amazon link to the book itself). The Poynting Vector antenna has been one of those novel designs on the fringes for a while now, it has been variously described as the “Super-T”, or the “flute”. Its party piece is tiny dimensions, a fraction of the size of a conventional dipole, and it achieves that by the interaction between a magnetic field across the plates of a capacitor in a tuned circuit and the electric field between a very short pair of dipole radiators. The trade-off is that it has an extremely high Q and thus a narrow bandwidth, and since its feeder can become part of its resonant circuit it is notoriously difficult to match to a transmitter. [Alan MacDonald, VE3TET] and [Paul Birke, VE3PVB] have a detailed page on the development of their Poynting antenna which takes the reader through the details of its theory and the development of their practical version.

In the roof space above the room in which this is being written there hangs a traditional dipole for the 20m amateur band. Though it is a very effective antenna given that it is made from a couple of pieces of wire and a ferrite core it takes most of the length of the space, and as we’re sure Hackaday readers with callsigns will agree a relatively tiny alternative is always very welcome.

If antennas are a mystery to you then we’d suggest you read an introduction to antenna basics to get you started.
A Thoroughly Modern Sinclair ZX80

At the end of the 1970s, the 8-bit home computer market had been under way for several years. Companies like Apple and Commodore had produced machines that retain a cult following to this day, and there was plenty for the computer enthusiast to get to grips with. As always though with a new technology, the trouble was that an Apple II or a Commodore Pet wasn’t cheap. If you didn’t have much cash, or you were a young person with uncomprehending or impoverished parents, they were out of reach. You could build a computer from a kit if you were brave or technically competent enough, but otherwise you were out of luck.

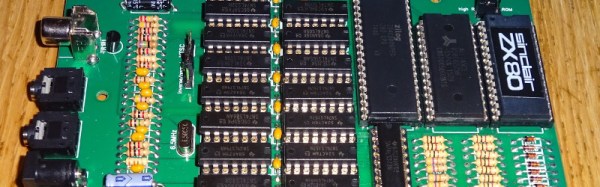
As you might imagine, the manufacturers understood that there was an untapped market for cheaper hardware, so as we entered the new decade a range of budget machines that appeared to satisfy that demand. Gone were internal expansion slots, dedicated monitors and mass storage, for cheap keyboards, domestic TV monitors, and home cassette recorders. 1980s teenagers would have computers of their own, their parents safe in the knowledge they were educational while the kids themselves were more interested in the games. Continue reading “A Thoroughly Modern Sinclair ZX80”

The World’s Lightest Brushless FPV Quadcopter

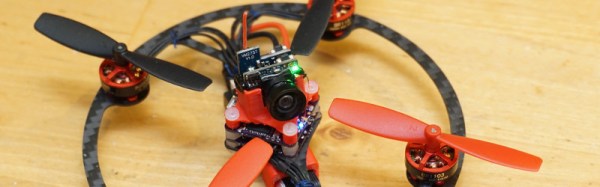
When a claim is made for something being the world’s lightest it is easy to scoff, after all that’s a bold assertion to make. It hasn’t stopped [fishpepper] though, who claims to have made the world’s lightest brushless FPV quadcopter. Weighing in at 32.4 grams (1.143 oz) it’s certainly pretty light.

The frame is a circular design cut from carbon-fiber-reinforced polymer, and on it are mounted four tiny brushless motors. In the center are the camera and battery on a 3D printed mount, as well as custom flight and speed controller boards. There are a series of posts detailing some of the design steps, and the result is certainly a capable aircraft for something so tiny. If you fancy experimenting with the design yourself, the files are available for download on the first page linked above.

There are two aspects to this build that make it interesting to us. First, the lightest in the world claim. We think someone will come along with something a bit lighter, and we can’t wait to see a lightest multirotor arms race. Good things come of technology races, which brings us to the second aspect. Governments are busy restricting the use of larger multirotors, to the extent that in some parts of the world all that will be available for non professionals will be sub-200g toy craft. Any project like this one which aims to push the boundaries of what is possible with smaller multirotors is thus extremely interesting, and we hope the community continue to innovate in this direction if only to make a mockery of any restrictions.

To get some idea of the sort of legislative measures we might be seeing, take a look at our coverage of a consultation in just one country.

From IKEA Lamp To Robot Arm

We’re used to projects that take everyday household objects and modify or enhance them into new and exciting forms that their original designers never intended. A particular theme in this endeavour comes from the IKEA hacking community, who take the products of the Swedish furniture store and use them for the basis of their work.

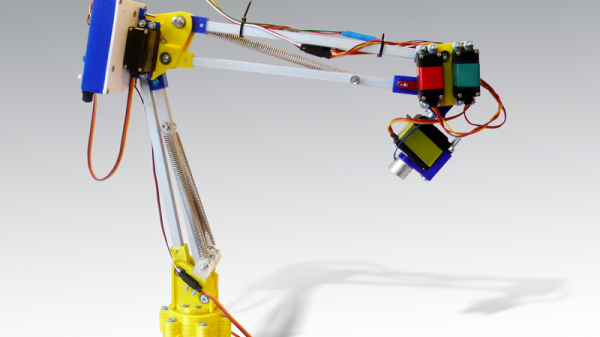
A particularly inventive piece of IKEA hacking is a project from [anastas.car], a low-cost 3D-printed robot arm based on Ikea Tertial lamp. The lamp in question is a relatively inexpensive spring-balanced desk lamp that when looked at in another light has all the metalwork ready-cut for a 5 degrees of freedom robot arm when combined with 3D-printed servo holders for five servos at its joints. The resulting design has all files available on Thingiverse, and judging by the video we’ve posted below the break makes for a rather effective arm.

Continue reading “From IKEA Lamp To Robot Arm”

A Ten Turn Pot, For Not A Lot

If you have a traditional regulated power supply that you want to make adjustable, you’ll have somewhere in the circuit a feedback line driven by a potential divider across the output. That divider will probably incorporate a variable resistor, which you’ll adjust to select your desired voltage.

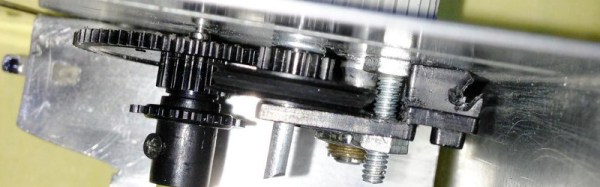
The problem with using a standard pot to adjust something like a power supply is that a large voltage range is spread across a relatively small angle. The tiniest movement of the shaft results in too large a voltage change for real fine-tuning, so clearly a better means of adjustment is called for. And in many cases that need is satisfied with a ten-turn potentiometer, simply a pot with a 10 to 1 reduction drive built-in.

[Dardo] had just this problem, and since 10-turn pots are expensive to buy and expensive to ship to his part of the world he built his own instead of buying one.

Continue reading “A Ten Turn Pot, For Not A Lot”

Getting The Amiga 500 Online

If you were lucky enough to have a Commodore Amiga or one of its competitor 16-bit home computers around the end of the 1980s, it’s probable that you were doing all the computing tasks that most other people discovered a few years later when they bought their first 486 or Pentium. So in the mid 1990s when all your friends were exclaiming at Paint Shop Pro or their Soundblaster cards you’d have had an air of smugness. Multitasking? Old hat! Digital audio? Been there! Graphics manipulation? Done that!

There was one task from that era you almost certainly wouldn’t have done on your Amiga though, and that was connect it to the Internet. The Internet was certainly a thing back in the late 1980s, but for mere mortals it was one of those unattainable marvels, like a supercomputer with a padded seat round it, or a Jaguar XJ220 supercar.

Later Amigas received Internet abilities, and Amiga enthusiasts will no doubt be on hand to extol their virtues. But the machine most people will think of as the archetype, the Amiga 500, lacks the power to run most of the software required to do it. If your 500 with its tasteful blue and orange desktop colour scheme is languishing though, never fear. [Shot97] has produced a guide to getting it online.

It’s important to understand that an Amiga 500 is never going to run a copy of Chrome or play a YouTube video. And he makes the point that any web browsers that might have surfaced for hardware of this class delivered a painful browsing experience. So instead he concentrates on getting the 500 online for something closer to the online scene of the day, connecting to BBSs. To that end he takes us through setting up a PC with  Hayes modem emulator, and connecting it to the Amiga via a null modem cable. On the Amiga is a copy of the A-Talk terminal emulator, and as far as the Amiga is concerned it is on a dial-up Internet connection.

The PC in this case looks pretty ancient, and we can’t help wondering whether a Raspberry Pi or even an ESP8266 module could be put in its place given the appropriate software. But he has undeniably got his A500 online, and shown a way that you can too if you still have one lurking in the cupboard. He has also produced a video which we’ve put below the break, but be warned, as it’s nearly an hour long.

Continue reading “Getting The Amiga 500 Online”

Comfort Thermometer With Impressive LED Display

A frequent early project for someone learning to use a microcontroller such as an Arduino board involves hooking up a temperature sensor and an LCD display to make a digital thermometer. Not many components are involved, but it provides a handy practical introduction to interfacing peripherals. Once you’ve passed that step in your tech education, do you ever return to thermometers? Probably not, after all what can you add to a thermometer but a sensor and a display?

Perhaps if you have asked yourself that question you might be interested in [Richard Stevens]’s thermometer project, as he refers to it, a Comfort Thermometer Display. It takes the form of an Ikea Ribba frame inset with 517 LEDs arranged as a central set of seven segment displays, a ring of bar graphs, and an outer ring of RGB LEDs. Behind the scenes is a mass of cabling, and four shaped pieces of stripboard to fit the area around the LEDs. The display cycles through readings for temperature, heat index, and humidity.

Powering it all are a brace of microcontrollers: an ATMega328 for the 7-segments and a range of PICs controlling the bar graphs and RGB LEDs. Another PIC handles RF communication with the sensors, which are housed in a remote box. We’ve embedded the video of the device in operation below the break, and we’re sure you’ll agree it’s an impressive piece of work.

Continue reading “Comfort Thermometer With Impressive LED Display”