Modern DIY FM Radio

Back in the day, building a DIY radio was fun! We only had to get our hands at a germanium diode, make some coils, and with a resistor and long wire as an antenna maybe we could get some sound out of those old white earplugs. That was back then. Now we have things like the Si4703 FM tuner chip that can tune in FM radio in the 76–108 MHz range, comes with integrated AGC and AFC, controlled by I2C, as well as a bunch of other acronyms which seem to make the whole DIY radio-building process outdated. The challenges of the past resulted in the proven solutions of the present in which we build upon.

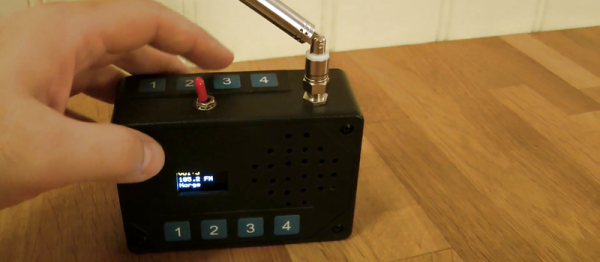
This little project by [Patrick Müller] is a modern radio DIY tutorial. With an Arduino Nano as the brains and controller for an Si4703 breakout board, he builds a completely functional and portable FM radio. A small OLED display lets the user see audio volume, frequency, selected station and still has space left to show the current available battery voltage. It has volume control, radio station seek, and four buttons that allows quick access to memorized stations. The source code shows how it is possible to control the Si4703 FM tuner chip to suit your needs.

As for ICs, not everything is new, [Patrick] still used the good old LM386 amp to drive the speaker, which is almost 35 years old by now. As we can listen in the demo video, it can still output some seriously loud music sounds!

Continue reading “Modern DIY FM Radio”

From XP To 10, DoubleAgent Pwns All Your Windows?

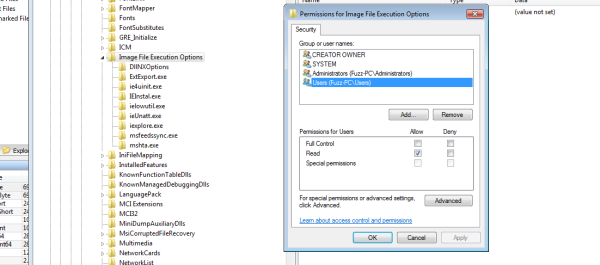
The Cybellum team published a new 0-day technique for injecting code and maintaining persistency on a target computer, baptized DoubleAgent. This technique uses a feature that all Windows versions since XP provide, that allows for an Application Verifier Provider DLL to be installed for any executable. The verifier-provider DLL is just a DLL that is loaded into the process and is supposedly responsible for performing run-time verifications for the application. However, its internal behaviour can be whatever an attacker wants, since he can provide the DLL himself.

Microsoft describes it as:

Application Verifier is a runtime verification tool for unmanaged code. Application Verifier assists developers in quickly finding subtle programming errors that can be extremely difficult to identify with normal application testing. Using Application Verifier in Visual Studio makes it easier to create reliable applications by identifying errors caused by heap corruption, incorrect handle and critical section usage. (…)

The code injection occurs extremely early during the victim’s process initialization, giving the attacker full control over the process and no way for the process to actually detect what’s going on. Once a DLL has been registered as a verifier provider DLL for a process, it would permanently be injected by the Windows Loader into the process every time the process starts, even after reboots, updates, reinstalls, or patches.

So it’s all over for Windows right? Well… no. The thing is, to register this DLL, the registered process has to have administrator rights so it can write the proper key to the Windows Registry. Without these permissions, there is no way for this attack to work. You know, the kind of permissions that allow you to install software for all users or format your own hard-drive. So, although this technique has its merit and can present challenges to processes that absolutely must maintain their integrity (such as the Cybellum team points out in the Anti-Virus software case), some other security flaw had to occur first so you can register this sort of ‘debugging DLL’.

If you already have administrator permissions you can do pretty much what you want, including DLL injection to fool anti-virus software. (Though it might be easy just to disable or remove it.)  This new tool has the advantage of being stealthy, but is a 0-day that requires root a 0-day?

[via The Hacker News]

Cloudbleed — Your Credentials Cached In Search Engines

In case you are still wondering about the SHA-1 being broken and if someone is going to be spending hundreds of thousands of dollars to create a fake Certificate Authority and sniff your OkCupid credentials, don’t worry. Why spend so much money when your credentials are being cached by search engines?… Wait, what?

A serious combination of bugs, dubbed Cloudbleed by [Tavis Ormandy], lead to uninitialized memory being present in the response generated by the reverse proxies and leaked to the requester. Since these reverse proxies are shared between Cloudflare clients, this makes the problem even worst, since random data from random clients was leaking. It’s sort of like Heartbleed for HTTP requests. The seriousness of the issue can be fully appreciated in [Tavis] words:

“The examples we’re finding are so bad, I cancelled some weekend plans to go into the office on Sunday to help build some tools to cleanup. I’ve informed cloudflare what I’m working on. I’m finding private messages from major dating sites, full messages from a well-known chat service, online password manager data, frames from adult video sites, hotel bookings. We’re talking full https requests, client IP addresses, full responses, cookies, passwords, keys, data, everything.”
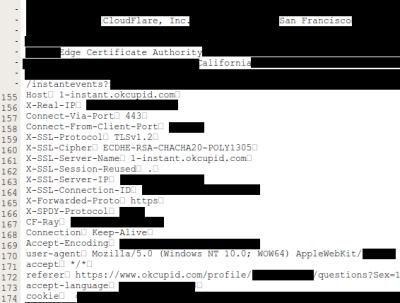
sexAccording to Cloudflare, the leakage can include HTTP headers, chunks of POST data (perhaps containing passwords), JSON for API calls, URI parameters, cookies and other sensitive information used for authentication (such as API keys and OAuth tokens). An HTTP request to a Cloudflare web site that was vulnerable could reveal information from other unrelated Cloudflare sites.

Adding to this problem, search engines and any other bot that roams free on the Internet, could have randomly downloaded this data. Cloudflare released a detailed incident report explaining all the technicalities of what happened and how they fixed it. It was a very quick incident response with initial mitigation in under 47 minutes. The deployment of the fix was also quite fast. Still, while reading the report, a sense that Cloudflare downplayed this issue remains. According to Cloudflare, the earliest date that this problem could have started is 2016-09-22 and the leak went on until 2017-02-18, five months, give or take.

Just to reassure the readers and not be alarmist, there is no evidence of anyone having exploiting what happened. Before public exposure, Cloudflare worked in proximity with search engines companies to ensure memory was scrubbed from search engine caches from a list of 161 domains they had identified. They also report that Cloudflare has searched the web (!), in sites like Pastebin, for signs of leaks and found none.

On the other hand, it might be very well impossible to know for sure if anyone has a chunk of this data cached away somewhere in the aether. It’s impossible to know. What we would really like to know is: does [Tavis] get the t-shirt or not?

SHAttered — SHA-1 Is Broken In

A team from Google and CWI Amsterdam just announced it: they produced the first SHA-1 hash collision. The attack required over 9,223,372,036,854,775,808 SHA-1 computations, the equivalent processing power as 6,500 years of single-CPU computations and 110 years of single-GPU computations. While this may seem overwhelming, this is a practical attack if you are, lets say, a state-sponsored attacker. Or if you control a large enough botnet. Or if you are just able to spend some serious money on cloud computing. It’s doable. Make no mistake, this is not a brute-force attack, that would take around 12,000,000 single-GPU years to complete.

SHA-1 is a 160bit standard cryptographic hash function that is used for digital signatures and file integrity verification in a wide range of applications, such as digital certificates, PGP/GPG signatures, software updates, backup systems and so forth. It was, a long time ago, proposed as a safe alternative to MD5, known to be faulty since 1996. In 2004 it was shown that MD5 is not collision-resistant and not suitable for applications like SSL certificates or digital signatures. In 2008, a team of researchers demonstrated how to break SSL based on MD5, using 200 Playstations 3.

Early since 2005 theoretical attacks against SHA-1 were known. In 2015 an attack on full SHA-1 was demonstrated (baptized the SHAppening). While this did not directly translate into a collision on the full SHA-1 hash function due to some technical aspects, it undermined the security claims for SHA-1. With this new attack, dubbed SHAttered, the team demonstrated a practical attack on the SHA-1 algorithm, producing two different PDF files with the same checksum.

The full working code will be released in three months, following Google’s vulnerability disclosure policy, and it will allow anyone to create a pair of PDFs that hash to the same SHA-1 sum given two distinct images and some, not yet specified, pre-conditions.

For now, recommendations are to start using SHA-256 or SHA-3 on your software. Chrome browser already warns if a website has SHA-1 certificate, Firefox and the rest of the browsers will surely follow. Meanwhile, as always, tougher times are ahead for legacy systems and IoT like devices.

From Zero To Nano

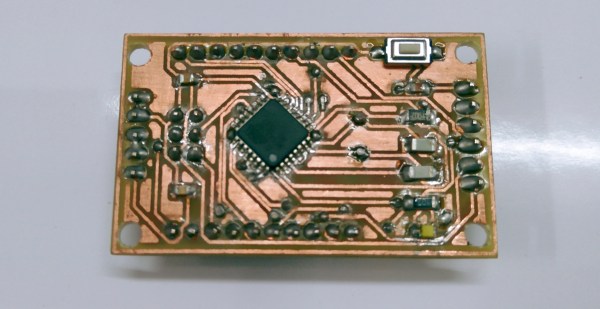
Have you ever wanted to build your own Arduino from scratch? [Pratik Makwana] shares the entire process of designing, building and flashing an Arduino Nano clone. This is not an entry-level project and requires some knowledge of soldering to succeed with such small components, but it is highly rewarding to make. Although it’s a cheap build, it’s probably cheaper to just buy a Nano. That’s not the point.

The goal here and the interesting part of the project is that you can follow the entire process of making the board. You can use the knowledge to design your own board, your own variant or even a completely different project.

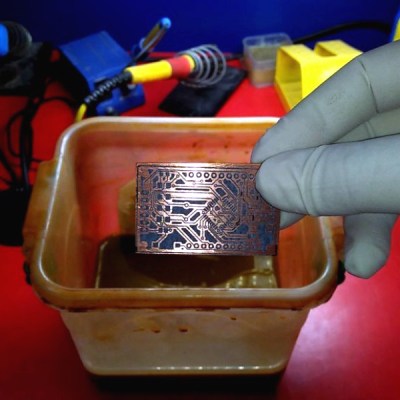
from-zero-to-nano-thumb[Pratik Makwana] starts by showing how to design the circuit schematic diagram in an EDA tool (Eagle) and the corresponding PCB layout design. He then uses the toner transfer method and a laminator to imprint the circuit into the copper board for later etching and drilling. The challenging soldering process is not detailed, if you need some help soldering SMD sized components we covered some different processes before, from a toaster oven to a drag soldering process with Kapton tape.

Last but not least, the bootloader firmware. This was done using an Arduino UNO working as master and the newly created the Arduino Nano clone as target. After that you’re set to go. To run an actual sketch, just use your standard USB to UART converter to burn it and proceed as usual.

Voilá, from zero to Nano:

Continue reading “From Zero To Nano”

Nespresso Capsule Detector

Nespresso fans rejoice! If you like coffee (of course you do) and are a Nespresso fan, chances are you are one of two types of persons: the ones that chosen one type of capsule and stick to it or the ones that have a jar full of mixed capsules and lost track which coffee is which. Of course, there is a third, rarer, OCDish, kind. The ones that have every capsule organized neatly by color in a proper holder, full of style. In any case, if you forgot which color is which coffee because you threw the case away and forgot about it here’s an interesting weekend project for you: the Nespresso Capsule Detector.

[circuit.io team] made a neat Arduino-based project that can detect which capsule is which using an RGB color detector and display information about it on an LCD display. It’s a pretty simple project to make. If you have a 3D printer you can print the case, if not it’s fairly easy to come up with a working casing for the electronics and capsule.

The operation is simple, just drop the capsule in the hole and the Nespresso Capsule Detector will tell you which type it is, its intensity, its flavor tones and the optimal cup size for the coffee in question. We are just not sure if it can detect the Nespresso weddingbots correctly, but who knows?

Have a look:

Continue reading “Nespresso Capsule Detector”

Arduino Altair 8800 Simulator

Browse around eBay for an original Altair 8800 and you quickly find that the price range is in the thousands of dollars. If you are a collector and have some money in your pocket maybe that’s okay. But if you want the Altair 8800 experience on a budget, you can build yourself a clone with an Arduino. [David] kindly shared the build details on his Arduino Project Hub post. Using an Arduino Due (or a Mega for 25% of original speed), the clone can accurately reproduce the behavior of the Altair’s front panel elements. We covered a similar project in the past, using the Arduino Uno.

While not overly complicated to build one, you will need a backfair amount of patience so you can solder all the 36 LEDs, switches, transistors, and resistors but in the end, you’ll end up with a brand new computer to play with.  In 1975, an assembled Altair 8800 Computer was selling for $621 and $439 for an unassembled version. Sourced right, your clone would be under 50 bucks. Not bad.

The simulator comes with a bunch of software for you to try out and even games like Kill-the-Bit and Pong. BASIC and Assembler example programs are included in the emulator software and can easily be loaded.

In addition, the simulator includes some extra functions and built-in software for the Altair which are accessible via the AUX1/AUX2 switches on the front panel (those were included but not used on the original Altair). From starting different games to mount disks in an emulated disk drive, there are just too many functions to describe here. You can take a look at the simulator documentation for more information.

In case you don’t know already, here’s how to play Kill-the-Bit:

Continue reading “Arduino Altair 8800 Simulator”