Daft Punk Word Clock Goes Stronger And Faster

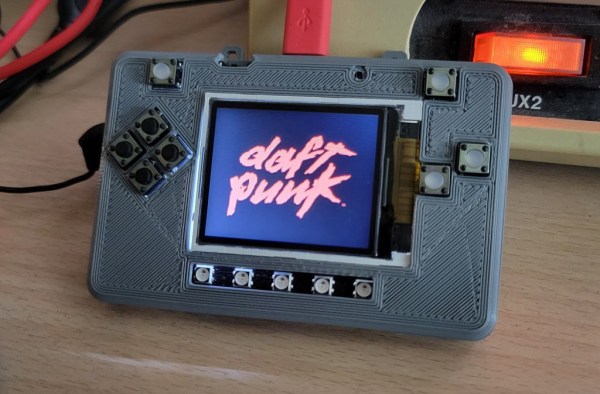
What would you call a word clock that doesn’t tell time? The concept of a word clock is that all the words needed to be used are already there and then just selected. [Ben Combee] realized there were only 18 unique words to make up the song “Harder Faster Better Stronger” and with an extra PyBadge from Supercon 2021 on hand, it seems obvious to make a musical word clock of sorts.

The PyBadge is a 120 MHz ATSAMD51 based board with a screen, buttons, and a case that he 3d printed. To get reasonable sound quality while still fitting with the 2MB of flash storage on the device, MP3 compression was chosen. Since there was only one speaker, it was mixed down to mono and a lower bitrate, getting the size down to just 880KB. The mp3 is processed by the audiomp3 module in circuitpython with the volume level being sent to five NeoPixels to act as a VU. Getting the timing correct was the hardest part as the lyrics needed to be separated out and the timing figured out. Using Audacity’s label track feature, he had all the words tagged in the track and could export it into a format that could be massaged into a python friendly format.

The music and the text cues becoming desynchronized became a larger issue as the file plays. Increasing the MP3 buffer helped but the real trick was to peek inside the music decoder and figure out how many samples had been decoded and cue the words based on that, rather than the time since it wasn’t as accurate. All the code and files are up on his Hackaday.io page if you feel the need to make your own. If you’re sticking with Daft Punk, make sure to have your helmet ready when you rock. Though based on this summary of the compressibility of pop songs, there are a few other songs with a small enough number of unique words that they too could get the word clock treatment. Video after the break.

Continue reading “Daft Punk Word Clock Goes Stronger And Faster”

The 3D Printed Car Tire Rim Finally Hits The Road, Sorta

When you think of “car rim” you probably think stamped steel or machined alloy with a sturdy drum to withstand the arduous life of the road, not something 3D printed out of ABS. That would be crazy, right? Not to [Jón Schone] from Proper Printing, who’s recently released an update about his long-term quest to outfit his older sedan with extruded rims.

There were a few initial attempts that didn’t go as well as hoped. The main issue was layer separation as the air pressure would stretch the piece out, forming bubbles. He increased the thickness to the absolute maximum he could. A quick 3D scan of the brake caliper gave him a precise model to make sure he didn’t go too far. He also couldn’t make the rim any bigger to fit a bigger wheel to clear the caliper, as he was already maxing out his impressive 420 mm build volume from his modified Creality printer.

A helpful commenter had suggested using a threaded rod going all the way through the print as a sort of rebar. After initially discounting the idea as the thickness of the rim gets really thin to accommodate the caliper, [Jón] realized that he could bend the rods and attach the two halves that way. Armed with a paper diagram, he cut and bent the rods, inserting them into the new prints. It’s an impressive amount of filament, 2.7 kg of ABS just for one-half of the rim.

It didn’t explode while they inflated the tire and it didn’t explode while they did their best to abuse it in the small alley they had selected for testing. The car was technically no longer road legal, so we appreciate their caution in testing in other locations. In a triumphant but anti-climatic ending, the rim held up to all the abuse they threw at it.

We’ve been following this project for several months now, and are happy to see [Jón] finally bring this one across the finish line. It sounds like there’s still some testing to be done, but on the whole, we’d call the experiment a resounding success.

Continue reading “The 3D Printed Car Tire Rim Finally Hits The Road, Sorta”

Pop Goes The Mechanical Ping Pong Sculpture

In the waiting rooms of some dentists or doctors, you might have seen a giant metal ball rolling around in a large glass case. While it sure beats looking through those magazines, the sculpture can’t have come cheap. But not all of us want to pay high-end prices for fun toys. As a more cost-effective alternative, [JBV Creative] built an awesome 3D-printed ping pong sculpture.

The basic concept is the same as those fancy sculptures: a ball goes up, moves through some sort of impressive range of motion as it makes its way back down, and some sort of drive mechanism pushes it back to repeat the cycle anew. The design of this particular art piece is no different. A ping-pong ball falls down a funnel into a queue where balls are slowly loaded via a 12-way Geneva mechanism. An Archimedes spiral cam charges an elastic band that yeets the ball up and out of the track and sends it sailing through the air and down inside the funnel mentioned earlier. Everything on this sculpture is 3D-printed aside from the rubber bands and the ping pong balls.

What’s tricky about these sorts of things is the precision required both in printing and in design. It needs to run for hundreds if not thousands of hours and make no mistake. Making something work correctly 99% of the time is hard, but that last 1% can be almost as much work as that first 99%. [JBV Creative]’s first attempt had a catapult mechanism and he printed and tried out several scoops, but none gave the trajectory that he was looking for.

[JBV Creative] tried a plunger mechanism, but without a counterbalance weight providing the power, it just didn’t have enough oomph to launch the ball. Luckily, holes were included in the design, so it was relatively easy to adapt what had already been printed to use rubber bands instead. An additional goal was to have no visible fasteners, so everything needed to be mounted from the back. Check it out in action after the break.

It’s an incredible project that took serious thought, dedication, and in [JBV Creative]’s words, plenty of CAD twirling. It’s a great lesson in iterating and experimentation. If your talents are more soldering-based rather than CAD-based, perhaps a circuit sculpture is more up your alley?

Continue reading “Pop Goes The Mechanical Ping Pong Sculpture”

Putting The ‘Go’ In Frisbee Golf With A Robot Launcher

If you’ve gone to a local city park lately, you might have noticed strange metal baskets on poles with chains dangling free. These baskets are spread out throughout the park seemingly at random. For the uninitiated, Frisbee golf (sometimes known as disc golf) is a confusing concept. You might not think it, but Frisbee golf can be a very big deal to some people. [Stuff Made Here] is back with a disc launcher that he hopes will put all the disc golfers to shame.

It’s no secret that we here at Hackaday are big fans of [Stuff Made Here], or [Shane] (he has his own tag after all), and for obvious reasons — the CAD design process, the careful machining and testing, and the extremely high bar that [Shane] sets for his projects. This one is no different, and it is a tale of iteration and scaling. He started out with a simple goal: break the speed record for a thrown Frisbee.

An initial design was decided upon based on high-pressure air pushing a piston to throw the Frisbee off of an arm. Initially, the arm was way too slow as the airflow was severely restricted due to air solenoids and pressure regulators. After fixing all those problems by fabricating his own solenoid and adding a secondary tank with no regulator, the arm started really moving. However, [Shane] wanted it to be able to be arm-mounted, so making sure the torque wouldn’t melt his arm bones was an important priority.

A counterbalance was added to cancel it out, but that ended up causing additional problems down the road, so the throwing arm had to be made as light as possible. The gripper mechanism had to be redesigned again and again as each time the speed was increased, a new problem arose. Turns out that small plastic discs being accelerated at many G’s tend to deform and slip out of their holders, no matter how well engineered. So [Shane] switched to a clever new design to pull the Frisbee along rather than push. It was too dangerous to really be handheld, and the only tests while he was wearing it were at very low amounts of pressure and power.

Testing it in a wide-open field at full power showed promise and while he had plenty of speed, he wasn’t able to beat the distance record. Breaking the distance record is much harder as Frisbees aren’t really designed with the sheer acceleration that [Shane] is subjecting them to, and they want to flip. Additionally, the Frisbees are lacking the spin that would keep them more stable, and what we do as humans is quite difficult to reproduce. Maybe a larger-scale version of this disc launcher could be made that accepts Frisbees?

It’s incredible to watch this contraption come together as each part needs to be designed and machined first by [Shane]. Video after the break.

Continue reading “Putting The ‘Go’ In Frisbee Golf With A Robot Launcher”

holding up the flavor stone

An Infinity Gem That Didn’t Make The Cut, The Flavor Stone

MSG (Monosodium Glutamate) is a flavor enhancer used to add a meaty/savory (often called umami) flavor to a dish. You might even have some in your pantry (though more likely it is in something that is in your pantry). What you might not know is that you can grow it into a large crystal.

[Chase] does an excellent job walking through the details of the process. MSG is one of the many common household substances that can grow into a crystal such as table salt, alum, fertilizer, sugar, or Epsom salt to name a few. The idea is quite simple —  just create a supersaturated solution with your desired crystal material and then suspend a string in it; but the execution has some nuance. To create a medium that’s super saturated, heat some water and mix in equal parts of MSG. Then let it cool once it has all dissolved and split it into two parts, one big and one small. You need to create a seed crystal, so place the small solution in a shallow dish and let a crystal percolate out over the new few days. You attach one of the seed crystals that grow to a string and suspend it in your solution. There are several gotchas around how to properly harvest the crystals but [Chase] enumerates them for you.

We’ve covered [Chase’s] efforts before when he grew crystals out of Rust. He is on a quest to grow all five flavor stones: salty, sweet, sour, umami, and bitter and we wish him all the best. What we would also love to see is the whole process of MSG from start to finish, making your own MSG.

Bringing IMessage To The Mac

If you’ve invested in the Apple ecosystem, the joys of iMessage likely illuminate your life. Your phone and desktop and laptop all sync your messages. But what if your desktop is running Mac OS 9 or System 2? This is where [CamHenlin’s] MessagesForMacintosh comes in.

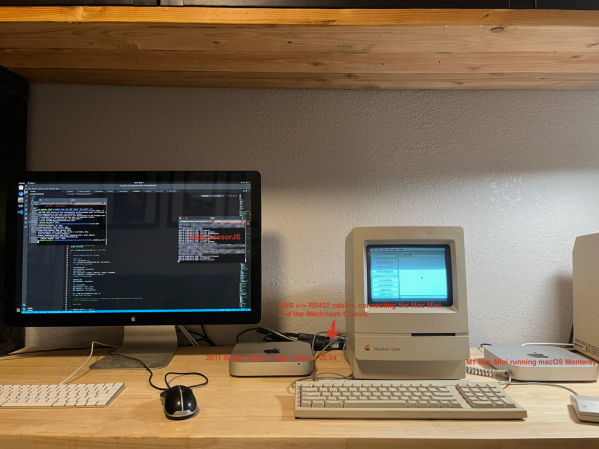
Unfortunately, it does require a more modern Mac to act as an access point into the wider iMessage network. The modern Mac sets up a GraphQL database that can be accessed. Then a serial cable connects your “retro daily driver” to a translation layer that converts the serial commands into GraphQL commands. This could be something simple and network-connected like an ESP32 or a program running on your iMessage Mac. [CamHenlin] has a second Mac mini in his demo, seen above.

[CamHenlin] leverages his library known as CoprocessorJS. It allows older machines to hand off complex workloads to more modern machines, allowing modern machines to act as a coprocessor. Getting a single binary to run across many different versions of Mac OS and System is tricky and there were a few tricks involved. Retro68 is a C++17 compiler that targets PowerPC and 68k architectures. Additionally, Nuklear Quickdraw is used to provide a GUI in a performant manner.

It is always a joy to see older hardware do new tricks, often with the help of a bit of modern hardware. Connecting your Mac to the internet can be as easy as Pi.

the active foil flying across the water

Hydrofoils Love This One Simple Trick

Earlier in the year, [rctestflight] created an active hydrofoil RC craft but found the actual performance very lacking. Luckily for him and for us, he continued to tweak it and one tweak suddenly turned it from a nightmare to a dream.

That tweak was adding ArduPilot’s airplane model. The design had three servos, which each actuated the angle of a foil underneath one of the three pontoons. The ship propelled itself via some propellers mounted near the top. If you know much about ArduPilot, you notice that active hydrofoil boat doesn’t show up on the list of supported platforms, and you’re right. [rctestflight] points out that the three servos actually function as a plane underwater. The front two are ailerons and the back one is an elevator, all things that ArduPilot knows how to handle with a tightly controlled loop except for one thing; there’s no altitude data.

So he stole a trick he developed earlier for his ground effect plane and used a distance sensor to let ArduPilot know how to adjust things. He used a sonar sensor instead of lidar as it works better with water and he was pleasantly surprised when he took it out on the lake and it just worked wonderfully. The original goal with the active stabilization was to have the efoil immune to choppy waters, and we’re sad to say that it didn’t quite reach that lofty target. The single sonar sensor follows the wave in front of it beautifully but can’t handle the complex waves being thrown at it. Perhaps some sort of sensor fusion algorithm could provide the necessary data to be truly resilient. But we love watching the foil glide across the water and it is hard to remember that it’s actively flying rather than just floating that way.

Others have tried and failed to 3D print a hydrofoil while others have succeeded. We love that [rctestflight] came back to finish the fight and came away a champion. Video after the break.

Continue reading “Hydrofoils Love This One Simple Trick”