Pop Goes The Mechanical Ping Pong Sculpture

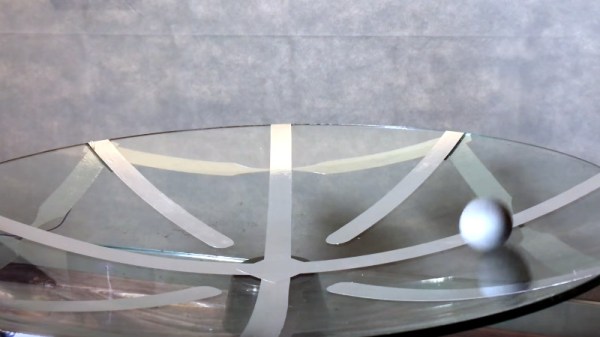
In the waiting rooms of some dentists or doctors, you might have seen a giant metal ball rolling around in a large glass case. While it sure beats looking through those magazines, the sculpture can’t have come cheap. But not all of us want to pay high-end prices for fun toys. As a more cost-effective alternative, [JBV Creative] built an awesome 3D-printed ping pong sculpture.

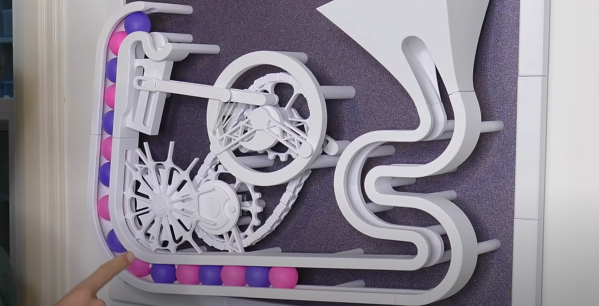
The basic concept is the same as those fancy sculptures: a ball goes up, moves through some sort of impressive range of motion as it makes its way back down, and some sort of drive mechanism pushes it back to repeat the cycle anew. The design of this particular art piece is no different. A ping-pong ball falls down a funnel into a queue where balls are slowly loaded via a 12-way Geneva mechanism. An Archimedes spiral cam charges an elastic band that yeets the ball up and out of the track and sends it sailing through the air and down inside the funnel mentioned earlier. Everything on this sculpture is 3D-printed aside from the rubber bands and the ping pong balls.

What’s tricky about these sorts of things is the precision required both in printing and in design. It needs to run for hundreds if not thousands of hours and make no mistake. Making something work correctly 99% of the time is hard, but that last 1% can be almost as much work as that first 99%. [JBV Creative]’s first attempt had a catapult mechanism and he printed and tried out several scoops, but none gave the trajectory that he was looking for.

[JBV Creative] tried a plunger mechanism, but without a counterbalance weight providing the power, it just didn’t have enough oomph to launch the ball. Luckily, holes were included in the design, so it was relatively easy to adapt what had already been printed to use rubber bands instead. An additional goal was to have no visible fasteners, so everything needed to be mounted from the back. Check it out in action after the break.

It’s an incredible project that took serious thought, dedication, and in [JBV Creative]’s words, plenty of CAD twirling. It’s a great lesson in iterating and experimentation. If your talents are more soldering-based rather than CAD-based, perhaps a circuit sculpture is more up your alley?

Continue reading “Pop Goes The Mechanical Ping Pong Sculpture”

Detail of an LED display made using ping-pong balls

Modular Design Enables Huge Ping-Pong Ball LED Displays

Ping-pong balls have many uses: apart from playing table tennis, they have been used for countless art projects, science experiments, and even to raise ships from the bottom of the ocean. As it turns out, they also come in handy as diffusers for LED pixels, allowing the construction of large-size displays without requiring large individual LEDs.

[david] designed an LED ping-pong ball display using 3D printed components, which allows for the construction of arbitrarily-large LED displays thanks to a strictly modular design. The basic unit is a small piece that holds a single LED module and has a cup-like structure for attaching a standard table tennis ball. Twenty-five of these basic units combine together into a panel that also contains wiring ducts. Finally, any number of these panels can be combined into a display, thanks to clips that give the structure rigidity in the out-of-plane direction.

A 3D-printed frame for making an LED display
A single panel holds 25 LEDs and comes with cable ducts. On the right is a clip for connecting multiple frames together.

Of course, simply mounting LED modules is not enough to create a display: the LEDs also need to be connected to power and data lines. [david] didn’t relish the thought of having to cut and strip 1,800 pieces of wire, and therefore devised a clever way of automating this process: he put a bunch of wires onto a piece of card stock and used a laser cutter to burn off the insulation at regular intervals. Then it was simply a matter of soldering these wires onto the LEDs and snipping off pieces along the data bus.

The finished panel is driven by a combination of a Teensy 3.2 to generate the data signals and a Raspberry Pi to process the images. You can see the rather impressive result in the video embedded below; if this inspires you to build your own, you’ll be happy to hear that the STL files and all code are available on [david]’s project page.

Massive LED displays are always fun to watch, and although this is not the first one to use ping-pong balls as diffusers, its modularity and open-source design makes this one perhaps the easiest to replicate. Assuming you have a good supplier of ping-pong balls, of course.

Continue reading “Modular Design Enables Huge Ping-Pong Ball LED Displays”

Moving Things With Electricity

We use electricity to move things with the help of motors and magnets all the time. But if you have enough voltage, you can move things with voltage alone. As [James] found out, though, it works best if your objects — ping pong balls, in his case — are conductive.

He wanted to add a Van de Graaff generator to add to his “great ball machine” which already has some cool ways to move ping pong balls. However, to get the electrostatic motion, [James] had to resort to spraying the balls with RF shielding spray.

Continue reading “Moving Things With Electricity”

Electronic Connect Four Has No Pieces To Lose

Recreating classic games in software is a great way to get better at coding or learn to code in the first place. If you do it in hardware though, you’ll gain a lot more than coding skills. Just ask [Kelly] and [Jack] did, when they built this Arduino-based electronic Connect Four for a school project.

We love that their interpretation manages to simplify game play and make it more fun than the original version. All the players have to do is turn it on and start pushing the arcade buttons along the bottom to choose the column where they want to make a play. The LEDs animate from top to bottom to imitate the plastic disc dropping down through the board. If a win is detected — four in a row of the same color going any direction — the board fills up with the winning color and the game starts over.

The state machine doesn’t currently do anything about tie situations, so there’s a reset button hidden on the side. As [Kelly] and [Jack] explain in their walk-through video after the break, that is something they would like to address in the future, along with making it possible to choose whatever battle color you want. We think a reset animation that mimics the look of the discs spilling out the bottom would be cool, too.

If you’ve never implemented a game on hardware before, something like this might be a bit daunting. May we suggest a game of 4×4 Tic Tac Toe instead?

Continue reading “Electronic Connect Four Has No Pieces To Lose”

Table Tennis Ball Lamp Serves Up Style

Although RGB LEDs diffused by ping pong balls will probably never stop being cool, [thomasj152] feels that flat panels of balls have become a bit of a tired concept. After a lot of effort and two complete builds, he has spun up an 80-ball spherical lamp. The results are positively glowing!

All the balls are connected together with some clever 3D printed pieces that were inspired by the classic soccer ball layout of hexagons and pentagons. [thomasj152] chose this shape because it’s fairly easy to code animation sequences for it.

The design also breaks down nicely into two halves, which makes it easier to wire. All 80 of the balls are controlled with a single NodeMCU ESP8266 development board.

This stranded version is the second lamp [thomasj152] built. The first one used the same soccer ball style, but had RGB LED strips instead, and the balls were wrangled with laser-cut support pieces. Strips lay much flatter than strands do, leaving the inside tidy and spacious. Unfortunately, the LED strips got fried accidentally, which is extra sad because the strips version looks like way more work.

The bright spot here is that [thomasj152] can now provide instructions for both versions. He even has code that cycles through each pentagon and hexagon section, lighting them up one at a time for testing and sanity checks. Roll past the break for a walk-through video that shows both versions and explains the differences.

Got a bunch of wall space begging for blinkenlights? Apparently it’s possible to throw together a working 300-ball video wall in less than 24 hours. Who knew?

Continue reading “Table Tennis Ball Lamp Serves Up Style”

Glitching LED Display Proves Crowd Favorite

There’s something enchanting about the soft glow of a properly diffused LED, and this is only improved by greater numbers of LEDs. [Manoj Nathwani] was well aware of this, setting out to build a large display using ping-pong balls for their desirable optical qualities.Unfortunately, not everything went to plan, but sometimes that’s not all bad.

The matrix, built back in 2016 for EMF Camp, was sized at 32×18 elements, for a total of 576 pixels. This was achieved with the use of 12 WS2811 LED strips, with the lights set out on a 50mm grid. Cheap knock-off pingpong balls were used for their low cost, and they proved to be excellent diffusers for the LEDs.

With everything wired up to a NodeMCU, basic testing showed the system to be functioning well. However, once the full matrix was assembled in the field, things started to fall over. Basic commands would work for the first 200 LEDs or so, and then the entire matrix would begin to glitch out and display random colors. Unable to fix the problem in the field, [Manoj] elected to simply run the display as-is. Despite the problems, passers-by found the random animations to be rather beautiful anyway, particularly at night.

After the event, [Manoj] determined the issue was due to the excessive length of the data line, which in the final build was 48 meters long. While the problem may be rectified when [Manoj] revisits the project, the audience seemed to appreciate the first revision anyway.

LED displays will be a hacker staple until the heat death of the universe. Ping pong balls will also likely retain their position as a favorite diffuser. If you’ve got a great LED build of your very own, be sure to hit up the tips line!

Electrostatically Accelerated Ping-Pong Ball Travels The Circuit

There is a special breed of hardware hacker whose playground lies in the high voltage arena. Their bench sizzles with the ozone and plasma of Tesla coils, and perhaps it’s best not to approach it without a handy fluorescent light tube to sniff for unseen hazards. There are many amazing things that can come of these experiments, and fortunately for those of us who lack the means or courage to experiment with them there are many YouTube videos to satisfy our curiosity.

One such comes from [Plasma channel], in the form of a table-top ping-pong ball accelerator. It lacks impressive sparksĀ  but makes up for it in scientific edification, because it uses static electricity to send a conductive-paint-coated ping-pong ball spinning round the inside of a curved glass bowl. It does this using alternate positive and negatively charged strips of aluminium tape on the inside of the bowl, each of which charges the ball as it rolls over it, then giving it a bit of repulsive force to keep it spinning. His power comes from a couple of small Wimshurst machines, but no doubt other similar generators could be used instead.

The whole is an entertaining if a little hazardous talking point, and a fun weekend build. The parts are easy enough to findĀ that you might even have them to hand. If continued electrostatic diversion floats your boat, you might like to read our recent excursion into the subject.

Continue reading “Electrostatically Accelerated Ping-Pong Ball Travels The Circuit”