Remove Your Arduino’s External Oscillator To Gain A Free Pair Of IO Pins

2free-arduino-io-pins

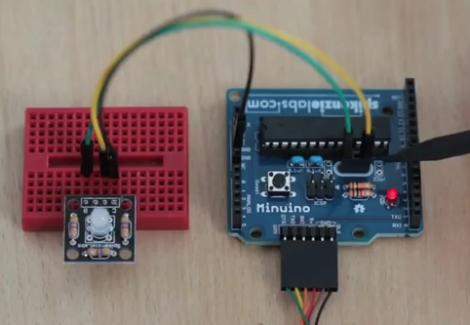
[Mark] from SpikenzieLabs was wrapping up a project using an Arduino the other day and found himself in need of a few more I/O pins. He could have added extra circuitry to the project, but he decided to see if he could gain a few pins by removing a few components instead.

He put together one of his Minuino boards, but rather than installing the crystal and its associated capacitors, he added a couple of pin headers in their place. It’s well known that the internal clock on the chip is not as precise as a crystal, but [Mark’s] project was not that time sensitive, so he had no problem sacrificing the oscillator for a few extra pins.

With his new I/O pins in place, he merely needed to tell the ATmega chip which clock it should be using, and he was well on his way. While this might not be the best solution for all projects out there, if you are building something that values pincount over precision, this hack is for you.

Check out the video below to see [Mark’s] hack in action.

[via HackedGadgets]

Continue reading “Remove Your Arduino’s External Oscillator To Gain A Free Pair Of IO Pins”

The Pirate Bay Aims For The Clouds…literally

tpb

There is no shortage of government and entertainment-related agencies chomping at the bit to shut down the Pirate Bay for good. While the group has not suffered a permanent service ending raid like [Kim Dotcom] and the Megaupload crew, they are always thinking up novel ways to ensure that the site can endure whatever law enforcement throws at them.

In a recent blog post, representatives from the group unveiled plans to put their front line servers in the clouds, courtesy of custom-made autonomous drones called “Low Orbit Server Stations.” The project is in its infancy, but the general idea is to mount small computers like the Raspberry Pi on GPS-controlled drones kept aloft 24×7 (presumably) using solar energy. These drones would communicate with clients on the ground via radio transmitters which they state can provide a “100Mbps node up to 50km away”.

Calling the claims grandiose would be an understatement, but then again the Pirate Bay has proven to be a difficult organization to quash in any substantial way, so only time will tell.

[via The Daily What – Thanks, roboman2444]

Arduino Shield Includes Everything But The Kitchen Sink

arduino-3g-shield

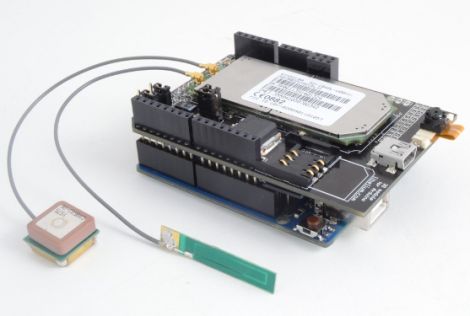
The crew at Cooking Hacks in Zaragoza wrote in to share a new shield they developed for the Arduino platform. There are a hundred different shields out there that do this and that, but we think their 3G/GPRS shield looks pretty slick.

The base shield contains a WCDMA and HSPA compatible 3G modem as well as a GPS receiver. The modem can be used with an Arduino, or plugged directly into a computer via USB, allowing it to be used any way you like it. The more advanced kit offered by the Cooking Hacks crew features a VGA video camera, as well as an audio kit that can both play and record audio.

One neat feature they were quick to point out is that not all network communications need to be handled by the Arduino. Simple transactions (HTTP/FTP/POP3/SMTP) can all be carried out by sending standard AT commands to the modem.

Now, the kits don’t come cheap, but we can’t help but be interested in seeing what applications people dream up with this shield at the helm. Cooking Hacks is a division of Libelium Communcations, but as they are the company’s “Open Hardware Division” there are schematics available should you be interested in rolling your own 3G modem instead.

When Console Modders Face Off, Only Good Things Happen

sega-multi-gen

We really love when friendly competition leads to excellent hacking. Not too long ago, we showed you a nicely done Sega Genesis portable put together by console hacker [Downing] who challenged fellow hacker [EVIL NOD] to a build off. The two were hacking Sega consoles, [Downing’s] for personal use, while [EVIL NOD] was working on a commissioned build.

As you might have guessed, [Downing] finished first, but that doesn’t mean [EVIL NOD’s] console is anything but spectacular. His Sega Multi Gen is a portable Genesis console modified to play both NTSC and PAL games. It features a large 5” PSOne screen as well as the guts from an official 6-button Genesis game pad. The case was vacuum formed by [Downing], and is another example of his fine workmanship. The console looks as if it’s had the controller melted right into its face – a design that is sure to give you the authentic feel of sitting in front of your TV mashing away at the buttons.

Check out the video below to see an unboxing video that [EVIL NOD] put together before sending the console out to its new owner.

Continue reading “When Console Modders Face Off, Only Good Things Happen”

Tearing Down A Failed LED Bulb

todd-harrison-led-bulb

[Todd Harrison] was thinking of replacing some incandescent light bulbs in his house with LED models, so and his wife picked up a single candelabra bulb to test before they spent the cash to swap them all out. The bulb died in about a week’s time, so [Todd] got out his trusty electronic disassembly device (his hammer), sharing his post-mortem examination with us.

After taking a cursory look at it, [Todd] found that the circuit powering the bulb was not overly complicated. A small bridge rectifier along with a few caps and resistors are all that was used to power the device, making it’s failure a bit puzzling. When [Todd] wired it up to his power supply, the bulb lit up, much to his surprise. His best guess as to why it died is that the shrink wrap around the PCB managed to cause a short, though he also noticed that one of the bridge rectifier’s legs was not soldered down.

He started tooling with the light to find out more about it, but he managed to blow out a handful of LEDs in the process. All in all the LED lighting swap was a disappointment, but at least he had some fun along the way!

Continue reading if you’re interested in seeing [Todd’s] diagnosis in its entirety.

Continue reading “Tearing Down A Failed LED Bulb”

altoids-pocket-projector

DIY Film Projector Fits In The Palm Of Your Hand

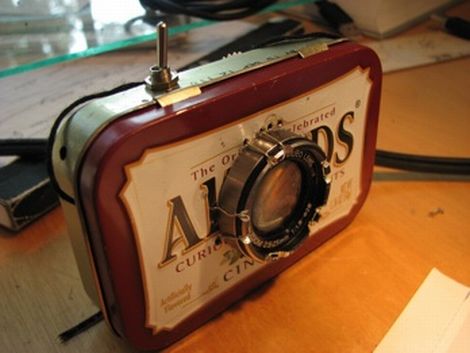
DSLRs aside, the price of digital cameras these days can make it easy to consider just tossing your old one out when it breaks. [Leonidas Tolias] had another idea, and with a few broken cameras he had on hand he constructed a slick little pocket-sized projector.

The project started out as a pair of lenses from busted cameras and an Altoids tin in which he mounted them. The larger lens from a video camera was installed on the exterior of the tin, while the smaller of the two was mounted inside. Bits from disposable cameras were used to create a set of film reels, which he supports with some hand cut scrap aluminum. He made some test photo slides by printing some images on transparency paper, which he can cycle through using a film advancement rig he built out of string and a couple of gears.

While you won’t be using this projector for your next boring PowerPoint presentation, it does work pretty well as you can see in pictures on [Leonidas’] site.

[Thanks, Taylor]

Kid-friendly RFID Media Center Playlist Control

rfid-dreambox-control

While young children have the tiny hands and fingers that most hackers/tinkerers wish they possessed from time to time, their fine motor skills aren’t always up to par when it comes to operating complicated electronics. People are always looking for ways to make their home entertainment systems accessible to their kids, and [Humpadilly] is no exception. Much like some of the other hacks we’ve seen this week, he has devised a way for his little ones (1 and 2 years old) to control his Dreambox Media Player using RFID, which seems to be the go-to technology for this sort of thing.

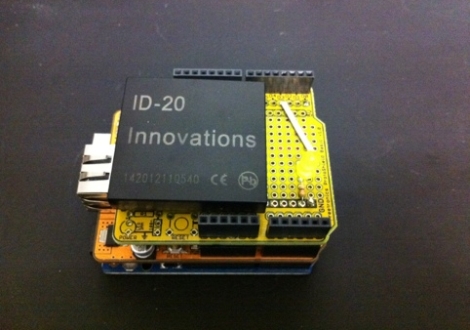
His RFID remote consists of three major components aside from the media player itself. An Arduino runs the show, and is connected to both an Ethernet shield and a breakout board fitted with an ID-20 RFID reader module. The Ethernet shield allows the Arduino to talk to his Dreambox over a telnet connection, while the RFID reader does what you would expect.

The device is in its infancy at the moment, and while [Humpadilly] hasn’t published a ton of details about the actual RFID devices he is using to control the system, he says that more details and improvements are forthcoming. In the meantime, you can check out his code here.