Electric Poncho Keeps You Warm On The Go

electric-poncho

With the mild winter and spring we have had, it might seem strange to think about ways to keep yourself warm, but there’s no better time than the present to prepare for chilly weather down the line.

In his blog [Berto] was thinking about how to keep warm when things cool off again, and decided that a heated poncho would be great to have on hand. He found a dead simple way to craft his heated poncho, requiring little more than a bit of wiring, some thread and cloth, as well as a pair of scissors.

[Berto] picked up a 12V-powered electric blanked, then proceeded to cut a head-sized slit in the middle of it, avoiding the heating coils. He sewed a bit of cloth around the hole to ensure it didn’t end up ripping over time, then he wired the blanket up to a 12V battery he tucked away in his backpack.

The result is a variable-temp poncho that you can use to keep warm in a variety of situations. [Alan Parekh] from Hacked Gadgets says that he thinks the poncho would be awesome on a full-day snowmobiling trip, and we think he’s right!

Continue reading to see a short video where [Berto] explains how to put one of these heated ponchos together.

Continue reading “Electric Poncho Keeps You Warm On The Go”

Remove Your Arduino’s External Oscillator To Gain A Free Pair Of IO Pins

2free-arduino-io-pins

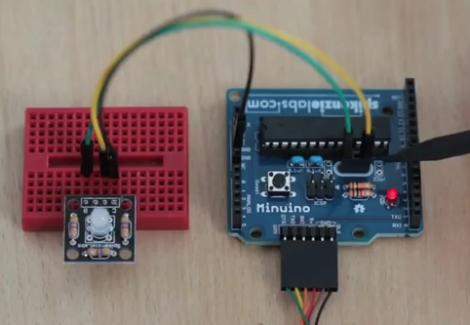
[Mark] from SpikenzieLabs was wrapping up a project using an Arduino the other day and found himself in need of a few more I/O pins. He could have added extra circuitry to the project, but he decided to see if he could gain a few pins by removing a few components instead.

He put together one of his Minuino boards, but rather than installing the crystal and its associated capacitors, he added a couple of pin headers in their place. It’s well known that the internal clock on the chip is not as precise as a crystal, but [Mark’s] project was not that time sensitive, so he had no problem sacrificing the oscillator for a few extra pins.

With his new I/O pins in place, he merely needed to tell the ATmega chip which clock it should be using, and he was well on his way. While this might not be the best solution for all projects out there, if you are building something that values pincount over precision, this hack is for you.

Check out the video below to see [Mark’s] hack in action.

[via HackedGadgets]

Continue reading “Remove Your Arduino’s External Oscillator To Gain A Free Pair Of IO Pins”

Baby’s First Star Light Projector And A Foil Slip Ring

For a newborn, everything is magical; a lack of object permanence means everything is new, wonderful, and novel. What then, could be better than a projected star field circling an infant’s room, gently sending them to sleep?

[Pete] was inspired by this earlier starlight projector that projects a rotating star field onto the walls and ceiling of a nursery. Instead of a rather loud servo, [Pete] used a quiet 12 Volt gear motor that spins the star field at 5 RPM. Like the previous build, a LED was used but [Pete] found a color-changing RGB LED that automatically shifts colors.

The shaft of [Pete]’s gear motor is tiny, and unlike the servo, there’s constant rotation. This meant a slip ring was needed to pass electricity into the spinning sphere. A piece of copper foil and a pair of improvised brushes served just fine. While [Pete]’s project, like its predecessor, doesn’t seem to have any recognized constellations drilled into the sphere, the foil slip ring opens up the possibility for a small microcontroller being fitted inside the globe with blinking lights.

Check out the video of [Pete]’s build in action after the break.
Continue reading “Baby’s First Star Light Projector And A Foil Slip Ring”

Adding New Features And Controlling A Kinect From A Couch

Upon the release of the Kinect, Microsoft showed off its golden child as the beginnings of a revolution in user interface technology. The skeleton and motion detection promised a futuristic, hand-waving “Minority Report-style” interface where your entire body controls a computer. The expectations haven’t exactly lived up reality, but [Steve], along with his coworkers at Amulet Devices have vastly improved the Kinect’s skeleton recognition so people can use a Kinect sitting down.

One huge drawback for using the Kinect for a Minority Report UI in a home theater is the fact that the Microsoft Skeleton recognition doesn’t work well when sitting down. Instead of relying on the built-in skeleton recognition that comes with the Kinect, [Steve] rolled his own skeleton detection using Harr classifiers.

Detecting Harr-like features has been used in many applications of computer vision technology; it’s a great, not-very-computationally-intensive way to detect faces and body positions with a simple camera. Training is required for the software, and [Steve]’s app spent several days programming itself. The results were worth it, though: the Kinect now recognizes [Steve] waving his arm while he is lying down on the couch.

Not to outdo himself, [Steve] also threw in voice recognition to his Kinect home theater controller; a fitting  addition as his employer makes a voice recognition remote control. The recognition software seems to work very well, even with the wistful Scottish accent [Steve] has honed over a lifetime.

[Steve]’s employer is giving away their improved Kinect software that works for both the Xbox and Windows Kinects. If you’re ever going to do something with a Kinect that isn’t provided with the SDKs and APIs we covered earlier today, this will surely be an invaluable resource.

You can check out [Steve]’s demo of the new Kinect software after the break.

Continue reading “Adding New Features And Controlling A Kinect From A Couch”

The First Raspberry Pi Build Is A MAME Machine

The Raspberry Pi was launched nearly a month ago, but these wonderful cheap single-board computers are still on their way from China to the workbenches of hackers and builders around the globe. Although they haven’t shipped yet, plenty of people are chomping at the bit to do something useful with the Raspi. [Nicholas] figured he should hit the ground running, so he emulated a Raspberry Pi to get everything ready for the MAME machine he’ll build when his new toy arrives.

[Nick] found a Raspi VirtualBox image on the official Raspberry Pi forums. After getting a web browser up and running with a few console keystrokes, he turned his attention to a MAME emulator. It’s a relatively simple install (although it did take six hours to compile), but we’re sure the Raspi will be featured in quite a few MAME builds so it was time well spent.

Sure, the Raspberry Pi you ordered a month ago is probably on a container ship in the middle of the ocean right now, but that doesn’t mean you can’t start planning your build. Just load up a VirtualBox image, check out a few of the tutorials, and you’re ready to go.

Kinect For Windows Resources

Despite having been out for nearly two months, the world has yet to see a decent guide to the Kinect for Windows. While the Xbox and Windows  versions of the Kinect use basically the same hardware, there are subtle but important differences. Thanks to [Matthew Leone] and his awesome summary of developer resources, getting your Kinect project up and running is now a lot easier.

After getting the SDK from the Microsoft Kinect for Windows site, you might want to check out the Microsoft Programming Guide. The Windows Kinect can only be used with Visual Studio, but with that inflexibility comes a few added features. Both versions of the Kinect have a microphone array that allows for determining the direction of a sound source. The Open Source driver has very little support for audio input, but the official Microsoft version has all the APIs for audio capture, source localization, and speech recognition ready to go.

At $250, the Kinect for Windows is a fairly hefty investment. A used Xbox Kinect can be had for around $80, so we’re pretty certain the hacker community is going to steer itself away from the Windows version. Still, if you’re ever paid to develop something for the Kinect you might want the friendly APIs and features not found in the XBox version.

Ancient Laptop Given New Life As Mobile Prototyping Platform

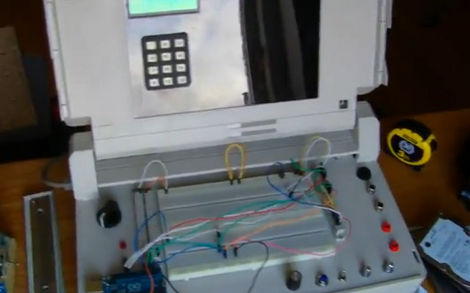
What can you do with a broken Compaq SLT 286? Its briefcase-like size and shape actually make for a pretty interesting portable electronic prototyping station. [Philip] gutted the components and started adding back the items he most commonly uses when developing a project.

He shares all of the details in the video after the break. At center stage is a double breadboard where the keyboard would normally be found. It’s hard to make out in the image above, but there is a set of terminal strips running vertically to either side of these breadboards. Each terminal is connected to a peripheral or power/ground bus. The black knob to the left lets him adjust the output of a variable voltage regulator. To the lower right there’s a rotary encoder, push button, toggle switch, and a couple of potentiometers. These, along with the keypad and character display (mounted where the screen used to be) and DB connectors (on the back of the case) have their pins mapped to the terminal block to the right. [Philip] has mounted an Arduino Uno over the area to the bottom left, but we’re sure that it’s pretty easy to swap out for just about any breakout board he needs.

To answer [Philip’s] running dialog from the video: no, it is not the worst demo ever. We think you did a great job demonstrating all the features. Loose connections are par for the course when it comes to prototypes.

Continue reading “Ancient Laptop Given New Life As Mobile Prototyping Platform”