Engine Hacks: Electrified Datsun Is The Ultimate Engine Swap

Engine Hacks Theme banner

white_zombie_electric_car

Forget the Tesla Roadster, we want an electric car like [John Wayland’s] White Zombie!

If it wasn’t plastered with sponsor stickers and the like, you would never realize that this otherwise unassuming ‘72 Datsun 1200 is an absolute beast of a car. The gas engine that used to provide a mere 69 horsepower was swapped out for a pair of custom-built electric motors which propel the Datsun to 60 miles per hour in under two seconds.

The electric motors supply 500 horsepower and a staggering 1250 foot pounds of instant torque, providing one hell of a ride. The car is powered by 12 custom 29.6V battery packs which provide 2,400 Amps of current each! Aside from laying down a quarter mile in under 11 seconds, White Zombie can make a 90 mile trek before requiring a recharge.

Needless to say, this impressive car takes plenty of people by surprise each time [John] hits the track. Continue reading to watch one poor sap learn the hard way that his brand new Maserati is no match for White Zombie.

[via Discovery]

Continue reading “Engine Hacks: Electrified Datsun Is The Ultimate Engine Swap”

kraftwerk_inspired_led_tie

Kraftwerk Inspired LED Tie

If you didn’t land the job after your last interview, it might have been because you were not wearing this sweet Kraftwerk-inspired necktie. Although our own [Caleb Kraft] insists that this recent creation by the folks over at Evil Mad Scientist Laboratories is a tribute to him, [Ralf Hütter and Florian Schneider] beg to differ.

The inspiration for the tie actually comes from Kraftwerk’s 1977 video for “The Robots”, in which the band wore black ties with embedded scrolling LEDs. The effect is very similar to that of a Larson Scanner, though Kraftwerk’s ties light the LEDs in a single direction and do not fade in and out.

EVMSL has released a firmware update to the Larson Scanner they sell in their shop that replicates the Kraftwerk effect, and they also put together a quick tutorial showing how you can construct your own coin cell-powered LED tie. We’re not suggesting that anyone rush out and buy their kit, as it can be replicated fairly easily – we just thought it was pretty cool.

So, if you’re looking for a retro-inspired Halloween costume, search no further – Evil Mad Scientist Labs has you covered.

Continue reading for a video demo of their tie, as well as the original video that inspired it.

Continue reading “Kraftwerk Inspired LED Tie”

Awesome Fiber Optic LED Viking Helmet

octobrite_led_mohawk_helmet

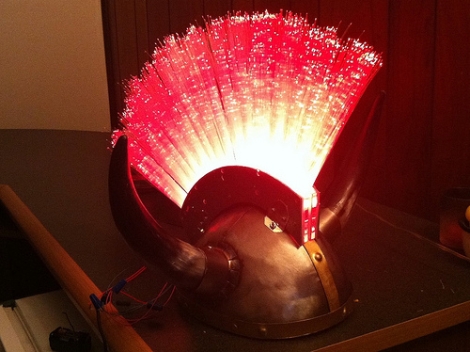
[Garrett] over at MaceTech was approached by a friend who needed a light-up mohawk installed on a Viking helmet, and he needed it ASAP.

Now, [Garrett] does tons of work with LEDs but it’s not every day you are asked to construct a sound-responsive LED mohawk. He had all sorts of LEDs and other bits on hand, but finding the fiber optics that would make up the mohawk itself took a bit of time.

After a bit of searching, he located some cheap bulk fiber optic toy wands, and got busy cutting them apart to remove the fiber bundles. The fibers were glued into a laser cut plastic assembly, where they were paired with a handful of OctoBrite CYANEA modules [Garrett] had on hand. He bought a handful of components from SparkFun, including an Arduino Pro Mini to control the device, as well as an electret mic and graphic equalizer chip to handle the audio input/filtering.

He wrapped up the code portion of the mohawk and handed it off to his friend, who says that the “helmet is +99 to epic awesomeness”, which sounds like a ringing endorsement to us.

[via BuildLounge]

Check out the video below to see the fiber optic mohawk helmet in action.

Continue reading “Awesome Fiber Optic LED Viking Helmet”

Robust Wireless DSLR Control Over Bluetooth

yanis_android_bluetooth_camera_controller

[Manishi] wrote in to share his latest project, a Bluetooth DSLR controller that works with Android. More than a mere Bluetooth shutter trigger, his device lets you control a wide array of other settings such as aperture, shutter speed, ISO, white balance, focus position and live view.

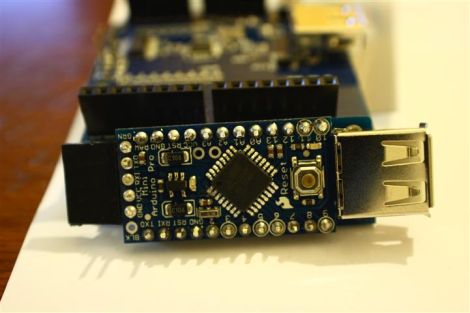
His “YaNis” control system was built using an Arduino Pro Mini, along with a USB host shield and a Bluetooth module he picked up from SparkFun. Obviously any other Arduino and SPP compatible Bluetooth board can be used, though component size is definitely a consideration for this project, and his selections are pretty well-suited to the job. The Arduino half of the software relies heavily on [Oleg Maruzov’s] PTP/USB libraries to get things done, but the free Android control app is all [Manishi’s] creation.

The Bluetooth dongle connects to the camera via USB, and once it’s paired with his Android phone, [Manishi] has total control at his fingertips. He has plenty of improvements planned for the near future including additional camera support, so we expect that we’ll see an even more robust control application before too long.

Continue reading to see a quick video demo of YaNis in action.

Continue reading “Robust Wireless DSLR Control Over Bluetooth”

Repairing An Old Pick And Place Machine

repairing_juki_placemat_360

Professional-grade pick and place machines are quite pricey, so when the crew at Null Space Labs picked up an old Juki Placemat 360 for only $1,200, they were stoked. When they finally got it in-house however, they realized that the seller’s definition of “working” was a bit different than theirs. The machine’s compressor is busted, and there are all sorts of other bits that require some TLC before they can get things up and running again. They have put together a “build log” showing off their work as the machine is taken from an ancient, mostly-working relic to a lean, mean, picking and placing machine.

So far, they have torn the thing down and inspected the upgrades and damage the machine has been subjected to over the years. The crew started making a few small repairs, and have even replaced the unit’s laser with machine vision, which seems to be working well thus far during testing.

While you might not have any similar machinery in your workshop, it’s still fun to watch as they tear it down and revamp it, bit by bit.

Google ADK On An EvalBot

evalbot_google_adk

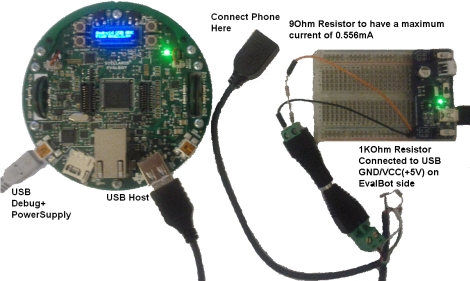
After learning that Google’s ADK relied on using an Arduino-compatible board, [Benjamin] was disappointed that other microcontroller platforms weren’t invited to the party. Rather than switch camps, he took it upon himself to get the ADK working with his EvalBot. In fact, his modifications should allow the ADK to work with nearly any Stellaris ARM kit.

The hack is composed of two parts. The first, and most important bit is the USB host driver he developed to work with the ADK. The code borrows some bits from Texas Instruments, and will be published on GitHub once he gets a chance to clean up the source a bit. To get his phone working with the EvalBot, he also had tweak the external USB power supply in order to provide the current required to operate properly with other USB-connected hardware.

It’s always nice to have more options when working with Google’s ADK, and [Benjamin’s] work is likely a welcome addition to any Stellaris developers toolkit.

Continue reading to see a quick video of his EvalBot ADK demo.

Continue reading “Google ADK On An EvalBot”

vacuum_forming_consistent_results_every_time

How To Build A Vacuum Form Table That Gets It Right Every Time

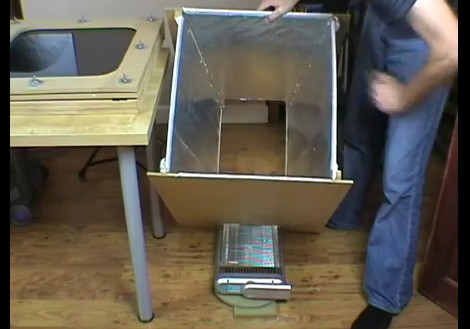
[James] builds all sorts of robots and superhero costume replicas at home, so he is always searching for a better way to get consistent results when using his vacuum table. A lot of people use their oven or exposed heating coils from electric frying pans to warm the plastic sheets, but [James] wasn’t really interested in going down that route. He cites that he would rather not heat plastic in the oven where he cooks his food, nor is he really keen on the idea of exposed heating elements.

Instead, he opted for a slightly pricier, though completely reasonable setup that produces consistent results every time. Most of the forming table was built using MDF sheeting, as you can see in the video below. His heating apparatus was the most expensive part of the rig, since it’s an off the shelf quartz-based room heater. He lays the heater on its back side, and directs the heat up through an MDF frame using aluminum foil as a reflector. The plastic sheeting mounted at the top heats evenly, and in no time, he has a perfectly vacuum formed prop that is ready to be painted.

Sure, it might cost a bit more than some other vacuum formers we’ve looked at before, but spending a bit more up front to get consistent results is well worth it if you ask us.

Continue reading “How To Build A Vacuum Form Table That Gets It Right Every Time”