Kinect-controlled Delta Robot Has A Magnetic Personality

kinect_controlled_delta_robot

[Malte] is a loyal Hackaday reader and neurobiology PhD candidate with a keen interest in hobby robotics – definitely our kind of guy! He wrote in to share a project he has been working on in his spare time, a Kinect-controlled delta robot (Google translation).

Deltares, as it is called, is pretty straightforward as far as delta robots are concerned. It uses three servos to actuate the arms, which are controlled by an AVR micro running BASCOM. The AVR gets its coordinate data from his computer via a serial connection after it has been captured by the Kinect. [Malte] opted to use Microsoft’s official SDK for the project, processing the Kinect skeletal data using a small C# application he wrote.

The end result is pretty neat as you can see in the pair of videos below. In the first video, [Malte] uses Deltares as a plotter, drawing a crude face on a piece of paper with a marker. In the second, he commands Deltares with his right hand, using his left to activate the magnetic solenoid to pick up the steel spheres.

It looks pretty cool to us, and we’d love to see what sorts of things he puts together if he ever ends up making robotics his career rather than a hobby.

Continue reading “Kinect-controlled Delta Robot Has A Magnetic Personality”

Building A Contact Mic Using Homemade Piezo Crystals

homemade_piezo_contact_mic

[Leafcutter] is big in to making music and has put together all sorts of musical instruments and tools over the years. Recently, he was inspired to make his own piezo crystals, and wrote in to share the results of his experiments with us.

[Leafcutter] is no stranger to messing around with piezo elements, and after seeing [Collin’s] tutorial on making your own piezo crystals at home, he knew he had to give it a try. He stopped by the grocery store to fetch all of the ingredients, then followed [Collin’s] instructions to the letter…well, almost. It seems that he might have cooled the solution too quickly, so he found himself with a jar full of tiny, barely usable piezo crystals instead of larger ones like [Collin] was able to produce.

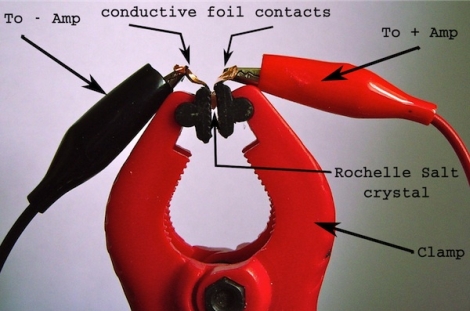
Undeterred, he decided to see if the stuff was any good, and rigged up a makeshift contact microphone using some conductive foil and a clamp. He piped the output to his amplifier, and wouldn’t you know it…it worked!

He has a small sound clip of what the mic sounded like on his site, and it worked pretty darn well despite the crystal’s tiny size. He is going to give the whole process another go, so we hope to see more experiments with bigger crystals in the near future.

[Dino] Tells Us About Transistor-based On/off Switches

hackaweek_transistor_onoffswitch

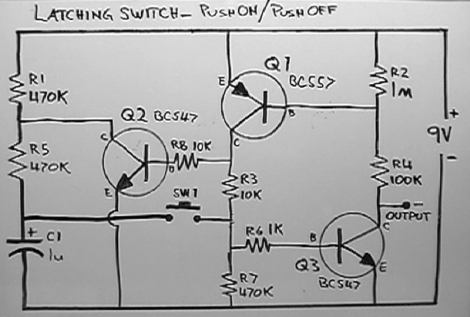
You know them, you love them, you take them for granted – they are single push button on/off switches. As [Dino] explains in the most recent episode of his Hack a Week series, they are typically implemented in the form of IC logic switches nowadays, but it wasn’t always that way. When they first came on to the scene in the 70’s, the single button soft switches were built using a set of transistors and a capacitor to get the job done, so [Dino] decided to research push on/push off transistor switches a bit and build his own.

After reading through a short tutorial, he was ready to go. As he explains in the video, the operation of the switch is fairly simple, though he did run into some odd issues when he prototyped the switch on a piece of breadboard. He’s looking for someone to explain why the unstable circuit suddenly performs better with the addition of a small capacitor between the battery’s positive lead and the circuit’s output, so if you have some insight, be sure to speak up in the comments.

In the meantime, check out [Dino’s] exploration of push on/push off switches below.

Continue reading “[Dino] Tells Us About Transistor-based On/off Switches”

laptop_screen_polarized_art_fixture

Polarized Art Fixture Made From A Busted Laptop Screen

[Pedro] had a busted laptop LCD screen on his hands, but rather than throw it out, he brainstormed what he could possibly do with what would typically be considered a worthless item. He decided to make a simple art installation using the scrapped part, so he gathered a few other supplies and got to work.

The first thing he did was pull the LCD screen from the laptop, separating the front panel from the backlight panel. He drained the liquid crystal fluid from the display, and set it inside a picture frame in place of the glass. He added spacers around the edge of the frame so that the backlight could be mounted several inches behind the LCD panel.

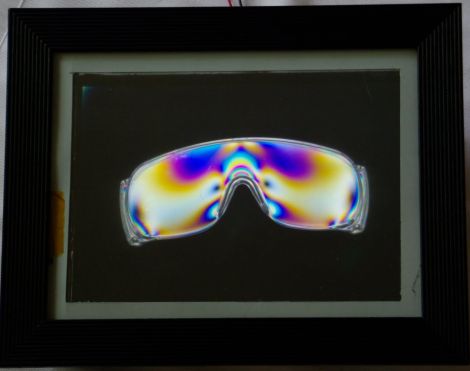
[Pedro] then found a few polystyrene and polycarbonate plastic items from around the house, and placed them inside the frame. As you can see in the picture above, the polarizing filter built into the LCD screen makes for some pretty cool effects.

While you could debate for hours over exactly what is art, there’s no denying that his PolFrame looks cool and is a great way to save electronics from the scrap heap. We just want to know what he did with the LC fluid he drained from the screen!

Hacking A2DP Support Into An Old Car Stereo

a2dp_tape_deck_retrofit

[Roofus] had an older car, and unfortunately his stereo’s cassette player just wasn’t doing it for him. He always wanted to simply get into his car, pull out his cell phone, and have his music ready to play without any fuss. After messing around with all sorts of different tape adapters, he got fed up and decided to rig up an A2DP (Stereo Bluetooth Audio) adapter on his own.

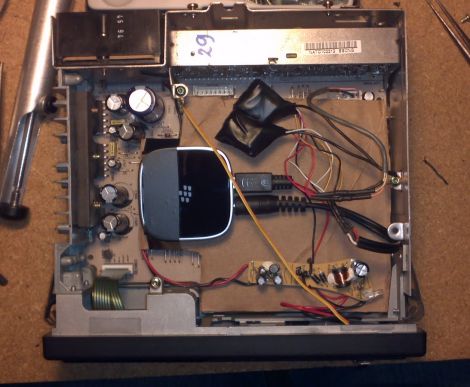
He pulled the head unit out and started looking around to see how he could wire an adapter in. He figured the best course of action would be to remove the tape deck, and fool the stereo into thinking that a tape had been inserted. After spending some time tracing wires and studying how his old tape adapters worked, [Roofus] had an A2DP connection wired in and was ready to rock out.

Greeted with nothing but silence, he turned to his favorite hacking site (Hackaday, naturally) for assistance. Some friendly forum-goers helped him identify a ground loop issue, and he set off to his nearest RadioShack for a pair of isolation transformers that would fix his problem.

Once he knocked out the ground loop issues, his adapter worked like a charm. He put everything back together, and aside from a tiny switch he installed to toggle between audio sources, you would never know it was there.

What Would You Put In A Shipping Container Makerspace?

rechar_what_to_include_in_a_mobile_workshop

Imagine that you have been asked to construct a portable shipping container workshop that will be sent to the other side of the globe, where the power grid is sketchy and the resources tight. If you had $20,000 to outfit this 20’ container, what components and tools would you include?

This was the question recently posed to us by [Luke Iseman], CTO at re:char. He and his partners are in the midst of putting together a mobile makerspace that will eventually be shipped over to Western Kenya in order to help the locals fertilize their land using biochar. The primary function of this workshop will be to build biochar chambers, so plenty of durable tools and machines are a must. They already have a pretty solid list of items put together, but they wanted input the from makers and hackers out there, who may have worked under similar conditions.

Have any suggestions? Share them in the forum, we’re sure [Luke] and co. will appreciate it!

Homebrew Weather Station Plus A Pan And Tilt Camera Rig

[Sebastian] wrote in to share his web site, where he has a bunch of different electronics projects. After looking through them, we found a pair that we thought you might find interesting.

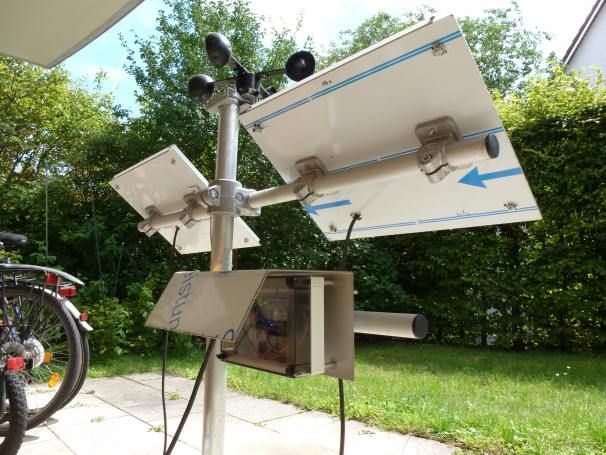
The first project is a homebrew weather monitoring station that [Sebastian] put together. He designed a weather shield, incorporating humidity, pressure and light sensors, along with digital I/O ports for monitoring an anemometer. The entire setup is powered using solar panels, and data is relayed to his computer via an Xbee.

The second item that caught our eye was a digital camera pan and tilt rig. The system was built using a Lynxmotion pan and tilt kit, which is controlled by an Arduino. The code he provides allows him to capture very large composite images without having to spend too much time “sewing” them together. While this second project mostly consists of schematics for a base plate and pan/tilt code, it struck us as something that could be very useful for any budding photographers looking to take panoramic shots.

All of the schematics and code for his projects are available on his site, so be sure to look around – you might find something interesting!