Wooden Ghettoblaster Makes Use Of Recycled Parts

Wooden Ghettoblaster made from recycled car audio parts

Humans generate a lot of waste. It is somewhat relieving to see so many great reuses of old items out there on the ‘web. We love covering these types of projects here on Hackaday. [Martin] likes using recycled items in his projects and wrote in to tell us about his recently completed Wooden Ghettoblaster that utilizes a bunch of old parts and doodads he had kicking around.

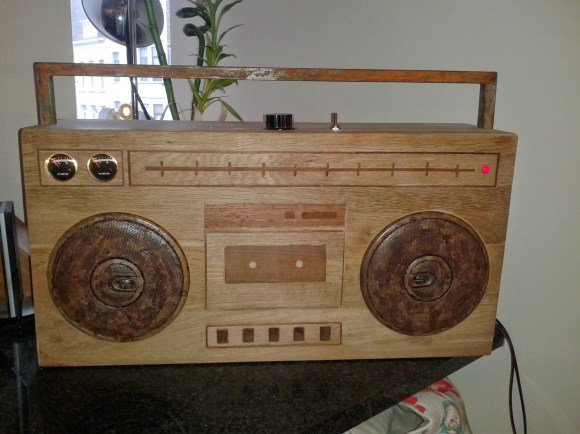
The main case, believe it or not, is constructed of leftover wood flooring. The fake tape deck, buttons and tuner may look like they are just burnt/etched/stained but they are actually inlaid pieces of darker wood. Once all of the inlays were installed in the front face of the cabinet, the entire surface was sanded smooth and the edges chamfered to add some visual appeal.

Holes for a pair of old aftermarket car speakers were not only cut into the front face of the case, they were also counterbored so the speakers would sit flush with the panel. [Martin] did decide to purchase one component for the project, a set of VU meters. They are mounted to the case via their own inlaid piece of wood and are connected in parallel with the line-level portion of the signal path.

Continue reading “Wooden Ghettoblaster Makes Use Of Recycled Parts”

$250; Pushing The Limit On Cheap (And Functional) CNC Machine Builds


$250 cnc machine - rotary tool

Cost is always a drawback and a hurdle when buying or building a CNC Machine, especially when building it just for fun or hobby. [Eric] was able to cobble together a working 3-axis rotary tool based machine for about $250, a few trips to the hardware store and a bunch of time.

The machine design is loosely based on this one he found on Instructables. [Eric] chose this style because he felt the boom supported tool would have been more stable and easier to build than a gantry style machine. Skate bearings, HDPE sliders and c-channel aluminum were used to support the XY table instead of traditional linear bearings and rails. All three axes are driven with stepper motors and 1/4″-20 threaded rods. The Harbor Freight dremel-style rotary tool helps keep the overall cost down.

Continue reading “$250; Pushing The Limit On Cheap (And Functional) CNC Machine Builds”

Apple Forces Non-Mac User To Make Ergonomic Mac Keyboard

Mac Ergonomic Keyboard

If you’ve ever typed for a significant amount of time you know that it can become painful. Long term exposure can cause wrist and arm injuries. There are some things that can help alleviate the risk of injury like taking frequent breaks, good posture and using an ergonomic keyboard. [Ian] likes the feel of Mac keyboard keys but doesn’t like the traditional straight layout. Unfortunately, Apple doesn’t make an ergonomic keyboard so [Ian] stepped up to the plate and made one for himself.

Mac Ergonomic Keyboard

Just starting this project was an extreme pain. Apple glues their Mac keyboards together. A heat gun was used to melt the glue to 400°F as kitchen utensils were stuck in between the halves of the case, keeping the glue from re-sealing the case together. Once the case was apart the unnecessary keys were removed. [Ian] is actually modifying two keyboards into one because he wants the middle keys to show up on both sides of the keyboard. With the necessary keys identified, the metal support frame was removed from the unneeded sides of the keyboard.

Continue reading “Apple Forces Non-Mac User To Make Ergonomic Mac Keyboard”

Precision Temperatures For Cooking Or Whatever

sous-vide temp controller

If you have not heard of the sous-vide method of cooking you are not alone. This method uses a low temperature water bath to cook food in airtight plastic bags. Because the temperatures are much lower than normal the cooking time must be much longer and the actual temperature is very critical. The advantage is that the food is heated evenly without overcooking the outside. Since the food is bagged, it also retains moisture.

[Brian] put together a sous-vide control system to automatically maintain the correct temperature of a rice cooker. A temperature control unit was sourced on eBay for about $15. This is not a bad deal considering it has an LED display, control buttons, built-in relay and thermometer input. The control unit is mounted inside a project box with a few other components. The 120 volt AC line comes into the box where the neutral and ground are connected to the control unit and a standard outlet. The hot wire is connected directly to the control unit which determines if the hot wire is or isn’t connected to the outlet by using its built-in relay.

Continue reading “Precision Temperatures For Cooking Or Whatever”

DIY Foot Pedal Controller For Guitar Rig 5

DIY Modeling Software Control Pedal

Back in the old days, it took external guitar effects pedals to modify a guitar’s sound. As computer processing power has been growing at an exponential rate, software-based effects modelers have been becoming more common. [Matthew]’s dad is running Guitar Rig 5 modeling software on his Lenovo tablet. Although it works well, it is a hassle to change effects and amp models while playing. That’s where [Matthew] comes in. He’s built a foot pedal controller so his old man can change up those sweet sounds on the fly.

Guitar Rig 5 has the ability to change presets with key presses. Even so, it would still be a hassle tapping a keyboard while playing, whether it be physical or on-screen. Since an Arduino-compatible board with an ATMEGA32U4 chip can be used to simulate an HID device, [Matthew] decided to use one as the basis for his project. Standard push buttons mounted in a project box indicate to the microcontroller which keyboard commands to send to the tablet. There are 4 buttons for 4 presets on this build but any number can be used. When a button is pushed, the associated keyboard command is sent to the tablet via a USB cable and Guitar Rig 5 responds to that command by changing the preset. And just so you know where you are, an indicator light adjacent to each button shows which preset is current.

Continue reading “DIY Foot Pedal Controller For Guitar Rig 5”

Fingerprint Scanner Both Simplifies And Complicates Opening Garage Door

Fringer Print Scanner Garage Door Opener

Opening a garage door by hand is a lot of work and a hassle, hence the advent of the garage door opener. Nowadays, some people may even say just pushing the button of a remote control requires too much effort. [nodcah] is one of those people so he came up with a fingerprint scanner that controls a pre-installed garage door opener. All kidding aside, it is a cool project that lets you into your garaage, keeps unknown people out and doesn’t require you to remember to carry a key or remote.

In the center of this project is an ATmega328 that runs a custom Arduino code. This ATmega328 is responsible for controlling a 16 character, 2 line LCD screen as well as communicate with an off the shelf fingerprint scanner from Sparkfun. The fingerprint scanner has a built in CPU, can store up to 20 fingerprints and does all its own processing of fingerprint scans. It then communicates to the ATmega328 with simple commands over serial Tx and Rx lines.

The ATmega328, LCD and fingerprint scanner are all mounted outside the garage in a 3D printed enclosure. If the wires for the internal-garage open/close button were just run straight into this outdoor module, anyone could open it up, short the wires and get into the garage. To prevent this, if the ATmega328 gets the ‘OK’ from the fingerprint scanner, then it sends a signal to an ATtiny85 that is inside the garage. If the ATtiny85 receives the correct signal, it will then actuate the garage door opener by shorting the open/close button contacts. This prevents anyone from sneaking into the garage.

[nodcah] did a great service to the community by making all of the part list, schematics, instructions and Arduino code available so anyone can easily put this project together.

Continue reading “Fingerprint Scanner Both Simplifies And Complicates Opening Garage Door”

Wooden Band Saw Fears Its Wood-Cutting Brethren

DIY Wooden Bandsaw

What is cooler than building a band saw out of wood? Building two, of course! And that is exactly what [Pekka] did. The first was a small bench top model while the second was a much larger version with the saw blade strung between big 13-3/4 inch wheels. For those who are unfamiliar with band saws, they are tools that have a long thin blade that is routed around rotating wheels. The wheels are spread apart to make the blade taut. Unlike the reciprocating action of a jigsaw, saws-all or scroll saw, the band saw blade continually rotates in one direction. These blades are typically thin making it easy to cut irregular and curved shapes.

The frame of [Pekka’s] larger machine is made from 35mm (~1-3/8″) plywood. This proved to be a sturdy frame material. The previously mentioned wheels were made by gluing pieces of oak together, mounting the assembly on a wood lathe and turning the outer diameter down to size. By using multiple piece of wood to construct the wheels allows the grain direction of each portion to be parallel with the blade. This method of construction ensures any expansion/contraction of the wood is uniform around the wheel. A strip of rubber around the blade’s outer diameter provides the friction required to prevent the blade from slipping.

[Pekka’s] friend was nice enough to turn the flanged axle shafts on his metal lathe. These shafts support the wooded wheels and are mounted in pillow block bearings. The upper pillow blocks are mounted to a sliding support that allows adjusting the tension of the saw blade. [Pekka] was not going to be satisfied with a one-speed band saw so he grabbed a motor he had kicking around that originally came from a wood lathe and already had 4 different sized pulleys mounted on the shaft.

This is a great project that shows what can be done with a little desire and ingenuity.