Hand-Machined Companion Cube Can Be Destroyed And Rebuilt

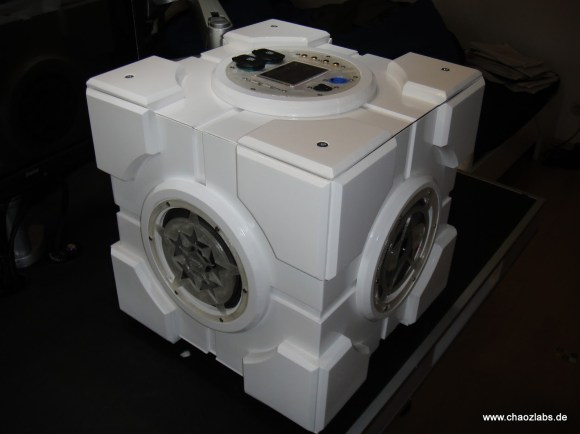
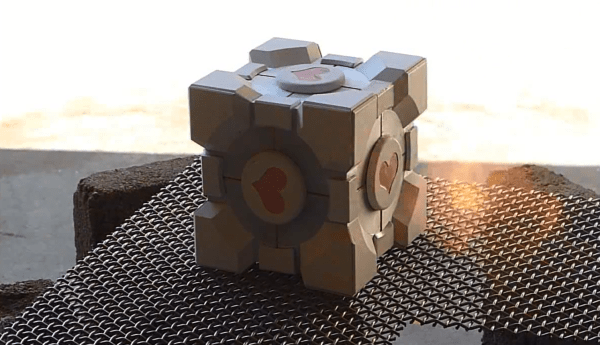
[Michael Gainer] is a big fan of Portal, and it shows in the Weighted Companion Cube he made. [Michael] hand-machined the many pieces that comprise the Cube’s body and medallions out of 6061 aluminum. Dykem was used to transfer the marks for accurate machining, and the color is powder-coated to a heat tolerance of 400F. A CNC was used to make the distinctive hearts. [Michael] notes the irony was “very Portal” in having them cut by a heartless machine when everything else was done manually. The attention to detail is striking, the level of design more so when [Michael] proceeds to incinerate the poor Companion Cube with a brush burner. In the video shown at the link above, the Cube falls apart as the glue holding it together melts. When all is said and done, just grab more glue to bring that Cube back to its six-sided glory. Repeat to your heart’s content. Huge success! We have to be honest, after seeing all those pieces, we aren’t sure we’d want to do this very often. Companion Cubes have been featured in various iterations on Hackaday before, but they were never built with the idea of repeatedly destroying and rebuilding them. This novel take would make GlaDOS proud.

[Michael] has plans to put an Android device inside it with some light and temperature sensors. He wants to give it a voice resembling Portal’s turrets so it can whine when it needs to be charged or scream when it’s too hot or cold. He dubs this next project the “Overly Attached Weighted Companion Cube.” It wouldn’t be a good idea to incinerate this upcoming version, though we’d probably be inclined to if it demanded so much of our attention!


LED Cube In An Elongated Cube Be Jammin’

LED cube and drive electronics inside an acrylic case

We get a lot of tips about LED cubes. They’re a great build to explore a lot of different things, from the circuit design, to current source and sink, and of course there’s the firmware. Why don’t we see a million of them on the front page? Well, we have seen a lot, but most of what is sent our way doesn’t exhibit such a clean build. It’s obvious that [Justin] took a lot of pride in his work on this 4x4x4 single-color cube.

Hidden away under one of the protoboards is an Arduino that drives it. A lot of the components were salvaged from the e-waste bin at his University. This includes the 12V AC wall wart he uses to power the device. A bridge rectifier converts to DC, and in addition to powering the LEDs there are a couple of USB charging ports. After the break you can see and hear it in action. The cube pulses to the music but the flip of a switch will disconnect the speaker if you want some peace and quiet to go with the light show.

If you’re looking for a challenge, this 8x8x8 RGB offering is several orders of magnitude harder to pull off… block out a lot of extra time if you do decide to take the plunge. We also heard that [Benchoff] might try to make a cube with some of those through-hole ws2812 pixels.

Continue reading “LED Cube In An Elongated Cube Be Jammin’”

Rubik’s Cube Solver Made Out Of Popsicle Sticks And An Arduino

rubix cube solver

[Matt] recently learned both how to solve a Rubik’s cube and the basics of an Arduino. Putting the two together, he decided to try his hand at making an automatic Rubik’s Cube solver!

We’ve seen this done quite a few times using LEGO Mindstorms, but we’re much more impressed with [Matt’s] clever use of popsicle sticks and mechanical linkages…. The device uses just two servos. One to rotate the base, and the second to flip the cube over.

He’s using an Arduino UNO (R3) with 2 Hitec HS-311 hobby servos, some popsicle sticks, hot glue, a paper towel roll, and a bit of plywood. He wrote the code to solve the cube himself, and has shared it on GitHub — but he didn’t stop there and decided to create a GUI to go with it using Python.

It’s not that fast, but it’ll solve a cube in about 20 minutes — stick around after the break to see it in action!

Continue reading “Rubik’s Cube Solver Made Out Of Popsicle Sticks And An Arduino”

Gaming On An 8x8x8 LED Cube

LEDCube

Building an LED cube is a great way to learn how to solder, while building something that looks awesome. Without any previous experience with soldering or coding, [Anred] set out to create a simple 8x8x8 LED cube gaming platform.

Rather than reinventing the wheel, [Andred] based the LED cube off of three separate Instructables. The resulting cube came out great, and the acrylic casing around it adds a very nice touch. Using an Arduino Mega, the 74HC574, and a few MOSFET’s to drive his LEDs, the hardware is fairly standard. What sets this project apart from many other LED cube builds, is the fact that you can game on it using a PlayStation 1 controller. All the necessary code to get up and running is included in the Instructable (commented in German). Be sure to see the cube in action after the break!

It would be great to see a wireless version of this LED cube game. What kind of LED cube will gaming be brought to next? A tiny LED cube? The biggest LED cube ever? Only time will tell.

Continue reading “Gaming On An 8x8x8 LED Cube”

SoundCube: A Companion Cube That Can Talk

sound_companionCube

The Enrichment Center likely disapproves of the SoundCube: a portal music box in the form of a Portal Companion Cube. [Andreas] finished this project a couple of years ago, but we’re glad he’s finally had time to give a rundown on the details at his blog.

The build is primarily a modified speaker box cube—constructed out of what appears to be MDF—with four Alpine SXE-1725S speakers placed at the center of the middle faces. The faces were routed out to resembled the Companion Cube, while the electronics mount and the speaker grills were 3d printed. Inside is a homemade amplifier built around an Arduino Mega, with a TDA7560 quad bridge amplifier, a TDA7318 audio processor, a Belkin bluetooth receiver, and a 3.5″ touchscreen for volume control and for input selections.

Two 12v 7.2Ah lead-acid batteries keep the cube functional for an entire weekend of partying, but probably add a few pounds to the already hefty MDF construction. Check out [Andreas’s] blog for more pictures and his GitHub for all the necessary code.

Companion Cube Christmas Lights Improved With Neopixels

cubes

[Crenn] obtained a string of official companion cube lights from Valve, but being in Australia couldn’t put them to their non-judgemental glory without the use of a step down transformer. They sat on the workbench for a few months until an idea was hatched: replace the bulbs with an Adafruit Neopixel strip, making these wonderful inanimate friends a string of individually addressable RGB LEDs.

The process of converting these cubes required stuffing a very small 9.4mm PCB inside. This PCB was designed in KiCAD thanks to a few classes at the Melbourne hackerspace. The board files were sent off, PCBs received, soldered up, and stuffed into the cubes.

Control is via a Duemilanove with a single IO pin using the Neopixel library. All the code, board files, and schematics are available on the gits. Future improvements might include a 3D printed cable relief and a way to securely mount the PCBs to the inside of the cubes.

Video available below.

Continue reading “Companion Cube Christmas Lights Improved With Neopixels”

8X8X8 Cube Invaders

F98YM6YHQQLNHN7.LARGE

Believe it or not, [Anred Zynch] had no soldering skills before starting this project! What we’re looking at here is an 8x8x8 LED cube set up as a Space Invaders style game with a Playstation 1 controller.

He was inspired by several other cubes like [Chr’s], and the Borg cube by [Das-Labour]. The project makes use of an Arduino Mega 2560 R3 to drive the 512-LED array, and an Arduino Uno to take care of the sound effects during game play. It’s kind of like Space Invaders — but in 3D!

Complexity of building and wiring it aside, [Anred] has provided great instructions and the code for the entire project, so if you’re looking to recreate it or something like it, you can! It’s also entered in an Instructable’s contest right now, so if you like it, we’re sure he’d appreciate the votes.

Continue reading “8X8X8 Cube Invaders”