Laser Trip Wire

Laser Trip Wire With Keypad Arming

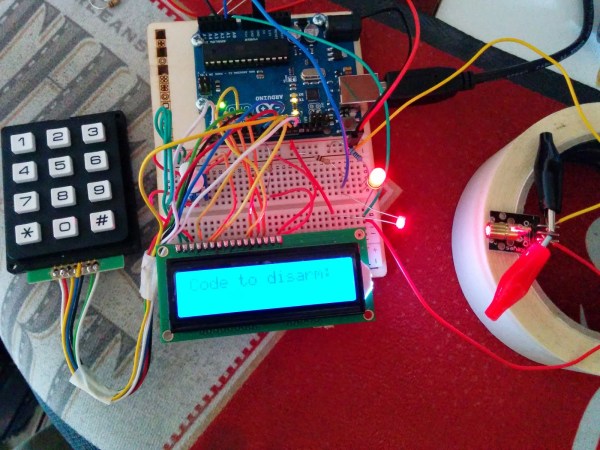
Most of us have had a sibling that would sneak into our room to swipe a transistor, play your guitar or just mess with your stuff in general. Now there’s a way to be immediately alerted when said sibling crosses the line, literally. [Ronnie] built a laser trip wire complete with an LCD screen and keypad for arming and disarming the system.

The brains of the project is an Arduino. There’s a keypad for inputting pass codes and an LCD screen for communicating if the entered code is correct or not. [Ronnie] wrote his own program using the keypad.h, liquidcrystal.h and password.h libraries. A small laser pointer is shined at a Light Dependent Resistor which in turn outputs an analog signal to the Arduino. When the laser beam is interrupted, the output voltage drops, the Arduino sees that voltage drop and then turns on the alarm buzzer. The value that triggers the alarm is set mid-way between the values created by normal daylight and when the laser beam is hitting the LDR. [Ronnie] made his code and wiring diagram available for anyone who’s interested in making their own laser trip wire.

Hopefully, [Ronnie’s] pesky little brother didn’t watch his YouTube video (view it after the break) to find out the secret pass code. For a laser trip wire sans keypad, check out this portable one.

Continue reading “Laser Trip Wire With Keypad Arming”

Drawing On Glow In The Dark Surfaces With Lasers

What do you get when you have a computer-controlled laser pointer and a big sheet of glow in the dark material? Something very cool, apparently. [Riley] put together a great build that goes far beyond a simple laser diode and servo build. He’s using stepper motors and a proper motion control software for this one.

The theory behind the device is simple – point a laser at some glow in the dark surface – but [Riley] is doing this project right. Instead of jittery servos, the X and Y axes of the laser pointer are stepper motors. These are controlled by an Arduino Due and TinyG motion control software. This isn’t [Riley]’s first rodeo with TinyG; we saw him at Maker Faire NYC with a pendulum demonstration that was absolutely phenomenal.

Right now, [Riley] is taking SVG images, converting them to Gcode, and putting them up on some glow in the dark vinyl. Since the Hackaday Skull ‘n Wrenches is available in SVG format, that was an easy call to make on what to display in weird phosphorescent green. You can see a video of that along with a few others below.

Continue reading “Drawing On Glow In The Dark Surfaces With Lasers”

Laser Triggered Camera Flash

High Speed Laser Based Camera Flash Trigger For Only $2

[Matt Kane] works at a really cool company in the UK where he recently finished working on the Triggertrap Ada — the highest-performance, most feature packed camera trigger out there. So just for fun, he decided to challenge himself again — could he make a super basic, super fast, bare-bones camera trigger for $2 instead?

At the most basic level this is just a laser pointer and a light sensor. When the object your photographing breaks the light path, the flash triggers. Typically this is done with an IR laser, but since he’s going for a low-cost system, he’ll use a basic 1mw red laser pointer — the only downfall is you might see it in the picture.

Next up is the sensor. Ideally we’d use a photodiode which is very fast, but also expensive. A photoresistor is cheap, but not fast enough. A nice medium between the two is a phototransistor, which is relatively fast, and cheap. Finally, we need a minimum trigger period to offset the flash. [Matt] thought about using a 555 timer but instead decided to just generate a pulse with an Attiny45.  Continue reading “High Speed Laser Based Camera Flash Trigger For Only $2”

Laser Piano Worthy Of The Band ‘Wyld Stallyns’

Laser Piano uses Arduino

[Robi] and [Kathy] from elecfreaks have put together a how-to article about a Laser Piano they just built. Instead of keys, the user breaks beams of laser light to trigger the sounds.

Several laser pointer diodes are wired in parallel and mounted in a box, cardboard in this case. The laser diodes are aimed at photocells that reside on the other side of the box. Each photocellis connected to a digital input pin on an Arduino. When the Arduino senses a state change from one of the photocell, meaning the beam of light has been interrupted, it plays the appropriate wave file stored on an external JQ6500 sound module.

[Robi] admits that there are some improvements to be made, specifically the trigger response time and the piano sounding too monotonous. If you have any ideas, please leave them in the comments section.

Continue reading “Laser Piano Worthy Of The Band ‘Wyld Stallyns’”

Automatic Laser Level Made From Hard Drive Components?

hard drive laser level

[Crispndry] found he needed a laser level, but didn’t want to spend a few hundred dollars on a tool he might only get a few uses out of… So he decided to build one himself.

If you’re not familiar, a laser level projects a laser beam, level to wherever you put it — it works by having a very precise gimbal assembly that keeps the laser perpendicular to the force of gravity. To build his, [Crispndry] needed a highly precise bearing assembly in order to build his gimbal — what better to use one out of a hard drive?

He used the main bearing from the platter for one axis, and the bearing from the read and write arm for the second axis. A square tube of aluminum filled with MDF is then mounted to the bearings, creating a weighted pendulum. The laser pointer is then attached to this with an adjustment screw for calibration.  Continue reading “Automatic Laser Level Made From Hard Drive Components?”

Attacknid Becomes Laser Death Drone

Laser Drone

[styroPyro] liked his Attacknid, but decided it needed just a bit more blue death ray laser. We’ve seen [styroPyro’s] high-powered laser hacks before, but this time he’s taken to hacking one of [Jaimie Mantzel’s] Attacknid robots. According to one of the top comments on [styroPyro’s] video—a comment by Attacknid inventor [Jaimie] himself—the robots were meant to be hacked, and [Jamie] is ecstatic.

[styropyro] removed the disk shooter from his Attacknid and used the fire control circuit to activate a 2 watt blue laser. A low powered, red laser pointer serves as a laser sight, allowing you to aim at your target before unleashing the beefy blue laser. As the video shows, 2 watts is a heck of a lot of power. The Attacknid easily pops balloons and sets fire to flash paper. As usual, we urge you to use caution when handling 2 watt lasers, which fall under Class 4: aka the most dangerous class of lasers. Goggles, skin protection, and safety interlocks are the order of the day. [styroPyro] has been working with high power lasers for a few years, and seems to know what he’s doing. That said, we’ll leave the burning lasers to the professionals.

Continue reading “Attacknid Becomes Laser Death Drone”

Constructable: Interactive Laser Cutting

constructable-interactive-lasercutting

Do you miss the old days of making things by hand, without the aid of a computer? Do you remember actually drafting drawings by hand? Well, the folks over at the Human-Computer Interaction group from the Hasso Plattner Institute have come up with a rather novel idea, combining manual input via laser pointers, to cut designs with a laser cutter. Sound familiar? A few days ago we shared another cool project on Laser Origami from the same people.

So what exactly is it? It’s an interactive drafting table which can produce very precise physical outputs from a rather imprecise input method. By using specific laser pointers, the user can instruct the laser cutter to cut, trace, or etch designs into the workpiece. A camera picks up the laser pointer and then the software cleans it up, by straightening lines, connecting the dots, etc. While only so much can be determined by the included video, it’s pretty impressive to see what the software comes up with while cutting the design… We can’t really imagine the programming behind it!

Between this and PACCAM: Interactive 2D Part Packing, it looks like laser cutting is going to get a whole lot more user friendly! Stick around after the break to see it in action, the results are quite impressive!

Continue reading “Constructable: Interactive Laser Cutting”