Robot Targets Eyeballs, Fires Lasers. OSHA’s Gonna Love This One

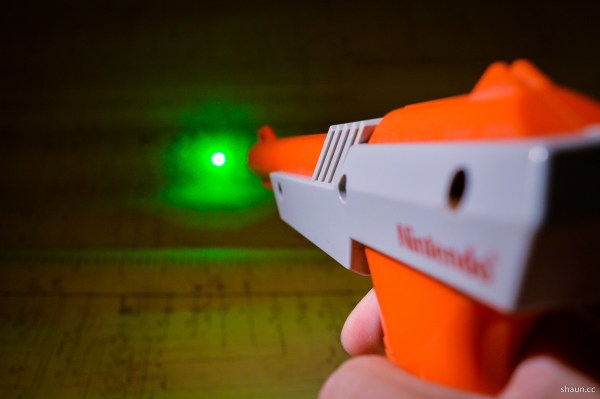
If you even think about hacking with lasers, you’re going to hear about eye safety. “Be careful” they’ll say. “Don’t look into laser with remaining eye” is a joke you’ll not be able to avoid. You’ll hear “Where are your goggles”, and about 1000 other warnings. Don’t get us wrong, laser/eye safety is important. However, the constant warnings can get a bit old — especially when you’re working with a “low power” class 3a laser — you know, the kind with a warning label that says “AVOID DIRECT EYE EXPOSURE” in big black letters on a yellow background.

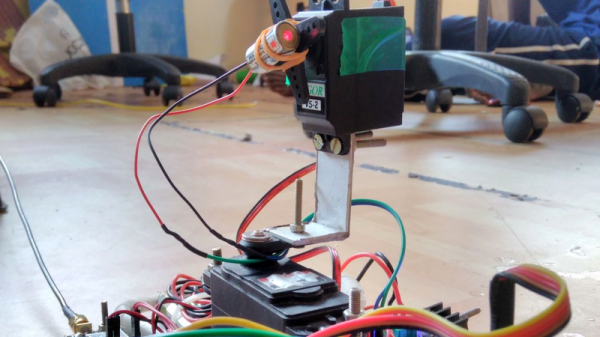
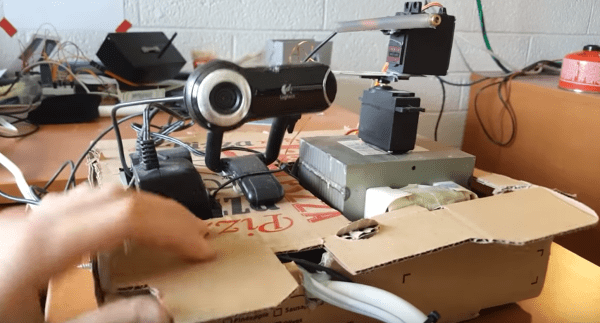
[Michael Reeves] got fed up, and went a bit nuts. He built a robot specifically to shine a laser into human eyes. No, not a medical robot. This ‘bot lives in a pizza box, is built from servos, duct tape, and [Michael’s] tears. It just shoots lasers at people’s eyes. Needless to say, please, don’t try this at home, or at all.

Designing such a diabolical beast was actually rather simple. The software is written in C#. Frames are captured from an old Logitech webcam, then passed into Emgu CV, which is a .NET wrapper for OpenCV. [Michael] runs a simple face detection algorithm, and uses the results to aim a laser. The laser is mounted on two R/C style servos. An Arduino forms the glue between the servos and the PC.

[Michael] has a great deadpan delivery and it all makes for a great video. Think of him of a younger [Medhi] over at Electroboom.  But we can’t condone this behavior. Properly labeled and characterized red laser pointers have never been shown to cause eye damage. Yet if the laser is out-of-spec or reflects of something that further focuses the beam it is certainly capable of damaging eyesight.

We want [Michael’s] eyesight to remain intact so he can make more videos — he’s entertaining, even if ignoring safety warnings isn’t.

Continue reading “Robot Targets Eyeballs, Fires Lasers. OSHA’s Gonna Love This One”

Real-Time Planet Tracker With Laser-Point Accuracy

Space. The final frontier. Unfortunately, the vast majority of us are planet-locked until further notice. If you are dedicated hobbyist astronomer, you probably already have the rough positions of the planets memorized. But what if you want to know them exactly from the comfort of your room and educate yourself at the same time? [Shubham Paul] has gone the extra parsec to build a Real-Time Planet Tracker that calculates their locations using Kepler’s Laws with exacting precision.

An Arduino Mega provides the brains, while 3.5-turn-pan and 180-degree-tilt servos are the brawn. A potentiometer and switch allow for for planet and mode selection, while a GPS module and an optional MPU9250 gyroscope/magnetometer let it know where you are. Finally a laser pointer shows the planet’s location in a closed room. And then there’s code: a lot of code.

The hardware side of things — as [Shubham Paul] clarifies — looks a little unfinished because the focus of the project is the software with the intent to instruct. They have included all the code they wrote for the RTPT, providing a breakdown in each section for those who are looking to build their own.

Continue reading “Real-Time Planet Tracker With Laser-Point Accuracy”

A Laser Effect Projector Built With Safety In Mind

There’s just something about wielding a laser pointer on a dark, foggy night. Watching the beam cut through the mist is fun – makes you feel a little Jedi-esque. If you can’t get enough of lasers and mist, you might want to check out this DIY “laser sky” effect projector.

The laser sky effect will probably remind you of other sci-fi movies – think of the “egg scene” from Alien. The effect is achieved by sweeping a laser beam in a plane through swirling smoke or mist. The laser highlights a cross section of the otherwise hidden air currents and makes for some trippy displays. The working principle of [Chris Guichet]’s projector is simplicity itself – an octagonal mirror spun by an old brushless fan motor and a laser pointer. But after a quick proof of concept build, he added the extras that took this from prototype to product. The little laser pointer was replaced with a 200mW laser module, the hexagonal mirror mount and case were 3D printed, and the mirrors were painstakingly aligned so the laser sweeps out a plane. An Arduino was added to control the motor and provide safety interlocks to make sure the laser fires only when the mirror is up to speed. The effect of the deep ruby red laser cutting through smoke is mesmerizing.

If laser sky is a little too one-dimensional for you, expand into two dimensions with this vector laser projector, and if monochrome isn’t your thing try an RGB vector projector.

Continue reading “A Laser Effect Projector Built With Safety In Mind”

NES Zapper: Improved With Lasers

The Zapper gun from the original Nintendo was ahead of its time. That time, though, was around 30 years ago and the iconic controller won’t even work with most modern televisions. With a little tinkering they can be made to work, but if you want to go in a different direction they can be made to do all kinds of other things, too. For example, this one can shoot green lasers and be used as a mouse.

The laser pointer was installed in the gun using a set of 3D printed rings to make sure the alignment was correct. It’s powered with a Sparkfun battery pack and control board which all fit into the gun’s case. The laser isn’t where the gun really shines, though. There’s a Wiimote shoved in there too that allows the gun to be used as a mouse pointer when using it with a projector. Be sure to check out the video below to see it in action. Nothing like mixing a little bit of modern Nintendo with a classic!

The Wiimote is a great platform for interacting with a computer. Since the Wii was released it’s been relatively easy to interface with them via Bluetooth. One of the classic Wiimote hacks is using an IR pen and projector to create a Smart Board of sorts for a fraction of the price. They’ve also been used with some pretty interesting VR displays.

Continue reading “NES Zapper: Improved With Lasers”

Star Track: A Lesson In Positional Astronomy With Lasers

[gocivici] threatened us with a tutorial on positional astronomy when we started reading his tutorial on a Arduino Powered Star Pointer and he delivered. We’d pick him to help us take the One Ring to Mordor; we’d never get lost and his threat-delivery-rate makes him less likely to pull a Boromir.

As we mentioned he starts off with a really succinct and well written tutorial on celestial coordinates that antiquity would have killed to have. If we were writing a bit of code to do our own positional astronomy system, this is the tab we’d have open. Incidentally, that’s exactly what he encourages those who have followed the tutorial to do.

The star pointer itself is a high powered green laser pointer (battery powered), 3D printed parts, and an amalgam of fourteen dollars of Chinese tech cruft. The project uses two Arduino clones to process serial commands and manage two 28byj-48 stepper motors. The 2nd Arduino clone was purely to supplement the digital pins of the first; we paused a bit at that, but then we realized that import arduinos have gotten so cheap they probably are more affordable than an I2C breakout board or stepper driver these days. The body was designed with a mixture of Tinkercad and something we’d not heard of, OpenJsCAD.

Once it’s all assembled and tested the only thing left to do is go outside with your contraption. After making sure that you’ve followed all the local regulations for not pointing lasers at airplanes, point the laser at the north star. After that you can plug in any star coordinate and the laser will swing towards it and track its location in the sky. Pretty cool.

Continue reading “Star Track: A Lesson In Positional Astronomy With Lasers”

Laser Trip Wire

Laser Trip Wire With Keypad Arming

Most of us have had a sibling that would sneak into our room to swipe a transistor, play your guitar or just mess with your stuff in general. Now there’s a way to be immediately alerted when said sibling crosses the line, literally. [Ronnie] built a laser trip wire complete with an LCD screen and keypad for arming and disarming the system.

The brains of the project is an Arduino. There’s a keypad for inputting pass codes and an LCD screen for communicating if the entered code is correct or not. [Ronnie] wrote his own program using the keypad.h, liquidcrystal.h and password.h libraries. A small laser pointer is shined at a Light Dependent Resistor which in turn outputs an analog signal to the Arduino. When the laser beam is interrupted, the output voltage drops, the Arduino sees that voltage drop and then turns on the alarm buzzer. The value that triggers the alarm is set mid-way between the values created by normal daylight and when the laser beam is hitting the LDR. [Ronnie] made his code and wiring diagram available for anyone who’s interested in making their own laser trip wire.

Hopefully, [Ronnie’s] pesky little brother didn’t watch his YouTube video (view it after the break) to find out the secret pass code. For a laser trip wire sans keypad, check out this portable one.

Continue reading “Laser Trip Wire With Keypad Arming”

Drawing On Glow In The Dark Surfaces With Lasers

What do you get when you have a computer-controlled laser pointer and a big sheet of glow in the dark material? Something very cool, apparently. [Riley] put together a great build that goes far beyond a simple laser diode and servo build. He’s using stepper motors and a proper motion control software for this one.

The theory behind the device is simple – point a laser at some glow in the dark surface – but [Riley] is doing this project right. Instead of jittery servos, the X and Y axes of the laser pointer are stepper motors. These are controlled by an Arduino Due and TinyG motion control software. This isn’t [Riley]’s first rodeo with TinyG; we saw him at Maker Faire NYC with a pendulum demonstration that was absolutely phenomenal.

Right now, [Riley] is taking SVG images, converting them to Gcode, and putting them up on some glow in the dark vinyl. Since the Hackaday Skull ‘n Wrenches is available in SVG format, that was an easy call to make on what to display in weird phosphorescent green. You can see a video of that along with a few others below.

Continue reading “Drawing On Glow In The Dark Surfaces With Lasers”