[James] was wandering around Walgreens after Christmas and found something very interesting – RGB LED Christmas lights that were individually addressable. At $6.50 for a strand of 15 lights, he just had to buy a few and figure out the control protocol. After all, who can turn down a big, cheap, controllable RGB LED strip?
The packaging for these lights – apparently manufactured by BriteStar – includes a ‘try me’ button that cycles through different light patterns. This button is what initially tipped [James] off to the fact the lights on this strand could be individually controllable. Opening up one of the lights, he found exactly what he wanted: an epoxy blob, two wires for power, and three wires for the signaling.
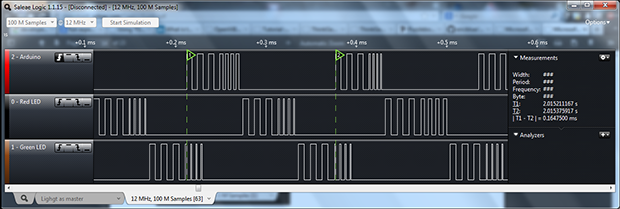
After checking out this light with a scope and logic analyzer, [James] realized there was a very, very simple protocol going on. Essentially, the entire string functioned as a gigantic shift register, taking the values for one light and pushing it down the string. In looking at the protocol, [James] also discovered] these lights support 16 levels of brightness. Yep, RGB LED Christmas Lights with PWM for under $7. Can’t beat that.
[James] wrote an Arduino library to control these strings and put it up on Github. While your local Walgreens has probably already hidden these lights away in the back of the store, it might be worth asking around to see if they have any left.