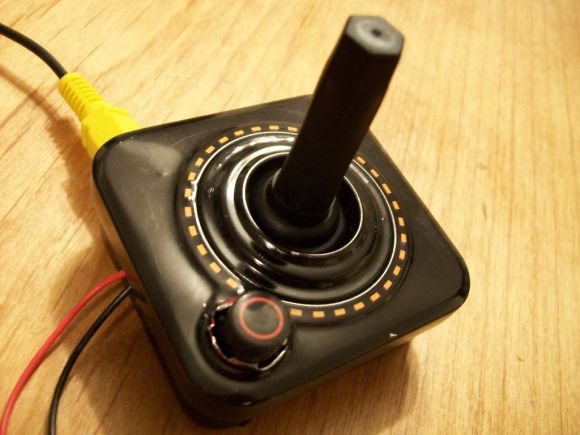
Janus: The Gatekeeper

janus-001

[Piet] wrote in to tell us about his hack that allows for his front gate to be opened without a key. Unlike this hack that we featured in August, you don’t need a subway pass, just a good memory. As explained in his article (and the video after the break) if the proper sequence of doorbell rings is input, the gate unlocks itself.

For hardware a [mehduino] is used to take the doorbell input and decide whether or not the “secret knock” has been achieved. The door can be unlocked remotely via a button on the processor. Reprogramming the code is achieved by simply holding the program button while the code is entered on the “remote ringer” button.

Be sure to check out the video after the break to see this lock in action. The housing application may not be exactly what you expect. Also of interest, is that in true hacker fashion, the bare processor is hanging by a hook on his wall! Continue reading “Janus: The Gatekeeper”

Zelda Engagement Ring Box Seals The Deal

Congratulations to [John Scancella] and his wife to be. Their recent engagement was aided by one of [John’s] projects. Since [Betsy] is a big fan of Zelda, he thought it would be fun to present the ring with the Zelda music playing in the background. He and a friend combined forces to build what you seen in this image.

The music is played by an Arduino with the help of a wave shield. This is pretty much a one-use item so battery life was never a concern. A magnetic switch was used to detect when the box was opened and start the music playing.

You can see the full-sized images after the break, but we can tell that [John] went with a traditional engagement ring. We’re still waiting to see if 3D printed rings are going to catch on in the geek scene. If you just can’t give her anything but precious metal there’s always the idea of encoding messages on the band itself.

Continue reading “Zelda Engagement Ring Box Seals The Deal”

Crystal Doorbell Helps Class Up The Joint

Even if you live in a dump this quick build will make your doorbell sound high-class. The new rig uses a crystal goblet to alert you of guests at the door. We suppose the room-silencing sound of flatware on a wine glass does make a great attention getter.

For [Tobias] the hardest part of the build was getting his wife to sign off on it. But he says the 1970’s era original was looking pretty shabby, which kind of made his argument for him. It took just two hours to develop and install the replacement. It uses a servo motor with an articulated striker to ping the glass which is hanging inverted between two pegs. The original AC transformer (which are most often 16V) was used to power the Arduino. He built a simple rectifier along with a big smoothing capacitor to make sure the Arduino doesn’t reset when voltage dips. Although it’s not mentioned in his comments, we’d bet the doorbell wire has been rerouted to connect directly to the Arduino, rather than remain patched into the power loop.

Don’t miss the clip after the break to hear how great this thing really does sound.

Continue reading “Crystal Doorbell Helps Class Up The Joint”

Personal Energy Orb Prevents Your Life From Being Swallowed By The Internets

We love the Internet, but we are definitely guilty of losing track of the time we spend traipsing around our virtual haunts. This project will not only remind you to get out and exercise, it will cripple your digital experience if you don’t heed its colorful warning.

[Janko Hofmann] calls it the Personal Energy Orb. It’s really just an Arduino and an RGB LED. But as with most creations, the idea is what makes it great. The orb has a dock next to your computer. It tracks how much time you spend online, changing colors as you rack up the hours. If you don’t heed the warning signs of overuse it will even start to slow down your mouse cursor. But never fear. Full functionality can be restored by topping off your personal energy. As you can see above, there’s also a docking station on [Janko’s] bicycle. The orb monitors your mileage, moving out of the red zone so that your computer will be unencumbered the next time you sit down for a long session of flash games. Don’t miss his video presentation embedded after the break.

Continue reading “Personal Energy Orb Prevents Your Life From Being Swallowed By The Internets”

Tutorial Explains The Concepts Behind An IMU

[Anilm3] wrote in to share the IMU tutorial series he is working on. An Inertial Measurement Unit is most often found in self-balancing robots and quadcopters, providing enough high-speed sensor data to keep up with the effects of gravity.  He previously used some all-in-one IMU devices in school which did most of the work for him. But he wanted to grind down and look at what each sensor spits out and how those measurements are used. The first installment deals with the accelerometer, using its data to calculate pitch and roll. For these demonstrations [Anilm3] is using this ADXL345 sensor board, an Arduino, and some processing sketches for testing.

Whenever working with sensors you need to take noise into consideration. The post shows how to implement a low-pass filter in the code which will help smooth out the readings. The filtered data is then fed to a couple of mostly-painless formulas which calculate the movement of the accelerometer in degrees. The demonstration sketch is mapped to a 3D cube to give you an idea of how accurate the accelerometer is. There’s a little bit of lag which would let a self-balancing robot have a nasty fall. The solution to this issue will be discussed in upcoming parts of the series. The next installment tackles the gyroscope sensor.

Speech Recognition On An Arduino

Speech recognition is usually the purview of fairly high-powered computers chugging along at hundreds of Megahertz with megabytes of RAM. Bringing speech recognition to the low-power microcontroller you’d find in an Arduino sounds like the work of a mad scientist or Ph.D. candidate, but that’s exactly what [Arjo Chakravarty] did. He developed the μSpeech library for the Arduino to allow for speech recognition for a limited set of voice commands.

Where most speech recognition systems use FFT and very fancy math to determine what phonemes a user is saying, [Arjo]’s system does away with this unnecessary complexity in favor of using very, very basic integral and differential calculus.

From [Arjo]’s user guide for μSpeech (PDF warning) we can see it’s possible to connect a small microphone to the analog input of an Arduino and accept voice commands such as ‘left’, ‘right’, and ‘stop’. The accuracy is pretty good, as well – 80% if μSpeech is trying to recognize words, and 30-40% if μSpeech is programmed to recognize single phonemes.

Sadly we couldn’t find a demo video of μSpeech in action, but you’re more than welcome to grab it via github for your own project. Send us a video of μSpeech in action and we’ll put it up.

Wiring Up A Lot Of LED Segment Displays

One look at this display and you know there’s a whole lot of pins that need to be wired up. Now look at what those display modules are mounted on. That’s right, [Kemley] is using point-to-point soldering to rig up this big display. It sports four sixteen segment modules on top for alpha-numeric information, and eight large seven segment modules for displaying numbers only.

We’re not certain as to how the electronics are arranged. When talking about the 16-segment modules he mentions that all four are in parallel with NPN transistors to switch the common anode of each. That’s easy enough to understand. But when you get a look at the transistor board you’ll see 24 of them in use. He’s included a 150 ohm resistor on the collector of each transistor. It must be set up to only allow one segment of each group to switch on at a time? We’d guess that each segment is divided into two (upper and lower pins are multiplexed separately), which would explain the double set of transistors. As for date and time, an Arduino board monitors a DS1307 RTC and manages the scanning of the display.