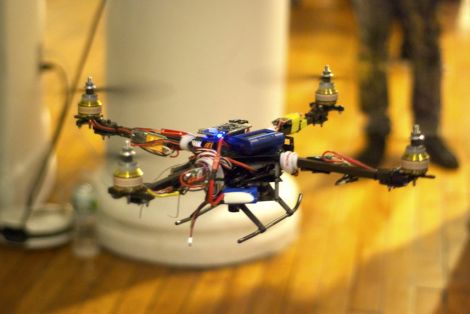
Giant POV Tube For Light Painting

writing_in_the_night_with_the_light_scythe

When you really want your feelings known, we always say that bigger is better. [Gavin Smith, aka The Mechatronics Guy] must come from the same school of thought, because there’s absolutely no mistaking what he is trying to say with his latest project.

Inspired by this WiFi signal painter we featured a while back, the LightScythe is a 2 meter long bar composed of multi-color LED strips that he bought from Adafruit. The light bar is controlled by a Seeduino micro controller, which takes direction from his laptop via a pair of XBee units. Once he generates an image from text with ImageMagic, a Python script is used to match the colors as close as possible to the RGB color space. The image is then converted to raw serial data for playback on the Scythe. When he is ready to go, he triggers his camera to take a 10-15 second exposure, during which he walks across the frame, painting his images with the LightScythe.

We always enjoy seeing creative derivations of previous projects we have covered, and the LightScythe does it well. He actually built a pair of these that can work in concert or independently, which we imagine can make for some pretty awesome pictures.

Be sure to check out his Flickr photostream for more examples of what the LightScythe can do.

Tweeting Bird Feeder Keeps A Picture Record Of All Visitors

wireless_tweeting_bird_feeder

If you weren’t aware, Adafruit Industries is sponsoring the “Make it Tweet” contest over at Instructables, and this Twitter-enabled bird feeder is [quasiben’s] entry into the competition.

His bird feeder not only sends messages to Twitter, it also sends a picture of each bird to Twitpic. The feeder itself is a standard off the shelf model which has been fitted with a LinkSprite camera. A LilyPad Arduino controls the camera, sending images to his computer via a pair of XBee modules. To detect when a bird has stopped by for something to eat, [quasiben] used an infrared LED and an IR detector. The emitter and detector are positioned at opposing sides of the feeder’s opening, triggering the Arduino to snap a picture whenever the beam is broken. Once the image has been transferred to his computer, it is posted to TwitPic.

We’re pretty sure [quasiben] built this Tweeting bird feeder just because he could, but we think it’s a pretty smart idea for people who don’t necessarily have the free time to gaze out the window into their yard. It’s a great way to keep tabs on all your new winged visitors while on the go.

Circuit Design For Multiple UART Connections

[Bill Porter] has a tip for designing circuits that have multiple connections to a single microcontroller UART. This stemmed from a review of a friend’s circuit design that used the UART in the project, but also called for an FTDI chip in order to reprogram via USB and a bootloader. Unlike the schematic above, the circuit called for straight connections without any resistors. With that design, a conflict will occur if two devices are connected and attempting to communicate at the same time.

The fix is easy. [Bill] discusses how to prioritize the connection by adding the pair of current limiting resistors seen above. This helps to ensure that damage will not occur, and that the FTDI chip will take precedence. Now the external hardware will not preclude the FTDI chip from accessing and programming via the bootloader. The tutorial is intended for those rolling their own boards out of an Arduino-based prototype, but it will work in any situation where you need multiple connections to a single set of UART pins.

Teamspeak Button Uses Tattoo Machine Foot Switch

As an avid gamer, [Pat Norton] uses Teamspeak with his friends when playing World of Warcraft. [Pat]’s friends were annoyed with the voice-activated option for Teamspeak and the constant squeaking of dog toys, and [Pat] was annoyed with the questionable usability of a push-to-talk key. Dissatisfied with his options, [Pat] built footswitch-controlled teamspeak button using a Teensyduino and a broken tattoo machine foot switch.

The Teensyduino is an incredibly small Arduino compatible board that was perfect for this project. Since the teensyduino can operate as a USB Human Interface Device, it’s very easy to have the board appear as another keyboard to the computer. After borrowing some code from the hardware button of a DIY photobooth, [Pat] hooked up the foot switch to two pins of the board. From there, it was very to adapt the code so the foot switch would act as a third ‘Control’ button. The results look very professional, like a factory-made game controller. We’ve seen a few foot switch keyboard devices before, and while this probably isn’t the most efficient way to have a foot switch button control something on a computer, it’s certainly the smallest we’ve seen.

Digitized Retro LCD Games Played Using An Arduino As A Controller

This one’s a bit abstract. Remember those LCD games that became quite popular sometime in the 1990’s? You know, the ones that had only one game, usually a character that could be moved back and forth to catch, hit, or block objects falling from the sky or being thrown by some villain? [Tobie Nortje] sure remembers them and has built an Arduino controller to play virtual versions of the games.

He started off by finding a website that is digitizing the old games. That is to say, they’ve taken images of each state of the LCD, then implemented the game play using those images and an approximation of the original physics. Unlike NES or Sega Master System games the ROMs of these devices can’t just be dumped because of the specialized screen. Instead, a virtual version of the hardware has been built into a web interface.

[Tobie’s] part of the hack is to use an Arduino and a few buttons as the controller. It’s easy to set up and we think the breadboarded controller approximates the size and weight of an LCD game pretty well. Check out the video after the break and let us know what you think in the comments.

Continue reading “Digitized Retro LCD Games Played Using An Arduino As A Controller”

Twitter Notifier Lets Us Know How Awesome We Are

twitter_notifier

Let’s admit it, you’re just a little bit vain. Heck, we’re all just a little bit vain when you really think about it. Instructables user [pdxnat] was self-absorbed enough that he constructed an LED “mood light” that alerts him each time someone mentions his user name on Twitter.

The build is pretty simple, with most of the work being done on his PC. His Arduino is wired to a simple RGB LED that calmly cycles through various colors until someone mentions his name on Twitter. At that point, the client software running on his PC passes a message to the Arduino over a serial interface, causing it to wildly pulse the LED. Once it catches his eye, he stops the alert cycle with the press of the reset button, returning the LED to its previous state. As a bonus, he decided to write the Twitter-polling application in both Processing and Python, enabling fans of either language to easily replicate his work.

It’s a pretty cool idea, and it would be great to see someone expand it to include other online services to provide a greater overall feel for how awesome they really are.

Keep reading to see a quick video of the notifier in action.

Continue reading “Twitter Notifier Lets Us Know How Awesome We Are”

Roomba Shares All Of Its Daily Activity On The Web

tweeting_roomba

Instructables user [matchlighter] wanted to see what he could program his Roomba to do, so he decided he would make his little cleaning machine report its status on Twitter whenever something happened.

He popped open the Roomba’s case to access its serial connector, crafting a simple interface cable from some spare Cat5 he had sitting around. He added a small voltage regulator between the Roomba and his Arduino in order to protect it from the high power output present while the Roomba is charging. Once the proper bits were in place, he hooked the Roomba’s serial interface to the Arduino and attached a SparkFun WiFly shield to allow for wireless communications. After a bit of coding, the Roomba was sharing its activities with the entire world on Twitter.

Not only did he want the Roomba to tweet, but he decided that he also wanted the ability to control it from the web. He created a simple interface using a handy library he found online and was sending cleaning commands to the Roomba in short order.

While there is no video of the Roomba in action, you can check out what it is up to here, and there’s plenty of code to be had on his Instructables page.