diy_table_saw

DIY Table Saw Cuts Through Anything, Leaves No Room For Mistakes

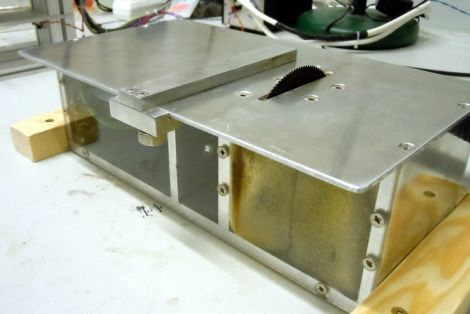
Students in the BASTLI lab at the Swiss Federal Institute of Technology Zurich had been stuck using underpowered and unreliable saws for quite some time. The saws often got stuck while cutting through PCBs and were generally a drag to use. When group member [Mario Mauerer] came across a big and powerful brushless motor in his basement, he decided it was time to upgrade the lab’s cutting tools.

Along with fellow student [Lukas Schrittwieser] he built a test rig to see how powerful the motor really was, and satisfied with the results, the pair set off to build their own table saw. The enclosure was wrapped up pretty quickly, leaving the pair to source a power supply. Rather than purchase one, they built a 700w monster switching PSU to power their saw.

As you can see in the video below the saw chews through most things with the greatest of ease, but the students added a “boost button” to the saw just in case they need to run it at full tilt.

While we can’t exactly overlook the lack of finger and eye protection in their demonstration, it does look like a great little tool to have around.

Continue reading “DIY Table Saw Cuts Through Anything, Leaves No Room For Mistakes”

Minecraft Is Now A 3d Design Tool

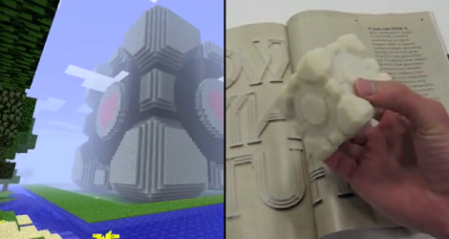
[Cody Sumter] and [Jason Boggess] are students at the MIT Media Lab, and they just came up with Minecraft.Print(), an attempt to create a bridge between Minecraft and the real world via 3D Printers.

The print is first prepared by placing obsidian, diamond, gold, and iron blocks on opposite corners of the model in Minecraft. From there, a Python script takes over and parses the world map to generate an .STL file for a RepRap or MakerBot.

So far, [Cody] and [Jason] have printed a few Companion Cubes and the model of the Enterprise D. We’re pretty impressed with the resolution of the prints, especially considering the original model is voxelated. The prints look very nice, and right now we really want to print out all the cool stuff we’ve seen, like Isengardgigantic CPU, or maybe a Minecraft 3D printer.

Minecraft.Print() sure is a nice program [Cody] and [Jason] have there. It would be a shame if anything happened to it. Check out a video demo after the break.

Continue reading “Minecraft Is Now A 3d Design Tool”

UPDATE: Playing Piano With Optical Sensors

[Sebastian Steppeler] has been hard at work on his optical sensors for an electric piano. When we looked in on the project back in October he was testing reflective sensors to increase responsiveness and MIDI data resolution for his electric keyboard. Since then he’s finalized the sensor circuits and produced enough boards to monitor all 88 keys on this full keyboard. You can see the string of PCBs just above the ivories, waiting to be installed. Not only are then in, but he also added sensors for the pedals.

Because the boards were installed by hand, there are some variances in the physical placement. This can have a rather dramatic effect on the readings from the reflective sensors so he has been working out a method of balancing the calibration. Part of this is already being taken care of by the C# interface that he wrote for a PC. Take a few minutes to check out all of his blog posts, then jump down after the break and hear how great it sounds.

Continue reading “UPDATE: Playing Piano With Optical Sensors”

ArduDelta Would Make A Great Pick And Place Machine

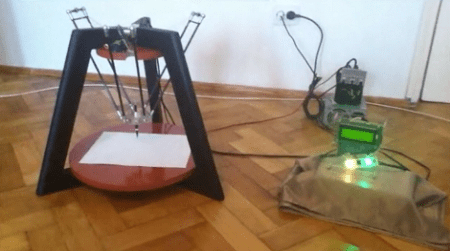
[Bogdan] sent in a great build of a delta robot he originally posted on the Arduino forum, but he didn’t receive much feedback there. We think a build like this deserves a lot more credit.

After working for 7 months on his robot, [Bogdan] has a pretty stable (and very classy) platform made out of wood. The platform and arms in delta robots are usually extremely light to reduce the inertia of the tool so [Bodan] crafted these out of carbon fiber tubes and plexiglas. Everything is controlled by an Arduino Mega2560 encased in a plexiglas enclosure with a 20×4 LCD, status LEDs, and an infrared receiver.

Continue reading “ArduDelta Would Make A Great Pick And Place Machine”

Hacking And Rolling At The Red Bull Creation Challenge

red_bull_creation_challenge_badge

The crew over at the HarfordHackerspace used their wits and creativity to land a spot at the final round of Red Bull’s Creation challenge. The team arrived in Brooklyn just yesterday, ready to take on all comers in the 72-hour hacking challenge which kicked off earlier this morning.

Like any other hacker convention, the Red Bull challenge sports its own unique guest badges just begging to be poked, prodded, and otherwise fooled with. Once the team arrived in New York they were given theirs, and after the opening festivities came to a close, the hacking began. The badges were putting out what looked like Morse code messages via a single red LED, and while part of the team worked to record and decode the message, others started reverse engineering the badge’s on-board PIC.

They were successfully able to bypass the PIC’s fuses to read the code inside, and what they found was pretty funny. You will have to follow the link above to find out what it was, but rest assured, the Red Bull folks definitely have a decent sense of humor.

Infrared Control For Appliances

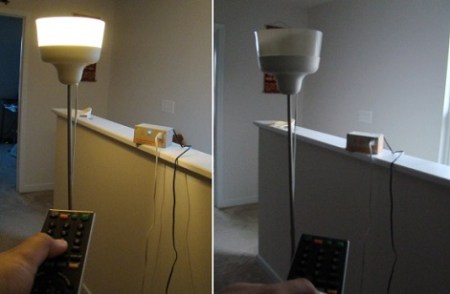
[RB] at Embedded Lab sent in a great guide on how to control appliances with a remote control using a really clever implementation of a decade counter and IR receiver.

The build itself is very simple – just a relay connected to mains power and a handful of resistors and transistors. The device is controlled with a decade counter and an infrared module usually found tucked away in the bezel of a TV.

When everything is plugged in, the first pulse from the remote switches the relay on, providing power to the outlet. When a second pulse is received, the reset pin on the decade counter is activated, setting the device back to its original off state. It’s a pretty clever build, and could be built with parts lying around the bench.

The project is powered through wall power with the help of a transformer and a 7805 regulator, but we think the size could be reduced with a pass-through power enclosure – the circuit certainly is small enough. In all, a very nice, low component count build.

Play Dress Up With Kinect

kinect_virtual_dressing_room

While we have seen Kinect-based virtual dressing rooms before, the team at Arbuzz is taking a slightly different approach (Translation) to the digital dress up game. Rather than using flat images of clothes superimposed on the subject’s body, their solution uses full 3D models of the clothing to achieve the desired effect. This method allows them to create a more true to life experience, where the clothing follows the subject around, flowing naturally with the user’s movements.

Like many other Kinect hacks, they use openNI and NITE to obtain skeletal data from the sensor. The application itself was written in C# with Microsoft’s XNA game development tools, and uses a special physics engine to render the simulated cloth in a realistic fashion

[Lukasz] says that the system is still in its infancy, and will require plenty of work before they are completely happy with the results. From where we’re sitting, the demo video embedded below is pretty neat, even if it is a bit rough around the edges. We were particularly pleased to see the Xbox’s native Kinect interface put to work in a DIY project, and we are quite interested to see how things look once they put the final touches on it.

Continue reading “Play Dress Up With Kinect”