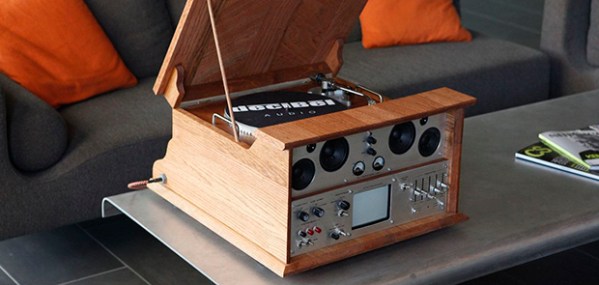
Human Powered Flight Extravaganza

humanpoweredflight

In case you haven’t heard, the Sikorsky Prize, an aeronautical challenge to build a human-powered helicopter that can hover at three meters for a full sixty seconds, has been claimed. This incredibly difficult engineering feat was accomplished by AeroVelo, along with a lot of help from the University of Toronto and a host of companies involved in the design and manufacture of rotorcraft. This prize has stood unclaimed for thirty years, and it’s not from lack of trying; in the 80s and 90s, universities in Japan tried their hand at the challenge, and recently a team from the University of Maryland had a go at it.

But as far as human-powered flight goes, a helicopter is just about the least efficient way to get off the ground. Helicopters need power to provide their own lift and thrust, whereas airplanes only need to generate some forward momentum.

From the bicycle-powered crossing of the English channel in 1979, human-powered flight has come a long way, so far that next the Royal Aeronautical Society will be hosting the Icarus Cup 2013. It’s a competition where teams of human-powered aircraft enthusiasts will compete in challenges measuring distance, speed, endurance, and landing accuracy.

No, it’s not an ornithopter from Da Vinci’s notebook, but human pectoral muscles aren’t powerful enough for that anyway.

Thanks [DainBramage1991] for sending this one in.

A 555 Player Piano

555_timer_automatic_music_player

From simple buzzers to an Atari Punk Console, the simple 555 timer chip is the foundation of a whole lot of interesting lo-fi synth projects perfect for beginners. [Steven] put together a great tutorial for using the 555 timer in a rudimentary synth, and even went so far as to build a simple electronic player piano able to play a song from a sheet of paper with punched holes.

The basic 555 oscillator circuit is very simple – just a few caps and resistors and powered by a few batteries. [Steven] built the simplest 555 circuit, but used a line of graphite drawn on a piece of paper for the resistor controlling the frequency. It’s basically a drawdio built on a breadboard, and easy enough to build for even the most neophyte electronic tinkerer.

Going one step further, [Stephen] drew a long thick line of pencil graphite on a piece of paper and mounted eleven wire loops attached to the circuit over his improvised resistor. After cutting a few holes in a piece of paper, he was able to create a simple player piano with his 555 synth. It worked well enough to play Greensleeves, and is the perfect project for the budding electronics hacker.

Continue reading “A 555 Player Piano”

Outputting Text On A Paper Tape Machine

thegame

Back before the days of 8 inch floppy disks, storing computer programs was much more primitive than even a stack of punch cards. The earliest general purpose computers used paper tape, a strip of paper with punched holes designating a 0 or a 1. Thankfully for the computer scientists of the day, these paper tapes weren’t created by hand. No, the Friden SP-2 tape punch took care of the duties of punching holes in these tapes. When [Max] rescued one of these tape punch machines from a trash bin, he knew what he needed to do: connect it to an Arduino so he could create his own paper tapes.

[Max] found a veroboard with a bunch of transistors inside the machine that was added by a previous owner. After finding the manual for the machine he connected it to an Arduino, holding each of the eight control pins high to punch the tape, and then holding another pin high to advance the tape. With this, he was able to punch letters instead of binary code into his paper tape.

[Max] also added an Ethernet shield to his Arduino that checks his email. If an email shows up in a special folder, it outputs the subject line to the tape punch machine, giving him an entirely retro ticker tape machine, built with vintage 60s hardware.

There are a pair of videos of [Max]’s tape punch machine in action below, along with a gallery of the glamorous gut shots of this incredible machine.

Continue reading “Outputting Text On A Paper Tape Machine”

Building A Digital Scale From Scratch

duplo

[Raivis] was given a particular task at his university – find a way to measure how many Duplo bricks are stacked together. There are a number of ways to do this, everything from computer vision to using a ruler, but [Raivis] chose a much more educational method. He built a digital scale from scratch out of a strain gauge and a Wheatstone bridge. The build log is immensely educational and provides some insight into the challenges of weighing things digitally.

A strain gauge is a simple piece of equipment, just a small force sensitive resistor. When attached to a metal bar and a force is applied, the resistance inside the strain gauge changes, but not by much. There’s only a few micro Ohms difference between the minimum and maximum of [Raivis]’ load cell, so he needed a way to measure very slight changes in resistance.

The solution was a Wheatstone bridge, or four resistors arranged in a square. When one of the resistors in the bridge is replaced with a strain gauge, very small changes in resistance  can be measured.

With a custom ‘duino amplifier shield, [Raivis] can measure the resistance of his load cell with 10-bit resolution, or a maximum weight of 1.32 kg with a resolution of two and a half grams. A single duplo block weighs about 12 grams, so we’ll call this one a success.

Tamagotchi ROM Dump And Reverse Engineering

tamagotchi-rom-dump-and-reverse engineering

Often the true key to success is persistence and that holds true for this project which dumped the ROM from the current generation of Tamagotchi toys. If you’re a fan of learning the secrets built into consumer electronics — and you know we are — you’ll want to go back and watch the 24-minute lecture on Tamagotchi hacking which [Natalie Silvanovich] gave a 29C3 last year. She had made quite a bit of headway hacking the playable pods, but wasn’t able to get her hands on a full ROM dump from the General Plus chip on board processor. This update heralds her success and shares the details of how it was done.

As we learned form the video lecture it was a huge chore just to figure out what processor this uses. It turned out to be a 6502 core with a few other things built in. After prowling the manufacturer’s website she found example code for writing to Port A. She was then able to execute her own code which was designed to dump one byte of ROM at a time using the SPI protocol.

[Natalie] posted her code dump if you’re interested in digging through it. But as usual we think the journey is the most interesting part.

[Thanks Itay]

High Voltage Thor’s Hammer: Mjolnir At 80,000 Volts

[Thor’s] hammer, Mjolnir, is pretty freaking awesome. It can only be picked up by [Thor], he can use it to fly, and probably the coolest part, it can summon lightning. After watching the first movie, and goofing around with the guys at ArcAttack, I had this idea that I could stuff a tiny tesla coil into a mjolnir and end up with a really cool prop.

At this point, I had to make a decision. I was either going to go portable and live with small arcs, or make this a stationary piece and hide a giant tesla coil in a base. It would have bigger arcs, but I couldn’t carry it around.  While I may re-visit the stationary version at some point, I ultimately decided I wanted to be able to wander around and play with this thing.

I had seen some videos of [Staci Elaan] showing off her battery-powered coils and I really liked her results. I figured, with her experience, she could probably do a better job than I could on getting the most bang out of a small package.  She was happy to be involved and delivered a small 12v powered coil for me to work with. I should also point out that the coils [Staci] makes are usually donated to educational groups. This woman is awesome.

Continue reading “High Voltage Thor’s Hammer: Mjolnir At 80,000 Volts”