CNC Table Saw Jig

table saw jig

[Woodgears.ca] seems to be a wealth of clever hacks, and this CNC box joint jig is no exception.  Although one has to manually move the jig to make the actual cut, it still gives the user a lot of extra functionality. One only has to click the mouse button to advance the workpiece.  One drawback to using a table saw, even with this jig is that some internal parts still may have to be cut. Check out the video after the break to see this device in action, or skip to around 3:08 to see what hand operations still have to be done.

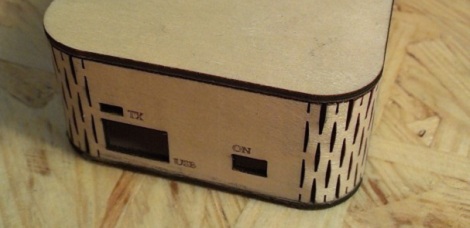
Besides just being a cool build, we loved the box-jointed project enclosure for the electronics. As this was made in 2003, it’s nice to see that the idea of “self-replication” (at least in part) didn’t start with the [Rep-Rap]. The 10 year old (as of 2003) Thinkpad notebook computer running QBasic in DOS is a nice “hacker” touch as is using 100 Watt light bulbs as power resistors. Pretty clever electronics, especially for someone that’s known more for his excellent woodworking skills than his obvious electrical engineering knowledge! Continue reading “CNC Table Saw Jig”

Printing Mounting Boards And Boxes For Hobby Projects

That’s a great base board for these Gadgeteer components. [Rob Miles] has been designing and printing mounting boards and enclosures for several of his projects. He just got into printing parts with the Ultimaker last week, and we’d say he’s found his stride. The board pictured here features nubs that act as stand-offs, and on the underside there are countersunk spaces for the bolt heads used as fasteners.

He started designing with Autodesk 123D but the interface didn’t really suit his working style. He switched over to FreeCAD and that experience fit him like a glove. He starts out with the sketch view to draw his parts, then extrudes that into the 3D model for further refinement before having the printer turn the digital into the real. This is the third board he produced in just one day of experimenting, but he is also showing off an enclosure he made for his thermal printer.

If you’re not working with boards that have nice mounting holes like these, don’t fret. We’ve seen 3d printed mounting systems that cradle the board, like these Raspberry Pi enclosures.

[Thanks Peter]

A Closer Looks Helps You Build Your Own DiWire Bender

Whether or not you’re actually going to build this CNC wire bender, we think you’ll love getting a closer look at how it’s put together. The team over at PENSA got such a strong response from a look at the original machine that they decided to film a video (embedded after the break) showing how the thing was put together. They’ve also posted a repository with code, bom, etc.

In the image above [Marco] shows off the portion that actually does the bending. It’s designed to mount on the pipe through which the straightened wire is fed. The 3d printed mounting bracket really makes this a lot easier. The assembly provides a place to attach the solenoid which moves a bearing in and out of position. That bearing presses against the wire to do the bending, but must be moved from one side of the wire to the other depending on the direction of the next bend. This is a lot easier to understand after watching the demo video which is also embedded after the break.

Continue reading “A Closer Looks Helps You Build Your Own DiWire Bender”

Milling A Motorcycle Engine

Real motorcycle enthusiasts design and mill their own engines. Well, perhaps that’s an overstatement. Certainly it takes to more obsession than enthusiasm to go to these lengths. But this gentleman’s modifications started out simple enough, and managed to make it to the most extreme of hardware fabrications.

The used bike came with a modified camshaft that seemed like a botched job. As he got further into tuning up engine performance the prospect of just replacing the entire thing with his own design started to grow. Using a manually operated milling machine he cut his own molds for the new cylinder head out of wood and sent them off to be forged out of aluminum. They come back in rough shape but he just “filed the cast without mercy” and machined the tolerances to his specifications. Apparently the first test ride had him a bit nervous — he also milled his own brakes for the bike. But after a few times around the block he gained confidence with his work.

[Thanks Carlos]

Salvaged Robot Arm Makes A Big 3d Printer

Wow, building a precision 3d printer is amazingly easy if you can get your hands on an industrial-quality robot arm. [Dane] wrote in to tell us about this huge extruder printer made from an ’80s-era SCARA robot arm. It is capable of printing objects as large as 25″x12″x6.5″.

This 190 pound beast was acquired during a lab clean out. It was mechanically intact, but missing all of the control hardware. Building controllers was a bit of a challenge since the it’s designed with servo motors and precision feedback sensors. This is different from modern 3d printers which use stepper motors and no feedback sensors. A working controller was built up one component at a time, with a heated bed added to the mix to help prevent warping with large builds. We love the Frankenstein look of the controller hardware, which was mounted hodge-podge as each new module was brought online.

You can see some printing action in the clip after the break. A Linux box takes a design and spits out control instructions to the hardware.

Continue reading “Salvaged Robot Arm Makes A Big 3d Printer”

Fast And Easy Solder Paste Stencils

If you’re making your own boards with SMD parts, you might want to get a solder paste stencil. Usually made of laser-cut mylar or extremely thin steel, these stencils allow you to squeegee solder paste onto your board’s pads and make assembly a whole lot easier. [Rochey] needed a stencil for a board he was working on, and lacking a laser cutter he turned to what he had available – a few bits of plastic and a CNC machine.

[Rochey] began making his stencils out of laminating pouches and an xacto knife. This worked well, but it was time-consuming, and a bit fiddly when cutting 1 mm square holes. To speed up the process, [Rochey] put one of these laminating pouches on his CNC machine, exported the ‘Top Cream’ layer in Eagle to the CNC software of his choice, and had his machine attack the plastic with a 1 mm drill bit.

To [Rochey]’s surprise, everything went as planned; in five minutes, he had a stencil with perfectly accurate holes that masked off everything but the SMD pads.

Thanks [Fabien] for sending this one in.

Finally, A 3D Printer For Burritos

[Marko] created a robot that prints burritos. Truly, we’ve reached new heights as a species.

The Burritob0t is based on the ORD Hadron 3d printer with a pair of air compressor/syringe-based extruders based on the Makerbot Frostruder. All the ingredients – rice, meat, salsa, and molten cheese – will be printed onto the surface of a tortilla heated by a Makerbot heated build platform.

[Marko] has some pretty neat plans for his Burritob0t such as an iPhone app for ordering your burritos and some sort of social commentary thing using burritos. We’re assuming [Marko] hasn’t yet got this Burritob0t up and running for the lack of any action shots or demo videos. That said, there’s a wonderful Flickr gallery and an about page that covers the artistic statement behind the Burritob0t.

If you want to get your own Burritobot, [Marko] hopes to have a Kickstarter up sometime in July.