Water Glider Prototype

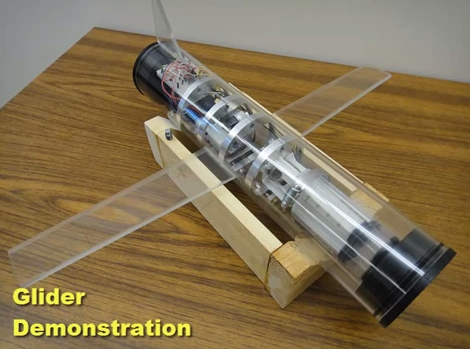
[Byrel Mitchell] wrote in to share some details on this water glider which he has been working on with his classmates at the Nonlinear Autonomous Systems lab of Michigan Technological University. As its name implies, it glides through the water rather than using propulsion systems typically found on underwater ROVs. The wings on either side of the body are fixed in place, converting changes in ballast to forward momentum.

The front of the glider is at the bottom right of the image above. Look closely and you’ll see a trio of syringes pointed toward the nose. These act as the ballast tanks. A gear motor moves a pinion connected to the syringe plungers, allowing the Arduino which drives the device to fill and empty the tanks with water. When full the nose sinks and the glider moves forward, when empty it rises to the surface which also results in forward movement.

After the break you can find two videos The first shows off the functionality and demonstrates the device in a swimming pool. The second covers the details of the control systems.

Continue reading “Water Glider Prototype”

PIC 18F4550 Dev Board

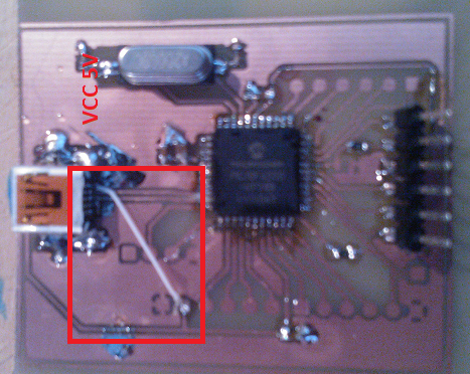
[Natsfr] was looking for a single-sided PCB to host a PIC 18F4550. Not finding one he designed his own in Kicad and is sharing (translated) the spoils of his labor.

This chip has USB capabilities which is why we see it used in a ton of projects. Almost all of them (including this USB input device post) use a very large DIP package. [Natsfr] went a different route, designing for the TQFP package to keep the drilling ot a minimum. The layout includes a crystal and USB-mini port, but it also breaks out the I/O pins on the chip. The red box above shows the quick fix he used on the VCC line as the board trace was shorting on the USB jack housing.

He didn’t drill out the holes for most of the breakout pins on this prototype. There’s just one header populated for programming the PIC chip. But he does have some plans for the first board. He’s going to use [Texan’s] AVR programming firmware for PIC to turn it into a USB AVR ISP programmer.

A Huge Microwave-powered Bug Zapper

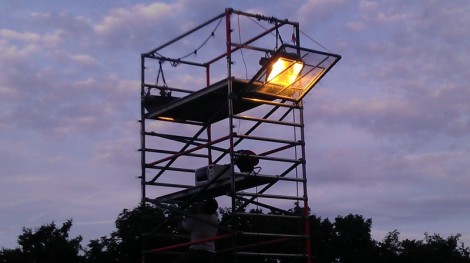
This is the biggest bug zapper we’ve ever seen. It’s called the Megazap as its zapping area is 1 square meter. [Eighdot] and [Sa007] combined their talents for the build in order to help reduce the insect population around the Eth0 2012 Summer festival.

You may recall from our bug zapping light saber build that these devices work by providing two energized grids. When an insect flies between the grids it allows the potential energy to overcome the air resistance by travelling through the insect’s body. The Megazap uses a transformer from a microwave oven to source that potential. The transformer produces 2.4 kV and the current is limited by a floodlight fitted inside the microwave. The side effect of using the lamp as a limiter is that it lights up with each bug zapped, providing a bit of a light show. Don’t miss the video after the break to see some flying foes get the life shocked out of them.

Continue reading “A Huge Microwave-powered Bug Zapper”

Raspberry Pi As A PIC Programmer

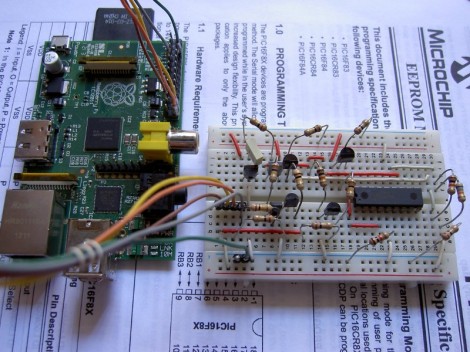
[Giorgio Vazzana] turned his Raspberry Pi into a PIC programmer using a rather small collection of common parts. It supports about a dozen different chips from the 16F family. But we’d guess that software is the limiting factor when it comes to supporting more chips.

Generally the problem with PIC programming is the need for a 12V supply. He chose to use an external 12V supply and a 78L05 linear regulator to derive the 5V rails from it. With the power worked out there are some level conversion issues to account for. The RPi provides 3.3V on the GPIO header pins, but 5V logic levels are needed for programming. He built transistor and voltage divider circuits to act as level converters. The programming software bit bangs the pins with a write time of less than eight seconds per 1k words of program data. So far this does not work with ICSP, but he plans to add that feature in a future version.

Turning [M. C. Escher] Prints Into Real Objects

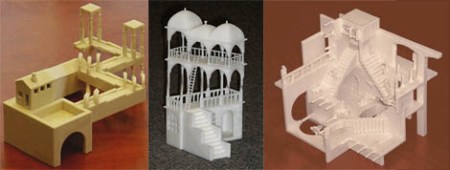
September is coming, and soon college freshmen the world over will be decorating their dorm room walls with Dark Side of the Moon posters and [M.C. Escher] prints. Anyone can go out and simply buy a prism, but what if you wanted a real-life version of objects and buildings from [Escher]’s universe? Professor [Gershon Elber] at the Technion at the Israel Institute of Technology decided to turn [Escher]’s prints into reality.

First beginning with simple shapes such as a Penrose Triangle and a Necker Cube, [Elber] decided to branch out into much more impossible shapes such as [Escher]’s Waterfall, Belvedere, and Relativity. These buildings are extremely hard to visualize in any traditional computer design program, so [Elber] wrote a plugin for his IRIT computer modeling program to design the buildings before committing them to a 3D printer.

In the video after the break, you can see a few rotating views of the resulting [Escher] buildings. Of course they only work from exactly one point of view – and even then, only with one eye closed – but it’s amazing to see these famous architectural studies brought into the real world.

Continue reading “Turning [M. C. Escher] Prints Into Real Objects”

Femto-photography: Taking Pictures Of Bullets Made Of Light

Femto-photography is a term that derives its name from the metric scale’s prefix for one-quadrillionth. When combined with photography this division of time is small enough to see groups of light photons moving. The effect is jaw-dropping. The image seen above shows a ‘light bullet’ travelling through a water-filled soda bottle. It’s part of [Ramesh Raskar’s] TED talk on imaging at 1 trillion frames per second.

The video is something of a lie. We’re not seeing one singular event, but rather a myriad of photographs of discrete events that have been stitched together into a video. But that doesn’t diminish the spectacular ability of the camera to achieve such a minuscule exposure time. In fact, that ability combined with fancy code can do another really amazing thing. It can take a photograph around a corner. A laser pulses light bullets just like the image above, but the beam is bounced off of a surface and the camera captures what light ‘echos’ back. A computer can assemble this and build a representation of what is beyond the camera’s line of sight.

You’ll find the entire talk embedded after the break.

Continue reading “Femto-photography: Taking Pictures Of Bullets Made Of Light”

Prototyping With Very, Very Small ICs

Gone are the days when all the cool chips are able to be thrown into a breadboard very easily. [starlino] was working with a circuit that uses an accelerometer, but unfortunately these chips come in hard to solder LGA-16 packages. [starlino] figured out a way to prototype with these packages that doesn’t require a custom breakout board or spending any time watching a reflow oven.

[starlino]’s LGA-16 adapter board began with a piece of perf board drilled out to form a space that perfectly fits his accelerometer. A piece of tape is placed over the pads of the chip and perf board, and the gap between the chip and board is filled in with a two-part plumbers putty.

Once the putty has cured, the leads on the acclerometer are connected to the pads on the board with a silver conductive pen. After putting a few header pins in the corners of the board, [starlino] soldered the pads to the pins and had a permanent breakout board for a very small accelerometer.

It’s not by any means a pretty build, but after [starlino] sealed the entire build in liquid electrical tape and installed it in a DIP socket, he had a completely functional accelerometer in an easy to prototype package. Not bad for a breakout board that can be built from stuff just lying around a workbench.