Time-lapse Dolly Uses Some Stock Parts And A Bit Of Machining Work

linear-carriage-for-time-lapse-photography

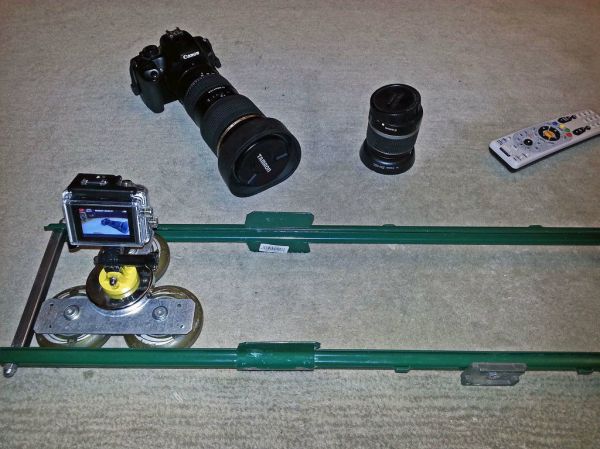
[Ben] just finished building this time-lapse dolly and decided to share his experience. We think he struck just the right balance of diy and commercially available materials to create a rig that is stable yet relatively inexpensive.

The project was inspired by Project Chronos. It gives a lot of details about the drive electronics and code used, but there are some gaps in the instructions for building the track itself. [Ben] forged ahead, purchasing linear bearings and a double-guide rail from IGUS. He didn’t mention the price on that item but we found 1000mm of the stuff (about 40 inches) for under $75 so it’s not outrageous. The part he couldn’t get for a reasonable price was precision thread bar. He ended going with regular threaded rod and a couple of nuts combined with a spring mechanism to keep the sled steady. That seems to work just fine. You can see the rod bouncing a bit in the clip after the break but it doesn’t harm the stability of the captured images.

The end stops including the one to which the stepper motor is mounted are his own work. It sounds like they required a bit more fabrication work than he was planning on but we figure if you don’t challenge your skill set you never get any better.

Continue reading “Time-lapse Dolly Uses Some Stock Parts And A Bit Of Machining Work”

Building A Remote Control For A Cable Release Camera

wireless-shutter-for-mechanical-camera

A lot of the remote shutter and intervalometer hacks we see are simplified by the camera’s built-in Infrared or other shutter techniques. But this camera doesn’t have a simple way to electronically trigger the shutter. The Fuji x100 is a digital camera, but it uses a cable release mechanism. The box you see on top is [Andy’s] method of making a remote shutter release for it.

The solution for “remote” triggering is that black cable which physically attaches to the shutter button. Just depress the plunger at the opposite end and a picture will be snapped. This process is automated with the use of a hobby servo hidden inside the box. It’s driven by an Arduino which is also monitoring the receiver. You could use just about any remote thanks to the Arduino’s flexibility in interfacing with hardware (we would have gone with a Bluetooth module and our smartphone). [Andy] chose to use an RF remote and receiver for a different camera.

Revolving Camera Mount Helps To Capture 3D Video-game Assests

3d-image-capture

Here’s a camera rig that makes it a snap to produce photorealistic 3D models of an object. It was put together rather inexpensively by an indie game company called Skull Theatre. They published a couple of posts which show off how the rig was built and how it’s used to capture the models.

They’re using 123D, a software suite which is quite popular for digitizing items. The rig has a center table where an object is placed, and a movable jig which holds three different cameras (or one camera for three rotations). You can see the masking tape on the floor which marks the location for each shot. These positions are mapped out in the software so that it has an easy time putting them all together. The shaft which connects the jig to the base is adjustable to accommodate large or small items.

One thing that we found interesting is the team’s technique for dealing with reflections. They use a matte spray to make those surfaces less reflective. This helps 123D do its job but also allows them to map reflective surface more accurately using the game engine.

Build An Eye Tracking Headset For $90

per_white_lines_faint_800

Eye tracking is a really cool technology used in dozens of fields ranging from linguistics, human-computer interaction, and marketing. With a proper eye tracking setup, it’s possible for a web developer to see if their changes to the layout are effective, to measure how fast someone reads a page of text, and even diagnose medical disorders. Eye tracking setups haven’t been cheap, though, at least until now. Pupil is a serious, research-quality eye tracking headset designed by [Moritz] and [William] for their thesis at MIT.

The basic idea behind Pupil is to put one digital camera facing the user’s eye while another camera looks out on the world. After calibrating the included software, the headset looks at the user’s pupil to determine where they’re actually looking.

The hardware isn’t specialized at all – just a pair of $20 USB webcams, a LED, an infrared filter made from exposed 35mm film negatives, and a 3D printed headset conveniently for sale at Shapeways.

The software for Pupil is based on OpenCV and OpenGL and is available for Mac and Linux. Calibration is easy, as seen in the videos after the break, and the results are amazing for an eye tracking headset thrown together for under $100.

Continue reading “Build An Eye Tracking Headset For $90”

Quantifying Cloudiness With OpenCV

What Can I see From the Shard?

The Shard is the tallest building in Western Europe, and has a great view of London.  The condos in the building are very expensive, and a tourist ride to the top of the building costs £24.95.

Since the value of the view is so high, [Willem] wanted to quantify the quality of the view at any given time. His solution is the Shard Rain Cam. This device combines a Logitech webcam with a Raspberry Pi to capture a time-lapse set of images. These images are fed to a Python script using OpenCV which quantifies the cloudiness.

[Willem] also had to build a weatherproof enclosure with a transparent window for the camera and RPi. ‘Clingfilm’, which is British for saran wrap, and mineral oil is used to improve the waterproofing of an IP54 rated enclosure.

The resulting data is displayed on www.whatcaniseefromtheshard.com, which provides an indication of whether or not the view is worth £24.95. All of the Python code is available, and is a good starting point for learning about image processing with OpenCV.

Finding 1s And 0s With A Microscope And Computer Vision

ROM

One day, [Adam] was asked if he would like to take part in a little project. A mad scientist come engineer at [Adam]’s job had just removed the plastic casing from a IC, and wanted a little help decoding the information on a masked ROM. These ROMs are basically just data etched directly into silicon, so the only way to actually read the data is with some nitric acid and a microscope. [Adam] was more than up for the challenge, but not wanting to count out thousands of 1s and 0s etched into a chip, he figured out a way to let a computer do it with some clever programming and computer vision.

[Adam] has used OpenCV before, but the macro image of the masked ROM had a lot of extraneous information; there were gaps in the columns of bits, and letting a computer do all the work would result in crap data. His solution was to semi-automate the process of counting 1s and 0s by selecting a grid by hand and letting image processing software do the rest of the work.

This work resulted in rompar, a tool to decode the data on de-packaged ROMs. It works very well – [Adam] was able to successfully decode the ROM and netted the machine codes for the object of his reverse engineering.

Flatbed Scanner Eliminates The Perils Of Macro Photography

IMG_7728

If you have ever played around with macro photography, you’ll know how hard it is to get a focused image of something that isn’t two-dimensional. For virtually every 3D object, you’ll have to deal with the depth of field – the small region where things are actually in focus. [David] came up with a neat homebrew solution for making sure everything in his macro photos is in focus using a discarded flatbed scanner and a Raspberry Pi.

[David]’s technique relies on focus stacking. Basically, [David] takes dozens of images of the same object, moving the camera closer by a fraction of an inch before snapping each frame. These pictures are stitched together with CombineZ, a piece of software used for extending the depth of field in images.

The hardware part of the build is a Raspberry Pi hooked up to a stepper motor driver and the shutter button of [David]’s camera. By attaching his camera to the carriage of a flatbed scanner, [David] can inch his camera ever closer to his object of study while grabbing the images for CombineZ.

The results are impressive, and would be nearly impossible to replicate any other way without tens of thousands of dollars in camera equipment.