Quick And Easy Wildlife Camera

This wildlife camera is really easy to put together. You should keep it in mind if you’re ever tying to figure out what’s eating the heads off of all of your tulips. [Revoltlab] put it together, and although there’s one fatal flaw in this particular system, the concept is quite sound.

The build uses a camera, paired with an ultrasonic range finder. When something passes within the pre-set distance for the sensor, a servo motor clicks the shutter button on the camera. It’s all driven by an Arduino and powered from a 9V battery.

If you watch the video after the break you’ll discover the flaw we mentioned. This is a disposable film camera and requires winding between pictures. That hasn’t been implemented yet. But we’ve got an old digital camera with a broken LCD screen which would be perfect for the job. We’d have to do a bit more work to turn the camera on before taking the picture though.

There are a couple of possible upgrades to the idea. [Revoltlab] mentions removing the IR filter from the camera and adding an infrared flash for night-vision shots. But we would also recommend ditching the servo motor for a simple remote shutter solution as a way to avoid scaring the wildlife with the motor noise.

Continue reading “Quick And Easy Wildlife Camera”

Adding A Remote Shutter To A Cheap Digital Camera

[Luo] sent in a very easy way to add a remote shutter to just about any Canon Powershot. Even though it’s just a button, battery, and USB cable, we’re sure this would be a great project to teach the younglings about the power of soldering.

Some Canon Powershot digicams are impressive beasts with the ability to take time-lapse, long exposure, and high-speed photos. These cameras are generally crippled by their firmware, but by installing CHDK these features can be enabled.

[Luo] read the CHDK wiki and found the firmware has the ability to snap a picture whenever a button is pressed. All he had to do is send 5V down a USB cable. After whipping up shutter button housed in a tin of Eclipse gum and attaching a cable, [Luo] had a functional shutter.

With the CHDK firmware, you can do a lot of really interesting stuff with the old Canon camera sitting on your shelf: we’ve seen a lot of intervalometers and even a few book scanners that use a similar setup. Nice work, [Luo].

Scanning Turntable Digitizes Objects As 3D Models

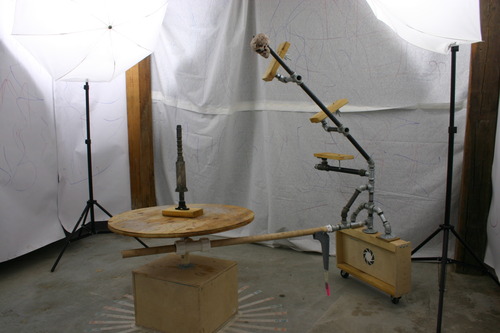
This turntable can automatically digitize objects for use in 3D rendering software like Blender3D. [James Dalby] built it using a high-quality DSLR, and some bits and pieces out of his junk box. The turntable itself is a Lazy Susan turned on its head. The base for the spinning model is normally what sits on the table, but this way it gives him an area to rest the model, and the larger portion acts as a mounting surface for the drive mechanism.

He used the stepper motor from a scanner, as well as the belt and tension hardware from a printer to motorize the platform. This is driven by a transistor array (a ULN2003 chip) connected to an Arduino. The microcontroller also controls the shutter of the camera. We’ve included his code after the break; you’ll find his demo video embedded there as well.

The concept is the same as other turntable builds we’ve seen, But [James] takes the post-processing one step further. Rather than just make a rotating gif he is using Autodesk 123D to create a digital model from the set of images.

Continue reading “Scanning Turntable Digitizes Objects As 3D Models”

A Camera That Describes A Picture For You

[Matt]’s Descriptive Camera looks just like any other point and shoot camera, albeit a little more boxy and homemade-looking. It even works just like the Polaroids of yesteryear – snap a picture and in a few minutes you’ve got a reproduction in your hands. Unlike any other camera before, [Matt]’s camera doesn’t give you an image. [Matt]’s camera gives you a description of the picture you took, printed out on  easily-scrapbooked thermal receipt paper. Yes, mankind is now that meta.

To build the hardware of his camera, [Matt] took a BeagleBone single-board Linux computer and attached a webcam and a thermal receipt printer. The real magic is in the artificial artificial intelligence that is Mechanical Turk. [Matt]’s camera sends his picture up to the Internet where some random stranger describes his picture. This description is sent back and printed on the receipt paper.

Even though [Matt] is spending $1.25 to have a single picture described on Mechanical Turk, there’s probably not another camera as retro-meta-fabulous-fantastic out there.

Stop Motion Animation Creation

PVC man stop motion animation

Stop Motion Animation has always been interesting to me since I “discovered” that one could make animated flip books by drawing each frame a little different. Fast forward 20 years or so, and computer technology has gotten to the point where this sort of thing can be done electronically quite easily and at an incredibly low price of a camera, computer, and free or paid-for software (here’s the technique using GIMP, a free, good quality photo editing tool) to put everything together.

The frames in the picture above are of my latest [PVC man] animation, which can be made with some electroluminescent lights, gloves, and some PVC pipe.  Each frame was individually photographed, and after several hours of work we had enough footage for 17 seconds of so of stop-motion animation.

Although by no means perfect, the quality of these animations has gone up dramatically from the first animations that I made using an old ENV2 camera phone. Although I was using a “custom mount” for it, it’s amazing these came out as well as they did. As with everything hacking related, this process is a constant work in progress. Check out the videos after the break for the [PVC man] video as well as one of the early ENV2-produced stop-motion shorts!

Continue reading “Stop Motion Animation Creation”

Autonomous Time Lapse With A Video Camera Throwie

When [Matt] came across a small video camera made to fit onto a keychain, the first thing that came to mind is a time-lapse video throwie. Like the LED + coin cell battery + magnet we’ve seen we’ve seen before (and deployed…), [Matt]’s video throwie would be deployed in interesting spots for a few days and shoot a time-lapse video until the battery ran out.

The camera [Matt] picked up has the capability of shooting video or still pictures and writing them to a microSD card. To make his camera film a time-lapse video, [Matt] connected an ATtiny45 to the camera shutter and power buttons and uploaded a short bit of code that would snap a picture ever 15 seconds.

Right now, [Matt] is having a few problems with his video throwie. When the camera is turned on, it iterates through the SD card to find the next unused file name. This eats up a few seconds, so the current setup will slowly speed up the time-lapse video. This isn’t an insurmountable problem, so we’re looking forward to the very interesting videos these tough little cameras will film.

Check out [Matt]’s video of ice melting after the break.

Continue reading “Autonomous Time Lapse With A Video Camera Throwie”

Automated Turntable Photography

[Muris] has a friend who is selling items on the internet. This friend wanted a simple way to make rotating images of the products and asked him to help. The result of his labors is this base unit that drives the turn table and controls the camera.

The first iteration of the turntable was powered by the stepper motor from a floppy drive. A disc was mounted directly on the motor spindle, but the results were a bit poor. This is because the motor had a fairly low resolution of 200 steps per rotation. That doesn’t allow for smooth animation, and there was a lot of vibration in the system. An upgrade to the geared system you see above included swapping out that motor for one from an old scanner. Now it achieves 1200 steps per rotation and the vibration is gone.

The connectors seen in the base are USB, incoming power, and shutter control. [Muris] wrote a program to control the PIC 16F628A inside the base. The program sends commands via USB and has parameters for number of frames per rotation, direction of rotation, and the like. Set it up as desired, place the product on the turntable, and hit start. Unfortunately there’s no video of this in action because [Muris] gave it to his friend as soon as it was finished. We guess the fact that he didn’t get it back means it’s working great.

If you don’t mind some rough edges and exposed wiring you can throw a system of your own together pretty quickly.