Digital “Toy” Camera, Made For Tilt-Shift And Other Analog-Like Experimenting

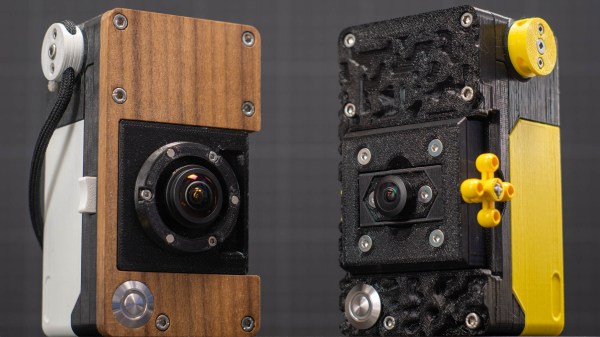
Like many others, [volzo] loves playing with photography in a playful and experimental way. Oddball lenses, vintage elements, and building from kits is what that world looks like. But that kind of stuff is really the domain of film cameras, or at least it was until [volzo] created his Digital Toy Camera design. The result? A self-built, lomography-friendly digital camera that allows for all kinds of weird and wonderful attachments and photo shenanigans.

3D-printed mounts and magnetic attachment makes swapping parts a breeze.

To make a DIY digital camera that allowed that kind of play, the first problem [volzo] had to solve was deciding on an image sensor. It turns out that sourcing image sensors as an individual is a pretty cumbersome process, and even if successful, one still needs to write a driver and create things from the ground up. So, the guts of [volzo]’s creations use the Raspberry Pi and camera sensor ecosystem and M12 lenses, a decision that allows him to focus on the rest of the camera.

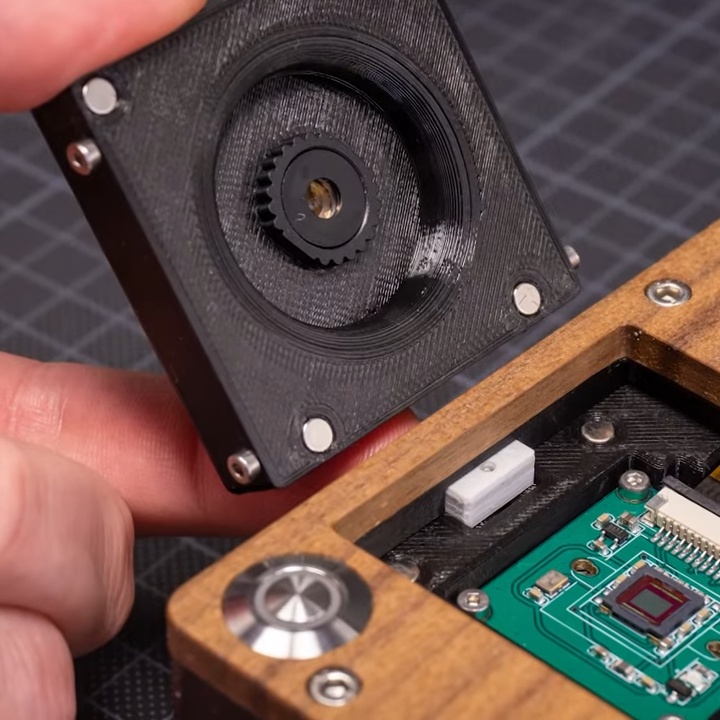
3D printing, a bit of CNC machining, and some clever design yields a “toy” camera: simple, inexpensive, and enabling one to take a playful and experimental approach to photography. The design files are available on GitHub, and there are some neat elements to the design. Magnetic mounts allow for easy swapping of lens assemblies, and a M12 x 0.75 tap cuts perfect threads into 3D-printed pieces for M12 lenses.

Heat-set inserts also provide robust fastening that can hold up to disassembly and re-assembly (and don’t miss that our own [Joshua Vasquez] has shared how best to design for and use heat-set inserts.)

[volzo] has a fantastic video to accompany his project; give it a watch (embedded below, under the page break) and see if you don’t come away with some inspiration of your own.

Continue reading “Digital “Toy” Camera, Made For Tilt-Shift And Other Analog-Like Experimenting”

Hackaday Links May 9th 2012

Homecut – CNC Cutting Directory

homecut

So you have a CNC machine that you use as a hobby, but would like to do some actual work on the side? Or maybe you have an idea you’d like made. Homecut is a map directory where you can maybe hook up with the right person.

The Curta Mechanical Calculator

curta calculator

As [leehart] mentioned in our comments section, the Curta mechanical calculator is a truly ingenious piece of engineering. A quick Google search should find all kinds of information on it, but this article could be a good place to start for some mechanical hacking inspiration!

Luxman Amplifier DAC Upgrade

nand-dac

[R. Barrios] wasn’t happy with using the sound card for his HTPC setup, so decided to add a DAC module onto his reciever. The resulting audio quality was very good, and the build came out quite clean.  Check it out if you’re thinking of a hack-upgrade to your stereo equipment.

3D Printable Tilt-Shift Adapter

tilt-shift-lens

A tilt-shift lens a neat piece of equipment that is used to make a large scene look like they were miniatures. It’s a cool effect, but professional lenses to do this can cost thousands of dollars. This Instructable tells you how to go about printing your own. For more info on the technique itself, check out this Wikipedia article.

New 3D Printer on the Block

3d-printer

If you would like to take the plunge into 3D printing, but are looking for somewhere to get a parts kit, the [ORD Bot Hadron 3D Printer] may be worth a look.  The build quality looks great, and the price for the mechanical components is quite reasonable at $399. You’ll need to provide the electronics and extruder. Thanks [comptechgeek]!

Guide To Producing Tilt-shift Photography

[Bhautik] is back again with more tilt-shift photography.  This time, hes brought us a quite in depth guide to tilt-shift photography. He covers the technical side of how tilt-shift works, showing the differences in several methods. There is a breakdown of different cameras and ease of modification as well as links to several of his past projects. He even shows comparisons between instant tilt-shift Photoshop methods and the real thing, pointing out key things to look for to identify the real deal.

Making A Tilt-shift Lens

tilt

[Bhautik] is on version 2 of his tilt-shift lens, and wrote in to share what he has learned. Some aspects of the design on version 1 made it a bit quirky to use. You had to hold the lens in place, manually adjusting the focus. This meant that no two shots were the same. Since [Bhautik] wanted to do time lapse with it, he needed to re design it. He kept it simple and cheap, around $22 total.  Version two takes a lot longer to setup for the shot, but the result is reproducible. This means he can make his tilt-shift time lapse videos.