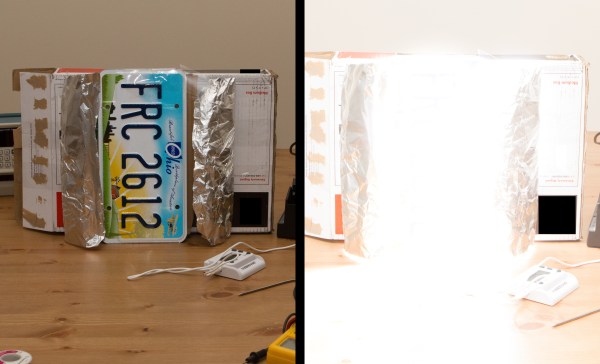
altoids-pocket-projector

DIY Film Projector Fits In The Palm Of Your Hand

DSLRs aside, the price of digital cameras these days can make it easy to consider just tossing your old one out when it breaks. [Leonidas Tolias] had another idea, and with a few broken cameras he had on hand he constructed a slick little pocket-sized projector.

The project started out as a pair of lenses from busted cameras and an Altoids tin in which he mounted them. The larger lens from a video camera was installed on the exterior of the tin, while the smaller of the two was mounted inside. Bits from disposable cameras were used to create a set of film reels, which he supports with some hand cut scrap aluminum. He made some test photo slides by printing some images on transparency paper, which he can cycle through using a film advancement rig he built out of string and a couple of gears.

While you won’t be using this projector for your next boring PowerPoint presentation, it does work pretty well as you can see in pictures on [Leonidas’] site.

[Thanks, Taylor]

Automated Sky Tracking To Catch UFOs

If you were to try to take a picture of a UFO, how would you do it? Sit by the side of a road in Nevada near Area 51? Pie tin on a string? A French team of UFO enthusiasts put together an automated UFO detection device (Google translate) out of a disco light and CCTV camera so long nights of watching the skies can be automated.

The build uses a disco light with an altitude and azimuth mount to constantly scan the skies on the lookout for strange, unexplained lights. Attached to this swiveling mount is a camcorder and a CCTV camera that streams video to the command and control laptops for image analysis.

In addition to object tracking, there’s also a diffraction grating in front of the CCTV camera. The team behind this project previously used this for some very low tech spectroscopy (translation) to identify emission lines in a light source. Light that have a signature including Oxygen and Nitrogen will probably be ionized air, while less common elements may be the signature of “advanced propulsion.”

While this build is going to detect a lot of satellites and meteors, there’s a definite possibility of capturing an unexplained phenomenon on video.

Controlling A DSLR With A Nintendo DS

At Hack a Day, we’ve seen dozens of intervalometer builds that open and close a camera shutter remotely. [Luke Skaff] decided to take these builds to the next level by automating a camera’s focus and shutter with a Nintendo DS.

[Luke]’s build is based on the Open Camera Controller project that puts the power of an intervalometer, sound trigger, sequencer, and HDR bracket shooting into the hands of professional photogaphers. The Open Camera Controller is built to run on a Nintendo DS with an AVR-based card attached to the Game Boy Advance cartridge port.

The Open Camera Controller attaches to a camera’s shutter port, but [Luke] stepped things up a little bit by using a USB host controller and implementing the picture transfer protocol. Now, instead of [Luke]’s controller telling his camera when to open and close the shutter, the focus of the camera can be adjusted as well. [Luke]’s build uses an Xilinx CoolRunner-II CPLD and a USB host controller to convert the DS cartridge port to a USB port every DSLR can connect to.

[Luke] still has a mess of wires on his hand, but even we can see the power that inexpensive automation would bring to the world of digital photography.

Continue reading “Controlling A DSLR With A Nintendo DS”

Avoid Shaky Camera Movements With Gyroscopic Stabilization

Right after “no editing whatsoever”, the “shaky camera” is the bane of YouTube viewers the world over. [David] came up with a nice solution to the problem of shaky cameras that uses gyroscopes to even out the bumps of making a great movie.

Most cameras attached to moving frames – from the zip-line cameras at NFL games to police helicopters and aerial reconnaissance drones – have some sort of gyroscopic stabilization. Even though gyroscopic stabilization has been around for more than 60 years, the designs haven’t changed that much. [David] dug up a few patents dating from the 50s and set to work replicating the design.

[David] bought a pair of [Glenn Turner]’s fabulously heavy and expensive-looking powered gyroscopes and began bolting them onto a piece of sheet metal. Per the 1950 patent, the gyroscopes were mounted 90 degrees apart and bolted onto the camera.

From the video demo (after the break), there’s a marked difference between filming a stroll though a parking lot with the gyros on and gyros off. While the pair of motor driven gyroscopes look a little ungainly and are a bit too loud for our tastes, the solution is much less expensive than the $1600 professional gyro [David] based his build on.

Continue reading “Avoid Shaky Camera Movements With Gyroscopic Stabilization”

Building Your Own Portable 3D Camera

diy-3d-camera

[Steven] needed to come up with a project for the Computer Vision course he was taking, so he decided to try building a portable 3D camera. His goal was to build a Kinect-like 3D scanner, though his solution is better suited for very detailed still scenes, while the Kinect performs shallow, less detailed scans of dynamic scenes.

The device uses a TI DLP Pico projector for displaying the structured light patterns, while a cheap VGA camera is tasked with taking snapshots of the scene he is capturing. The data is fed into a Beagleboard, where OpenCV is used to create point clouds of the objects he is scanning. That data is then handed off to Meshlab, where the point clouds can be combined and tweaked to create the final 3D image.

As [Steven] points out, the resultant images are pretty impressive considering his rig is completely portable and that it only uses an HVGA projector with a VGA camera. He says that someone using higher resolution equipment would certainly be able to generate fantastically detailed 3D images with ease.

Be sure to check out his page for more details on the project, as well as links to the code he uses to put these images together.

Monitoring And Controlling Your Garage Door From Afar With An IP Camera

remote-control-garage-door

Last year, [Mark Simonelli’s] wife asked him if he could design something that would allow her to remotely check if their garage door had been left open. [Mark] jumped at the chance to tinker with electronics and designed a system around an old TrendNet IP camera. When remotely connected to the camera using IP Cam Viewer Pro for his Android phone, [Mark] could watch the video stream and also trigger the garage door opener via a small relay circuit he built.

His remote opener worked well, but his camera unfortunately lacked any sort of IR vision/low light capabilities. Since his camera wasn’t very useful in the dark, he decided that he needed to add some way to trigger a light when remotely monitoring his garage. He figured the best way to do this would be to control a power strip-connected light using a circuit similar to the one he built to open the garage door itself.

He stopped by the hardware store and picked up a cheap power strip, disassembling it and removing the power toggle once he got home. He fitted it with a small 5v relay, which he connected to the camera’s terminal block. While he admits that it might not be the absolute safest solution, he can easily control both the light and the garage door with a simple swipe of his phone’s screen.

Continue reading to see his remote controlled power strip in action, and be sure to swing by his site to see more details about his camera-controlled garage door opener.

Continue reading “Monitoring And Controlling Your Garage Door From Afar With An IP Camera”

A Zoom Lens For Your Webcam

We need to find the kind of friends that [Dino] has. They seem to drop off all of their older, yet totally awesome, electronics with him once they’re through with the devices. One example of this is the Sony Handycam that came into his possession. He decided to crack it open and repurpose the 20x optical zoom lens for use with a webcam.

We always like [Dino’s] style. You can tell that he has no idea if he’s going to be able to pull off his goal, but at the same time he has an intuitive sense that he’ll make it happen. In the video after the break he starts off investigating what components are in the camera. At first the lens is passing no light at all, but he just strips down parts until he can see through it.

There are a couple of servo motors which control zoom and focus. He removes those before attaching the CCD from a Logitech webcam. At the end of his video he shows a demo of the functionality, which is pretty finicky when focusing by hand. But we think this hack would make a fantastic camera for soldering projects, it just needs a custom controller so the motors can be once again used to adjust focus.

Continue reading “A Zoom Lens For Your Webcam”