Insane Macro Photography Rig

[fotoopa] just put up a Flikr build log of his 3D macro photography rig he uses to take pictures of insects in flight. Outside Hollywood or National Geographic, we’ve never seen a crazier photography rig.

[fotoopa]’s build is based around two cameras – a Nikon D200 and D300. These cameras are pointed towards the subject insect with two mirrors allowing for a nice stereo separation for 3D images. Of course, the trouble is snapping the picture when an insect flies in front of the rig.

For shutter control, [fotoopa] used two IR laser pointers pointed where the two cameras converge. A photodiode in a lens above the rig detects this IR dot and triggers the shutters. To speed up the horribly slow 50ms shutters on the Nikons, a high-speed shutter was added so the image is captured within 3ms.

[fotoopa]’s 2011 rig took things down a notch; this year he’s only working with one camera. Even though he didn’t get any 3D images this year, the skill in making such an awesome rig is impressive.

via (diyphotraphy.net)

Panning Time-lapse Rig

Here’s a simple camera setup that lets you make your own panning time-lapse videos. It uses a couple of motors driven by an Arduino to snap successive still images which can later be rolled into a video format.

[Acorv] was not thrilled with the fact that his new Lumix LX5 didn’t have a time-lapse option built-in. But luckily it does have a standard connector on top for an external flash. He saw on a forum post that someone had built a jig which mounts to the flash bracket and uses a servo motor to depress the shutter release button. He recreated that and had half of this hack done.

The panning portion is facilitated by the Gorillapod. This particular model offers a swivel feature. This is automated by connecting it to a stepper motor with a piece of string. As the stepper turns the string is wound on a spool and gradually pans the camera. Simple, and it seems to work great. Check out the video after the break to see a test which was shot at sunset on the shores of a lake.

If you have a camera which offers an IR remote shutter release the time-lapse portion can be handled with an IR intervalometer, making the mechanical build a bit easier.

Continue reading “Panning Time-lapse Rig”

Google Hangout Laser Turret

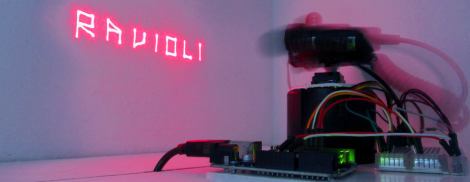
The guys from the House4Hack hackerspace in Johannesburg won the 2011 Google+ Hackathon with their Friggin’ Laser Turret. The build started off as a remote-controlled webcam that can be controlled by anyone in a Google+ hangout. On a whim, the team decided to add a laser to the build because lasers are awesome.

The inspiration for the build was to have a Google+ hangout available whenever someone is at the hackerspace. If a guest can’t grace the team with their physical presence, at least they can be there virtually. The camera is controlled by an Arduino running a bog-standard servo library implementation. The Arduino is connected to a laptop over a serial connection and is able to move left and right. To spice things up a little, the team added a 25mA laser diode to the build controlled from a digital output on the Arduino.

For winning the Jo’burg Google+ Hackathon, the guys scored themselves a Samsung Galaxy S II phone. Not a bad prize for building something cool. Check out the demo of the friggin’ laser turret after the break.

Continue reading “Google Hangout Laser Turret”

Canon FD Lenses On An EOS Mount

Camera lenses are expensive and if you’re like us, you can easily find really cheap lenses that your camera can’t use. [Sam] has a Canon EOS and a bunch of old-school FD lenses at his disposal. There’s one problem though: using these old lenses with an adapter means focusing at infinity is out of the question. Thankfully, he put up a few videos (part 1, part 2, and part 3) walking through the process of modifying an FD lens for his new camera.

To do the modification for the FD lens, all that’s needed is some epoxy, a screw driver, and an M42 to EF adapter. After disassembling the back of the FD lens, [Sam] mounted the M42 adapter on his camera and held the lens up to check the minimum focusing distance. A bit of grinding or a few metal shims ensure that the lens is in the right position.

The next step is making sure the aperture can still be controlled. [Sam] goes through this in part two of his video. A little bit of dremeling takes care of all the hard work. The lens is finally attached to the M42 adapter with a tiny bit of epoxy, and the conversion is complete.

While [Sam] could have put up a few close up pics of his build, he goes through every step of the process very well. Check out the embedded videos after the break.

Continue reading “Canon FD Lenses On An EOS Mount”

Shutter Trigger Remote With Some Nice Design Considerations

Here are the guts of [Lukasz’s] infrared camera remote control. He based it off of an existing design, but looked for places where improvements could be made. He felt the ATtiny2313 was a bit wasteful in this case. But further investigation led him to see why it was chosen. If you were to drop down to an ATtiny13 the ability to connect a crystal oscillator is lost (that chip only offers a 1-pin clock signal input) and the internal RC oscillator isn’t quite up to his standards for reliable IR communications.

Instead of driving the IR LED directly from an AVR pin he used a transistor in hopes that it will allow the maximum current to flow through the diode when in use. We’re not sure if it’s necessary, but we can see how it makes sense. Power is received from an unregulated 3 volt coin cell, so maybe as that voltage drops over time this will come into play.

Speaking of that coin cell, battery life is a concern here. [Lukasz] is using the sleep functions of the AVR after three seconds of use. This should keep the cell alive for quite a long time. But his 0 volt measurement is an anomaly with the multimeter he’s using. To get a precise measurement for tiny current flow you need extra equipment, like [Dave Jones’] uCurrent adapter.

The schematic for this Canon camera compatible project is only provided in Eagle format so we’ve embedded an image of it after the break for your convenience. You should have no problem making this work with a Nikon if you swap out some of the code from the TV-B-Gone shutter release we saw on Thursday.

Continue reading “Shutter Trigger Remote With Some Nice Design Considerations”

TV-B-Gone Can Double As A Camera Remote Control

[Christopher] found a way to get a bit more mileage out of his TV-B-Gone kit. The little device is intended to turn off every television in range with the push of a button. But at its core it’s really just a microcontroller connected to some infrared LEDs. Instead of sending codes to shut of televisions, you can rewrite the firmware to send a camera remote shutter release code.

It doesn’t take too much to pull this off. You need a way to flash new firmware to the device, and you need to know the new code timing that you want to send. Since the firmware is open source it’s easy enough to make code changes, and there are several easy methods of flashing AVR devices (like the tiny85 used here), including using an Arduino as an ISP.

But [Christopher] did more than just add the Nikon code for his camera. He realized that there’s a jumper to select between European or American television codes. Since he wasn’t using the foreign option, he replace that pin header with a switch that selects between normal TV-B-Gone operation and camera shutter release modes. Nice.

Making A Wall Power Adapter For A Digital Camera

Instructables user [txoof] was unhappy with the fact that Olympus didn’t manufacture a wall power adapter for the E-510 camera and decided to do something about it. The resulting new power adapter is described in this article. What it amounts to is a fake battery pack made out of plywood.

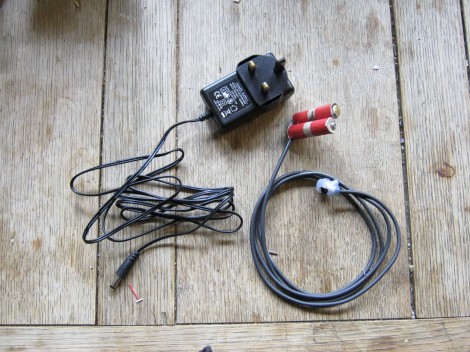
A 2.5mm DC power adapter is attached as seen in the picture above and the fake battery contacts are made with a thin brass or steel plate. According to the article, a steel soda can or bean tin works well for this.  Google sketchup with the slicer plugin is used to make slices of wood to be glued together in a “battery” shape.  Alternatively, something like this would be a good project for a 3D printer or CNC router.

Although there is nothing that revolutionary about this hack, it solves a problem that many people have with cameras or other electronics without a readily available wall power supply. This can be especially evident when trying to do time-lapse photography or other activities that need a long time span. For another hacked-together wooden camera project, check out this remote trigger built using plywood and air freshener components.