Zero-G Experiments Will Make Some Pretty Pictures

Does a yo-yo work in zero-g? How about a paper airplane? These questions were answered in 1985 on the Space Shuttle Discovery, but reproduction of results is the cornerstone of the scientific method. [Rob] is about to reproduce some of the awesome zero-g pictures by riding on a vomit comet and taking a few pictures of water globes colliding.

For the last few months, [Rob] has had a standby ticket on the G-Force One, a plane that takes passengers on parabolic arcs to simulate microgravity. He was lucky as his standby ticket allowed him to take a few experiments on board, so [Rob] decided there’s just not enough awesome pictures of water colliding in zero-g.

He built a rig out of micro t-slot aluminum. A DSLR is mounted to the frame along with a few ‘test tubes’ containing water. When [Rob] blows through a tube, a small sphere of water will be released to collide with other object. Think of it as the nerd’s version of water splash photography.

Of course, a trip through zero-g wouldn’t be complete without a few more experiments. [Rob] plans on testing a few toys to see if yo-yos ‘sleep’ without gravity (they don’t), and if a grandfather clock works on the moon (there’s a month-long day, so kind of). We can’t wait to see [Rob]’s pictures once he comes back to Earth.

DIY LED Photography Lights

led-light-box

[Markus] had been drooling over some LED panels to use as a soft light source for photography, but being a hobbyist, he didn’t want to spend a ton of money to buy them. He figured that he had enough electronics know-how to build his own panels, while saving a boatload of cash in the process.

He hoped to keep the total cost under £100, so along with new items like LED light strips, he would have to use some stuff he had sitting around, like the metal cooking containers that make up the body of the lights. While originally planned for use in a different project, it turns out that the cooking containers were ideal for his lighting setup, since they are both durable and great heatsink material.

The remainder of the build is pretty straightforward. [Markus] used a pre-made LED dimmer to control the panel’s brightness, along with some tinted plexiglas to diffuse the light while bringing the color temperature into a more usable range.

While he missed his £100 mark, the lights look great – we just might have to build a few of them ourselves.

Insane Macro Photography Rig

[fotoopa] just put up a Flikr build log of his 3D macro photography rig he uses to take pictures of insects in flight. Outside Hollywood or National Geographic, we’ve never seen a crazier photography rig.

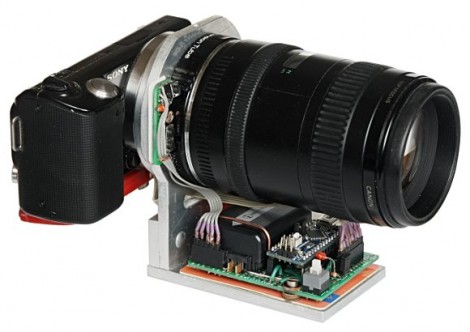
[fotoopa]’s build is based around two cameras – a Nikon D200 and D300. These cameras are pointed towards the subject insect with two mirrors allowing for a nice stereo separation for 3D images. Of course, the trouble is snapping the picture when an insect flies in front of the rig.

For shutter control, [fotoopa] used two IR laser pointers pointed where the two cameras converge. A photodiode in a lens above the rig detects this IR dot and triggers the shutters. To speed up the horribly slow 50ms shutters on the Nikons, a high-speed shutter was added so the image is captured within 3ms.

[fotoopa]’s 2011 rig took things down a notch; this year he’s only working with one camera. Even though he didn’t get any 3D images this year, the skill in making such an awesome rig is impressive.

via (diyphotraphy.net)

Panning Time-lapse Rig

Here’s a simple camera setup that lets you make your own panning time-lapse videos. It uses a couple of motors driven by an Arduino to snap successive still images which can later be rolled into a video format.

[Acorv] was not thrilled with the fact that his new Lumix LX5 didn’t have a time-lapse option built-in. But luckily it does have a standard connector on top for an external flash. He saw on a forum post that someone had built a jig which mounts to the flash bracket and uses a servo motor to depress the shutter release button. He recreated that and had half of this hack done.

The panning portion is facilitated by the Gorillapod. This particular model offers a swivel feature. This is automated by connecting it to a stepper motor with a piece of string. As the stepper turns the string is wound on a spool and gradually pans the camera. Simple, and it seems to work great. Check out the video after the break to see a test which was shot at sunset on the shores of a lake.

If you have a camera which offers an IR remote shutter release the time-lapse portion can be handled with an IR intervalometer, making the mechanical build a bit easier.

Continue reading “Panning Time-lapse Rig”

Google Hangout Laser Turret

The guys from the House4Hack hackerspace in Johannesburg won the 2011 Google+ Hackathon with their Friggin’ Laser Turret. The build started off as a remote-controlled webcam that can be controlled by anyone in a Google+ hangout. On a whim, the team decided to add a laser to the build because lasers are awesome.

The inspiration for the build was to have a Google+ hangout available whenever someone is at the hackerspace. If a guest can’t grace the team with their physical presence, at least they can be there virtually. The camera is controlled by an Arduino running a bog-standard servo library implementation. The Arduino is connected to a laptop over a serial connection and is able to move left and right. To spice things up a little, the team added a 25mA laser diode to the build controlled from a digital output on the Arduino.

For winning the Jo’burg Google+ Hackathon, the guys scored themselves a Samsung Galaxy S II phone. Not a bad prize for building something cool. Check out the demo of the friggin’ laser turret after the break.

Continue reading “Google Hangout Laser Turret”

Canon FD Lenses On An EOS Mount

Camera lenses are expensive and if you’re like us, you can easily find really cheap lenses that your camera can’t use. [Sam] has a Canon EOS and a bunch of old-school FD lenses at his disposal. There’s one problem though: using these old lenses with an adapter means focusing at infinity is out of the question. Thankfully, he put up a few videos (part 1, part 2, and part 3) walking through the process of modifying an FD lens for his new camera.

To do the modification for the FD lens, all that’s needed is some epoxy, a screw driver, and an M42 to EF adapter. After disassembling the back of the FD lens, [Sam] mounted the M42 adapter on his camera and held the lens up to check the minimum focusing distance. A bit of grinding or a few metal shims ensure that the lens is in the right position.

The next step is making sure the aperture can still be controlled. [Sam] goes through this in part two of his video. A little bit of dremeling takes care of all the hard work. The lens is finally attached to the M42 adapter with a tiny bit of epoxy, and the conversion is complete.

While [Sam] could have put up a few close up pics of his build, he goes through every step of the process very well. Check out the embedded videos after the break.

Continue reading “Canon FD Lenses On An EOS Mount”

Shutter Trigger Remote With Some Nice Design Considerations

Here are the guts of [Lukasz’s] infrared camera remote control. He based it off of an existing design, but looked for places where improvements could be made. He felt the ATtiny2313 was a bit wasteful in this case. But further investigation led him to see why it was chosen. If you were to drop down to an ATtiny13 the ability to connect a crystal oscillator is lost (that chip only offers a 1-pin clock signal input) and the internal RC oscillator isn’t quite up to his standards for reliable IR communications.

Instead of driving the IR LED directly from an AVR pin he used a transistor in hopes that it will allow the maximum current to flow through the diode when in use. We’re not sure if it’s necessary, but we can see how it makes sense. Power is received from an unregulated 3 volt coin cell, so maybe as that voltage drops over time this will come into play.

Speaking of that coin cell, battery life is a concern here. [Lukasz] is using the sleep functions of the AVR after three seconds of use. This should keep the cell alive for quite a long time. But his 0 volt measurement is an anomaly with the multimeter he’s using. To get a precise measurement for tiny current flow you need extra equipment, like [Dave Jones’] uCurrent adapter.

The schematic for this Canon camera compatible project is only provided in Eagle format so we’ve embedded an image of it after the break for your convenience. You should have no problem making this work with a Nikon if you swap out some of the code from the TV-B-Gone shutter release we saw on Thursday.

Continue reading “Shutter Trigger Remote With Some Nice Design Considerations”