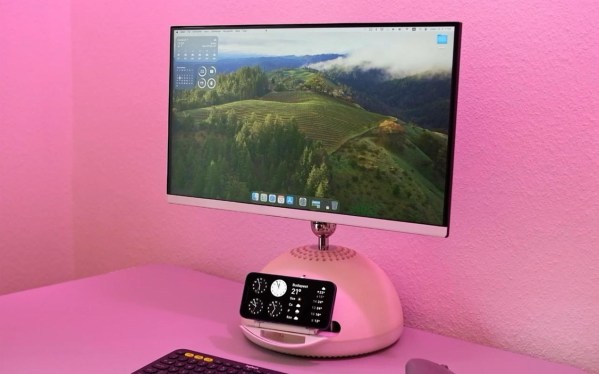
RavynOS: Open Source MacOS With Same BSD Pedigree

That macOS (formerly OS X) has BSD roots is a well-known fact, with its predecessor NeXTSTEP and its XNU kernel derived from 4.3BSD. Subsequent releases of OS X/macOS then proceeded to happily copy more bits from 4.4BSD, FreeBSD and other BSDs.

In that respect the thing that makes macOS unique compared to other BSDs is its user interface, which is what the open source ravynOS seeks to address. By taking FreeBSD as its core, and crafting a macOS-like UI on top, it intends to provide the Mac UI experience without locking the user into the Apple ecosystem.

Although FreeBSD already has the ability to use the same desktop environments as Linux, there are quite a few people who prefer the Apple UX. As noted in the project FAQ, one of the goals is also to become compatible with macOS applications, while retaining support for FreeBSD applications and Linux via the FreeBSD binary compatibility layer.

If this sounds good to you, then it should be noted that ravynOS is still in pre-release, with the recently released “Hyperpop Hyena” 0.6.1 available for download and your perusal. System requirements include UEFI boot, 4+ GB of RAM, x86_x64 CPU and either Intel or AMD graphics. Hardware driver support for the most part is that of current FreeBSD 14.x, which is generally pretty decent on x86 platforms, but your mileage may vary. For testing systems and VMs have a look at the supported device list, and developers are welcome to check out the GitHub page for the source.

Considering our own recent coverage of using FreeBSD as a desktop system, ravynOS provides an interesting counterpoint to simply copying over the desktop experience of Linux, and instead cozying up to its cousin macOS. If this also means being able to run all macOS games and applications, it could really propel FreeBSD into the desktop space from an unexpected corner.

Optimizing A QuickTake Image Decoder For The Apple II’s 6502

The idea of using the Apple II home computer for digital photography purposes may seem somewhat daft considering that this is not a purpose that they were ever designed for, yet this is the goal that [Colin Leroy-Mira] had, requiring some image decoder optimizations. That said, it’s less crazy than one might assume at first glance, considering that the Apple II was manufactured until 1993, while the Apple QuickTake digital cameras that [Colin] wanted to use for his nefarious purposes saw their first release in 1994.

These QuickTake cameras feature an astounding image resolution of up to 640×480, using 24-bit color. Using the official QuickTake software for Apple Macintosh System 7 through 9 the photographs in proprietary QTK format could be fetched for display and processing. Doing the same on an Apple II would obviously require a bit more work, not to mention adapting of the image to the limitations of the 8-bit Apple II compared to the Motorola 68K and PowerPC-based Macs that the QuickTake was designed to be used with.

Targeting the typical ~1 MHz 6502 CPU in an Apple II, the dcraw QTK decoder formed the basis for an initial decoder. Many memory and buffer optimizations later, an early conversion to monochrome and various other tweaks later – including a conversion to 6502 ASM for speed reasons – the decoder as it stands today manages to decode and render a QTK image in about a minute, compared to well over an hour previously.

Considering how anemic the Apple II is compared to even a budget Macintosh Classic II system, it’s amazing that displaying bitmap images works at all, though [Colin] reckons that more optimizations are possible.

Rackintosh Plus Is The Form Factor Nobody Has Been Waiting For

For all its friendly countenance and award-winning industrial design, there’s one thing the venerable Macintosh Plus can’t do: fit into a 1U rack space. OK, if we’re being honest with ourselves, there are a lot of things a Mac from 1986 can’t do, but the rack space is what [identity4] was focused on when they built the 2025 Rackintosh Plus.

Some folks may have been fooled by this ad to think this was an actual product.

For those of you already sharpening your pitchforks, worry not: [identity4]’s beloved vintage Mac was not disassembled for this project. This rack mount has instead become the home for a spare logic board they had acquired Why? They wanted to use a classic Mac in their studio, and for any more equipment to fit the space, it needed to go into the existing racks. It’s more practical than the motivation we see for a lot of hacks; it’s almost surprising it hasn’t happened before. (We’ve seen Mac Minis in racks, but not the classic hardware.)

Aside from the genuine Apple logic board, the thin rack also contains a BlueSCSI hard drive emulator, a Floppy Emu for SD-card floppy emulator, an RGB-to-HDMI converter to allow System 7 to shine on modern monitors, and of course a Mean Well power supply to keep everything running.The Floppy Emu required a little light surgery to move the screen so it would fit inside the low-profile rack. [identity4] also broke out the keyboard and mouse connectors to the front of the rack, but all other connectors stayed on the logic board at the rear.

Sound is handled by a single 8-ohm speaker that lives inside the rack mount, because even if the Rackintosh can now fit into a 1U space, it still can’t do stereo sound…or anything else a Macintosh Plus with 4 MB of RAM couldn’t do. Still, it’s a lovely hack. and the vintage-style advertisement was an excellent touch.

Now they just need the right monochrome display.

Rebuilt Batteries For The Cutest Clamshell At The Cafe

Keeping retrocomputers going can be tricky enough, but when you’re talking retro laptops, the battery packs add an extra challenge. While one could simply live without the battery, that’s not going to give you the full retro experience. Replacement batteries are long out of stock, so what can one do? Well, one can check out this excellent tutorial by [lazd] on rebuilding an iBook G3 Clamshell battery.

Even if you don’t have this particular laptop, the general process is likely to be similar for PC laptops of similar vintage. (Which we still can’t believe is a whole quarter-century ago.) Luckily for retrocomputer enthusiasts, even Apple used standard 18650 cells in those bygone, halcyon days when computers were allowed to be more than a few atoms thick. They do need to be unprotected, flat-top cells, but that’s easy enough to source.

So it’s really a matter of carefully prying apart the casing (apparently it needs to be Apple-branded; aftermarket cases can’t survive being opened), removing the old batteries, and welding nickel tabs onto the new cells in the proper configuration. One thing that surprised us is that, apparently, Apple did not go in for balancing in those days — so make sure your cells are all in perfect condition and all equally charged before you start, or things won’t end nicely.

As always, battery orientation matters! The cells are welded into two sets in this Clamshell iBook battery.

Assuming you can pull it off (and your battery pack’s control chip has lasted the 300 moons since its manufacture), you’ll get a not-insignificant 5-hour battery run out of what’s sure to be the cutest clamshell computer at the cafe.

If you are repairing an iBook, while you’re at it, why not upgrade the RAM? You might even be able to fix the screen if it’s succumbing to the sadly-too-common vinegar syndrome.

Universal Control For The Last Mac You’d Ever Expect

Universal control is a neat feature on Macintosh computers, allowing you to slide your mouse seamlessly from device to device. Of course you need a relatively recent version of MacOS to make it work, right? Not necessarily– thanks to [Bart Jackobs] MacFriends, universal control has come to the Macintosh Classic.

The Arduino is perfect for this purpose, but choosing it ruined a perfectly good pun and we can never forgive that.

Well, not exactly universal control, but similar functionality at any rate. [Bart] can slide his mouse from one side of his retina display over onto the glorious 512 x 342, 1-bit display of his Macintosh Classic, just as if the 68k powered antique was a modern device. As you might expect, the Motorola 68000 in that old Mac is getting a teensy bit of help– though sadly for our love of puns, from an Arduino Nano and not any kind of Teensy.

The Arduino is emulating a mouse and keyboard on the Apple Desktop Bus using code based on the abduino by [akuker]. [Bart]’s custom software on the modern Mac captures the mouse and keyboard inputs to pipe to the Arduino via USB serial. Apple’s Universal control doesn’t require a wired connection between the two machines, of course, but then, it doesn’t work on the Classic. One could imagine redoing this project for Bluetooth communication to have that a same Clarkian feeling of technological magic Apple has always wanted to convey– but nothing was wireless in 1990 except for telegrams and a handful of telephones, so the project is appropriate as-is.

As much as we might resent that micro-controller for ruining a pun, if you want to hook into the ADB– perhaps to use old peripherals with an emulated Macintosh— an Arduino will do the job. So would a Teensy, though, and then we’d have our pun.

Our thanks to [Bart Jakobs] for the tip. Don’t forget to send in your own: the endless maw of the tipsline is always hungry.

Soldered RAM Upgrades Finally Available For Mac-PPC

In the retrocomputing world, [DosDude1] is a name spoken with more than a little respect. He’s back again with a long-awaited hack for PowerPC Macintosh: soldered RAM upgrades!

[DosDude1] is no stranger to soldering his way to more storage– upgrading the SSD on an M4 Mac Mini, or doubling  the VRAM on an old GPU. For a PPC Mac, though, it is not enough just to solder more RAM onto the board; if that’s all it was, we’d have been doing it 20 years ago. Once the RAM is in place, you have to have some way to make sure the computer knows the RAM is in place. For a WinTel machine, getting that information to the BIOS can be as easy as plugging in the right resistors. Continue reading “Soldered RAM Upgrades Finally Available For Mac-PPC”

Before Macintosh banner with stylized pixelated picture of one

Before Macintosh: The Story Of The Apple Lisa

Film maker [David Greelish] wrote in to let us know about his recent documentary: Before Macintosh: The Apple Lisa.

The documentary covers the life of the Apple Lisa. It starts with the genesis of the Lisa Project at Apple, covering its creation, then its marketing, and finally its cancellation. It then discusses the Apple Lisa after Apple, when it became a collectible. Finally the film examines the legacy of the Apple Lisa, today.

The Apple Lisa was an important step on the journey to graphical user interfaces which was a paradigm that was shifting in the early 1980s, contemporary with the Macintosh and the work at Palo Alto. The mouse. Bitmapped graphics. Friendly error messages. These were the innovations of the day.

Continue reading “Before Macintosh: The Story Of The Apple Lisa”