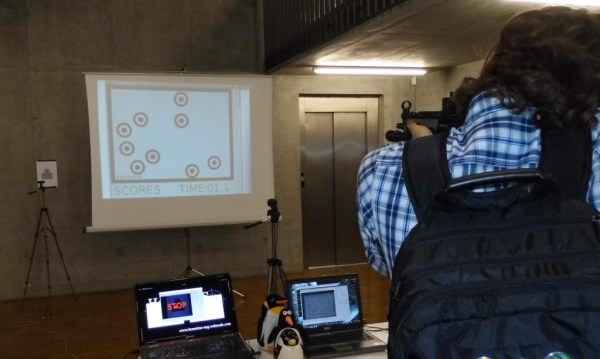
Voices From The Past: Recovering Audio From Wire Recordings

wire recorder setup[Nick]’s grandfather was quite the old school hacker. In the 1940s, he built his own wire recorder and microphone to capture everything from his children’s Chirstmas wishes to his favorite songs and programs from the radio. Only 20 or so spools have survived and were doomed to silence until [Nick] was able to find a vintage wire recorder, restore it, and feed digitized audio into Audacity.

Once he restored one of the two machines that he was able to get his hands on, [Nick] was in business. Since his grandfather also rolled his own spools, [Nick] had to build a playback spindle that would hold them. His uncle found an old mechanical counter to do the job, which [Nick] secured to the workbench. He fed the output from the wire recorder’s playback head into a guitar pre-amp, effectively digitizing the audio for recording in Audacity.

After playing all the spools, he adjusted the levels where necessary and cleaned up the recordings. His biggest challenge was feeding the wires back on to their original spools, which he managed with an electric drill and a rubber grommet. Be sure to check out the mp3 clips on [Nick]’s page. If you’re in the mood for old audio hacking stories, here’s one about building a tape recorder in 1949.

Purely Mechanical Display Uses 804 Balls To Create A Kinetic Display

Whoa. That’s all we have to say about this art installation.

Oops, did we say art? Don’t let that three letter word scare you, because this project called Breaking Wave is nothing short of an absolutely incredible, fully mechanical, machine.

It’s kind of hard to tell in the picture, but there are 804 rusty spheres hanging from cables which make up the pixels of this display. Each of those cables could be attached to a servo for a very simple, digital-to-analog display — it’d be expensive, but you could display anything. But no, that’s not how this works. Instead of each of those cables is wrapped around a different size drum or roller, which are all connected to a large central hub motor driving a cam.

As the beastly hub-motor spins, the display morphs and changes shapes. It is all pre-programmed manually by varying the sizes of the rollers and the lengths of the cables, a mind numbing task of its own. What’s more, because it is three dimensional, you can only see the patterns if you’re standing in the right place at the right time.

Continue reading “Purely Mechanical Display Uses 804 Balls To Create A Kinetic Display”

The Inaugural Hackaday.io Meetup

hackaday-meetup-banner

Last Monday we held our very first Hackaday Projects Meetup at the Congregation Ale House in Pasadena, CA. We knew there were a lot of Hackaday.io members in the area and figured a meetup is a great excuse for them to meet each other.

The turn out was surprisingly good, with a wide variety of makers and hackers. People I met included aerospace engineers, embedded device developers, 3d printer inventors, and web developers. About thirty Hackaday readers turned up along with some newbies and a merry few hours of drinking beer, exchanging tales, poking at blinky things and admiring 3d printers ensued.

Continue reading “The Inaugural Hackaday.io Meetup”

Bubble Displays Are Increasing In Resolution

PipeDreams 3 bubble display

[Bruce] has created a pretty cool bubble display that is capable of showing recognizable photographs of people. This entire art installation is no slouch at 3-stories tall! This one resides at the Ontario Science Centre in Toronto, Canada. If you are unfamiliar with bubble displays, they consist of several clear vertical tubes filled with a liquid. A pneumatic solenoid valve mounted at the bottom of each tube allows a controlled amount of air to enter the tube at a very specific time. Since the air weighs less than the liquid, the air bubble travels up the tube of liquid. Interesting patterns can be made if these bubbles are timed correctly. This setup uses a Linux-based computer with custom control software to manipulate the valves.

[Bruce] didn’t start off making super-complex bubble displays. This is actually his 3rd go-around and with 96 individual tubes and capable of displaying raster images, it is the most complicated so far. His first creation consisted of 16 tubes, each larger in diameter than the most recent creation. With the larger diameter and less number of tubes came less resolution and the ability to only display simple shapes. Version 2 had twice as many tubes, 32 this time. In addition to doubling the tube quantity [Bruce] also colored the fluid in the tubes, not all the same color but all the colors of the rainbow, from red to violet. Still, this version could not show raster images. It appears to us that the third time’s the charm! Video after the break….

Continue reading “Bubble Displays Are Increasing In Resolution”

A Homemade Bubble Robot For The Kids

bubbles-machine

Kids generally can be amused pretty easily, but when jangling keys stop holding their interest you might want to take a look at [drenehtsral]’s new project. He’s created an automatic bubble robot (YouTube link) that keeps the kids endlessly entertained!

The project started as an idea at a festival where one of [drenehtsral]’s kids took great interest at a bubble machine. [drenehtsral] had never heard of a bubble machine before, but it turns out that it’s pretty simple in practice. All that’s required is a tank of soapy water, a motor to turn the bubble wands, and a fan to form the bubbles and make them waft gently through the air.

[drenehtsral] also used a 12V battery for power, some other hardware to hold it all together, and a 5V regulator and some other control electronics for the fan and the motor. He notes that he could have bought a bubble machine but in true hacker style found it fun to build himself. The next step in this project could be something to vary the size of the bubbles, or perhaps a set of wheels for the robot so it can entertain the kids on the move!

Continue reading “A Homemade Bubble Robot For The Kids”

A Beverage Cooler With A Stereo

Cooler

If you are looking for a way to spice up your summertime parties, try following [Pastryboy’s] lead. After letting the idea rattle around in his head for a few years, he finally built himself the cooler he always dreamed of.

[Pastryboy] was originally inspired by a YouTube video he found a few years ago. He took the basic concept and rolled with it. He started out with a mini fridge he found for $10. He removed the compressor and other plumbing bits. He also removed all of the internal shelving. Any leftover holes were patched up with silicone. Now when the fridge is laid on its back, it’s essentially the same as an ordinary cooler.

Next [Pastryboy] purchased two 6.5″ Boss speakers and an inexpensive head unit. He drilled a few pilot holes in the side of the refrigerator and then used a jigsaw to cut the holes to the proper sizes. Once the speakers were mounted in place, he needed to find a way to waterproof the inside. This was accomplished by using some small plastic bowls. The edges of the bowls were attached to the cooler wall using silicone.

[Pastryboy] was able to run most of the cabling through the inside of the cooler’s walls. The system is powered by a 12V lead acid battery. He chose a specific model of battery that can be stored in any orientation and that can handle being knocked around a little bit.

Next he added a couple of handles to the sides to make it easier to transport. A small bit of ski rope was attached to the inside of the lid, preventing the lid from flopping completely open. [Pastryboy] also added a drain to the bottom to make it easier for one person to empty the cooler. The final touch was to pretty it up a bit. He sanded down the entire thing and gave it several coats of red paint. The end result looks very slick.

[via Reddit]

The Science Of Strengthening Glass

Strengthen Glass

[Ben Krasnow] is at it again. This time he’s explaining a simple method for strengthening glass. As usual, he does a fantastic job of first demonstrating and explaining the problem and then following it up with a solution.

[Ben] first uses a simple rig to place a controlled amount of force against a glass microscope slide. His experiment shows that the slide shatters once about 30psi of force has been applied to the center of the slide.

[Ben] then goes on to explain that current methods for producing glass leave many tiny impurities, or cracks, in the glass. As the glass slide flexes, the inside edge is placed into a compression force while the outside edge is under tension. The glass is more easily able to handle the compression force. The tension is where things start to break down. The tension force eventually causes those tiny impurities to spread, resulting in the shattering glass.

One possible solution to this problem is to find a way to fill in those tiny impurities. According to [Ben], most glass has sodium added to it in order to lower the melting temperature. [Ben] explains that if you could replace some of these smaller sodium atoms with larger atoms, you could essentially “fill” many of the tiny impurities in the glass.

[Ben] does this himself by heating up a small vat of potassium nitrate. Once the powder becomes molten, he submerges the glass slides in the solution for several hours. During this time, some of the sodium atoms are replaced by potassium atoms due to the natural process of diffusion.

Once the slides have cooled down, [Ben] demonstrates that they become much stronger. When placed in the testing rig, the stronger slides do not break until the pressure gets between 60psi and 70psi. That’s twice as strong as the original glass. All that extra strength from such a simple process. Be sure to watch the full video below. Continue reading “The Science Of Strengthening Glass”