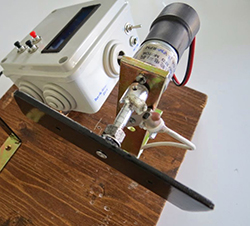
Two Wheeler Is Gyroscope Stabilized

[Jim] loves gyros – not those newfangled MEMS devices, but old-fashioned mechanical gyroscopes. His obsession has pushed him to build this gyro stabilized two wheeler. We love watching hacks come together from simple basic materials and hand tools, with liberal amounts of hot glue to hold everything in place.  That seems to be [Jim’s] philosophy as well.

This is actually the fifth incarnation of [Jim’s] design. Along the way he’s learned a few important secrets about mechanical gyro design, such as balancing the motor and gyro assembly to be just a bit top-heavy. [Jim’s] gyro is a stack of CDs directly mounted to the shaft of a brushed speed400 R/C airplane motor. The motor spins the CDs up at breakneck speed – literally. [Jim] mentions that they’ve exploded during some of his early experiments.

The gyroscope is free to move in the fore-aft direction. Side to side balance tilting is on the wheels themselves. The wheels are model airplane wheels, which have a curved tread. No cheating by using flat LEGO wheels in [Jim’s] lab! A potentiometer measures the tilt angle of the gyro. The voltage from the pot is fed into an Arduino Uno which closes the loop by moving a servo mounted counterweight.

The vehicle is controlled with a regular R/C plane radio. A servo steers the front wheel while another DC motor drives the rear wheel. Not only is [Jim’s] creation able to balance on its own, it can even make a U-Turn within a hallway.

Continue reading “Two Wheeler Is Gyroscope Stabilized”

a black aluminum heatsink with fins on a green matt

Hacking Manufacturing: Ordering A Custom Heatsink From China

Building a one-off hack is fun. But what happens when people like your hack so much they want to buy it? As many of us have discovered, going from prototype to product can be a frustrating, tedious, and often expensive process. [Nick] at Arachnid labs has documented the process of manufacturing a custom heatsink in China.

While designing the Re:Load Pro, [Nick] discovered that there were no enclosures with integrated heatsinks which suited his application. Rather than design an entire case from scratch, [Nick] used an aluminum extrusion. This is a common technique in the electronics world, and literally thousands of extrusion profiles are available. The problem was the heatsink. Only a custom part would fit the bill, so [Nick] created a CAD drawing detailing his design. Much like the case, the heatsink was an aluminum extrusion. The custom nature of the heatsink meant that [Nick] would need to pay mold/tooling costs as well as satisfy minimum orders.

Continue reading “Hacking Manufacturing: Ordering A Custom Heatsink From China”

Galvanic Isolated FTDI Board Saves Your USB Ports

Isolated FTDI circuitg

We work with some dangerous circuits in the pursuit of cool hacks. High voltage, high current, all demand some respect. We can protect our bodies easily enough, but what about that fancy new laptop or Macbook? [David] is here to help with his isolated versatile FTDI circuit.

Our computers are often wired directly into the circuits we’re hacking on. In days past that might have been a parallel or serial port. Today it’s almost always USB, specifically serial over USB. USB has some safety features built-in, such as current limiting. However, it isn’t too hard to blow up a USB port, or even a motherboard with high voltage. Galvanic isolation is a method of removing any electrical connection between two circuits. Connections can still be made through optical, magnetic, or capacitive methods, just to name a few. One of the simplest methods of galvanic isolation is the humble optocoupler.

Isolating a high-speed USB connection can get somewhat complex. [David] wisely chose to isolate things on the serial side of the FTDI USB to serial converter. He started with SparkFun’s open source FTDI Basic Breakout. Galvanic isolation is through either an Analog Devices ADuM 1402 or ADuM 5402. The 1402 needs a bit of power on the isolated side, while the 5402 includes an isolated DC/DC converter to provide up to 60mA.

[David] didn’t just stop at galvanic isolation. He also added ESD protection, over current protection, and multiple options which can be selected when the board is built. Nice work [David]! Now we don’t have to worry about our laptop frying when we’re blowing up wires.

Playing Tetris On An Oscilloscope

Have engineers stopped putting Easter eggs into technology lately? It’s always been a fun way to connect with your more advanced customer base (i.e. hackers) — anyway, here’s a great Easter egg you can find on the Hewlett Packard 54600B Oscilloscop — Tetris!

[RaffttaM] discovered this trick when a coworker let him know that one of the oscilloscopes in the lab had the hidden feature. A little fiddling later and a game of Tetris was revealed. If you press the Print/Utility button on the 54600B oscilloscope, followed by pressing the second and third button below the screen at the same time, you can launch the game!

Another cool embedded Easter egg is in the Game Boy Printer — If you hold the feed button during power up it spits out a Mario themed image! One of our readers even managed to hack the printer to show the Hack a Day Logo instead!

Do you know of any more modern tech with cool (and sneaky!) Easter eggs? Let us know by sending in a tip!

[Thanks Gregory!]

Measuring Light With ChipKIT

light meter showing LUX value

How does one go about measuring the amount of light in a given area? With a Light Meter of course! Maintaining proper lighting levels can be very important in places like schools, hospitals and even your own workbench.

[Raj] over at Embedded Labs has put together an excellent tutorial on how to construct your very own light meter based upon the chipKIT platform. The chipKIT Uno32 is similar to Arduino, but boasts a much more powerful PIC32MX320F128 microcontroller.  We’ve seen projects that feature the chipKIT Uno (pdf warning) here before. From playing pong to hosting several temperature sensors, it’s certainly a versatile platform.

The light meter uses an I/O shield and communicates to a BH1750FVI digital light sensor via I2C. The firmware divides the raw data coming off the sensor by a constant, and displays the light intensity data on an OLED display in Lux, foot-candles, and Watts/m^2 units. Be sure to check out the tutorial for full schematics and source.

model helicopter attached to boom

Self-Learning Helicopter Uses Neural Network

Though this project uses an RC helicopter, it’s merely a vessel to demonstrate a fascinating machine learning algorithm developed by two Cornell students – [Akshay] and [Sergio]. The learning environment is set up with the helicopter at its center, attached to a boom. The boom restricts the helicopter’s movement down to one degree of motion, so that it can only move up from the ground (not side to side or front to back).

The goal is for the helicopter to teach itself how to get to a specific height in the quickest amount of time. A handful of IR sensors are used to tell the Atmega644 how high the helicopter is. The genius of this though, is in the firmware. [Akshay] and [Sergio] are using an evolutionary algorithm adopted from Floreano et al, a noted author on biological inspired artificial intelligences. The idea is for the helicopter to create random “runs” and then check the data. The runs that are closer to the goal get refined while the others are eliminated, thus mimicking evolutions’ natural selection.

We’ve seen neural networks before, but nothing like this. Stay with us after the break, as we take this awesome project and narrow it down so that you too can implement this type of algorithm in your next project.


Continue reading “Self-Learning Helicopter Uses Neural Network”

The Computer Without A CPU

1bit

[Jeff Laughton] was contacted by a customer that was interested in adding some automated functions to a printing press. Before eventually settling on a microcontroller for the job, [Jeff] went old school and started looking at logic gates, counters, and flip-flops. This lead him to the Motorola 14500 industrial control unit, a minimal processor with only 16 instructions. After a few ‘back of the napkin’ sketches, he came up with an extremely minimal computer that doesn’t use a microprocessor. It’s an interesting design notable not only for its electronic brevity, but also because it only uses one instruction.

The only instruction this computer will ever execute is an input test, the result of which controls a two-way branch. Instructions consist of an input address, output address, and a single bit of data. If the data bit is true, the computer jumps to one location in ROM, and if the data bit is false, a jump to another location is executed.

A computer really isn’t a computer without some form of memory, and this design is no exception. [Jeff] managed to add two bits of data between the 8-bit latch and 8-bit multiplexer in the design. This is enough to call a few subroutines which test the I/O-mapped memory to decide what the next instruction should be.

It’s a truly bizarre design, but actually much closer to a true Turing machine than the computers in your pocket, on your wrist, on your desk, and in your car.

Thanks [James] for the tip!