Blame It On The Sockets: Forensic Analysis Of The Arecibo Collapse

Nearly three years after the rapid unplanned disassembly of the Arecibo radio telescope, we finally have a culprit in the collapse: bad sockets.

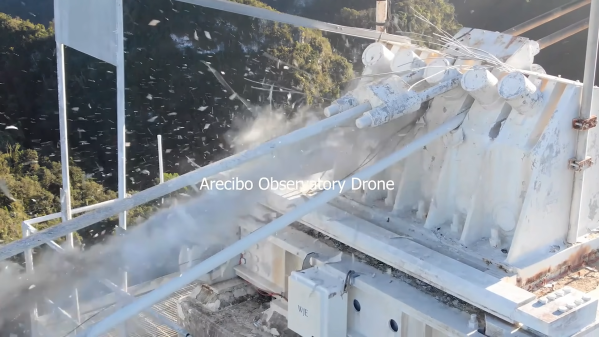
In case you somehow missed it, back in 2020 we started getting ominous reports that the cables supporting the 900-ton instrument platform above the 300-meter primary reflector of what was at the time the world’s largest radio telescope were slowly coming undone. From the first sign of problems in August, when the first broken cable smashed a hole in the reflector, to the failure of a second cable in November, it surely seemed like Arecibo’s days were numbered, and that it would fall victim to all the other bad luck we seemed to be rapidly accruing in that fateful year. The inevitable finally happened on December 1, when over-stressed cables on support tower four finally gave way, sending the platform on a graceful swing into the side of the natural depression that cradled the reflector, damaging the telescope beyond all hope of repair.

The long run-up to the telescope’s final act had a silver lining in that it provided engineers and scientists with a chance to carefully observe the failure in real-time. So there was no real mystery as to what happened, at least from a big-picture perspective. But one always wants to know the fine-scale details of such failures, a task which fell to forensic investigation firm Thornton Tomasetti. They enlisted the help of the Columbia University Strength of Materials lab, which sent pieces of the failed cable to the Oak Ridge National Laboratory’s High Flux Isotope reactor for neutron imaging, which is like an X-ray study but uses streams of neutrons that interact with the material’s nuclei rather than their electrons.

The full report (PDF) reveals five proximate causes for the collapse, chief of which is “[T]he manual and inconsistent splay of the wires during cable socketing,” which we take to mean that the individual strands of the cables were not spread out correctly before the molten zinc “spelter socket” was molded around them. The resulting shear stress caused the zinc to slowly flow around the cable strands, letting them slip out of the surrounding steel socket and — well, you can watch the rest below for yourself.

As is usually the case with such failures, there are multiple causes, all of which are covered in the 300+ page report. But being able to pin the bulk of the failure on a single, easily understood — and easily addressed — defect is comforting, in a way. It’s cold comfort to astronomers and Arecibo staff, perhaps, but at least it’s a lesson that might prevent future failures of cable-supported structures.

Continue reading “Blame It On The Sockets: Forensic Analysis Of The Arecibo Collapse”

Deep-Sleep Problems Lead To Forensic Investigation Of Troublesome Chip

When you buy a chip, how can you be sure you’re getting what you paid for? After all, it’s just a black fleck of plastic with some leads sticking out of it, and a few laser-etched markings on it that attest to what lies within. All of that’s straightforward to fake, of course, and it’s pretty easy to tell if you’ve got a defective chip once you try it out in a circuit.

But what about off-brand chips? Those chips might be functionally similar, but still off-spec in some critical way. That was the case for [Kevin Darrah] which led to his forensic analysis of potentially counterfeit MCU chips. [Kevin] noticed that one of his ATMega328 projects was consuming way too much power in deep sleep mode — about two orders of magnitude too much. The first video below shows his initial investigation and characterization of the problem, including removal of the questionable chip from the dev board it was on and putting it onto a breakout board that should draw less than a microamp in deep sleep. Showing that it drew 100 μA instead sealed the deal — something was up with the chip.

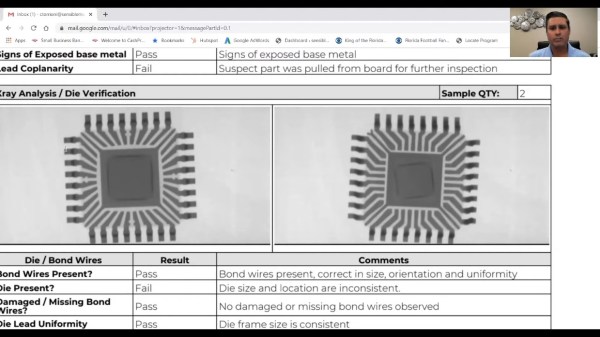
[Kevin] then sent the potentially bogus chip off to a lab for a full forensic analysis, because of course there are companies that do this for a living. The second video below shows the external inspection, which revealed nothing conclusive, followed by an X-ray analysis. That revealed enough weirdness to warrant destructive testing, which showed the sorry truth — the die in the suspect unit was vastly different from the Atmel chip’s die.

It’s hard to say that this chip is a counterfeit; after all, Atmel may have some sort of contract with another foundry to produce MCUs. But it’s clearly an issue to keep in mind when buying bargain-basement chips, especially ones that test functionally almost-sorta in-spec. Caveat emptor.

Counterfeit parts are depressingly common, and are a subject we’ve touched on many times before. If you’d like to know more, start with a guide.

Continue reading “Deep-Sleep Problems Lead To Forensic Investigation Of Troublesome Chip”

Iowa Forensics Opts For A CSI Style Hack To Save Their Budget

Stungun

There’s a very effective way of lifting dusty fingerprints from the field, or in a lab. It’s called an Electrostatic Dust Print Lifter — but as you can imagine, it is rather expensive from a forensic supply store. [Bradley VanZee] — from the Iowa Division for International Association for Identification — realized how simple a tool it was, and made his own for just over $50.

But first, how does it work? Electrostatic print lifting is a non-destructive process where you develop an electrostatic field on a sheet of “lifting film” which attracts the dust particles to stick to the film. It’s capable of recovering impressions from both porous and non-porous surfaces — even ones not visible to the naked eye.

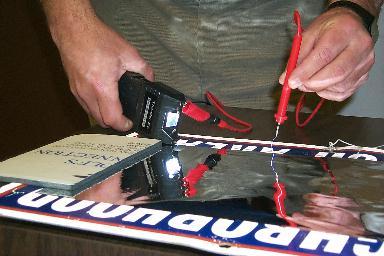
Commercial versions of the tool cost upwards of $600-$800 + lift film. The first hack they realized is that instead of using proprietary lift film, it is just as effective to use car window tint instead! The second hack is even more clever — using a 80,000V tazor, some electrical leads, and some tinfoil you can create your own version of the tool. The aluminum foil acts as a ground, and the object you are inspecting is sandwiched between it and the lifting film. Holding the tazor with one electrode to the foil, you can trace the film using the other electrode at a distance, which induces an electrostatic charge in the film, attracting and capturing the dusty fingerprints. Allow the static to discharge, and store the film in a safe place to be digitized later!

Now obviously this is only really effective for flat objects, but it’s still a brilliant hack — especially to save your budget!

[Thanks John!]

Open Source Data Recovery Tools


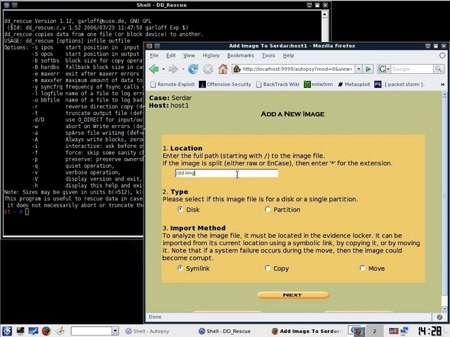
InformationWeek has great article on open source data recovery tools. What type of tools you use will depend on the severity of the situation. You can use live Linux distros designed for recovery like SystemRescueCD or Partedmagic (the latter being more user friendly). Security tools distrubutions like BackTrack can also be helpful; Helix in particular was designed for forensics work. dd is a standard *nix tool for imaging drives, but something like TestDisk can help you repair partition tables for whole disk recovery. Most deletion operations don’t overwrite the data which means you can use file carving to capture the lost files. PhotoRec is able to find files in a number of common formats. Finally, if you’ve got some serious forensic work ahead of you there’s The Sleuth Kit and many other command line tools.

As an addendum, OStatic put together a list of 5 freeware tools for protecting your system.